

Many boats we buy, either new-to-us or brand new, will be fitted with DC electrical systems that are not close to cruising ready, and even further from offshore ready.
So, over the next few weeks, I’m going to add what I have learned while fixing that on three boats—twice on one of them as I came up with a better system after living aboard for 10 years—to our Online Book Electrical Systems for Cruising Boats.
As I already promised—sorry for the delay, went down the lithium rabbit hole—this series will be a deep dive into how to do this right, with lots of diagrams and photos, as well as the full system I designed for, and recently installed on, our new-to-us J/109.
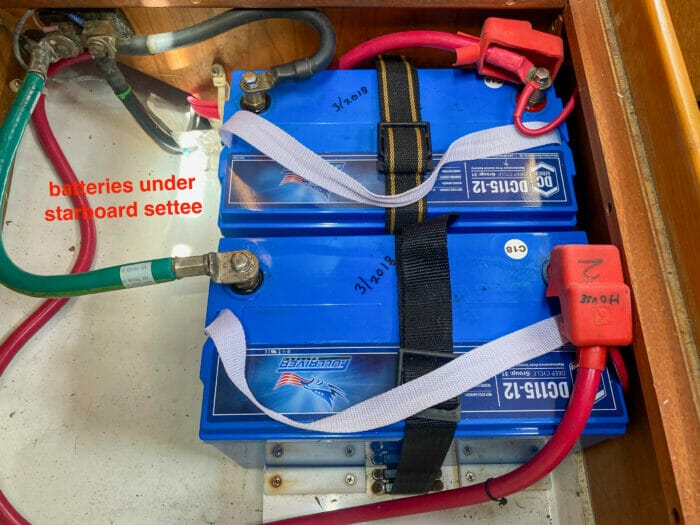
Let’s start with battery containment, since most production boats I see have woefully inadequate battery compartments that need to be fixed, at least before we take the boat offshore.
A Real Problem
If you doubt that, read, as I have, accounts of knockdowns and rollovers at sea. A common thread is that the batteries came adrift, often doing huge damage in the process.
That was bad enough back in the day when a typical cruising boat had a couple of Group 31 or similar-sized lead acid batteries, but these days, with huge battery banks, the need for proper battery containment has never been higher.
Specifying The Solution
The first step when designing a new battery containment area, is to consult the relevant standard. Yes, I know, getting access to these standards costs money, but, seriously, do we want to go through all the grief and expense of this project and end up with a battery area that’s not compliant? Clearly not.
Those of us in North America should join ABYC as I did, and read their E10-Storage Batteries document. Lots of good stuff there about ventilation, covering contacts, and the like, but let’s zero in on requirements for the structure that will contain our batteries:
10.7.1Battery mounting materials and surfaces potentially in contact with corrosive electrolytes (e.g., lead acid type) shall withstand electrolyte attack.
10.7.3 Fasteners for the attachment of battery boxes or trays shall be isolated from areas intended to collect spilled electrolyte.
10.7.4 Batteries, as installed, shall be restrained to not move more than one inch (25 mm) in any direction when a pulling force of twice the battery weight is applied through the center of gravity of the battery…
ABYC E-10
We Need Better Than ABYC
So ABYC were doing great on spill containment and the two-gravity requirement, but then they had a complete brain fade. One inch of movement allowed? WTF?
That might be OK inshore in smooth water, but Matt Marsh, AAC tech-guru, once calculated that a passage to and from Bermuda would subject the boat to around a quarter of a million wave cycles. And I’m betting, based on having done those passages over a score of times, that many of those cycles would likely move batteries constrained only to the ABYC spec, at least a bit.
And one thing I know for sure from my years at sea, is that once something heavy is allowed to move back and forth, failure is a matter of when, not if. One of the immutable laws of the sea is:
Movement begets more movement.
Me…I think…unless I heard it someplace else…or maybe Churchill said it, or Mark Twain.
So we need to change 10.7.3 to be:
Batteries, as installed, shall be restrained to not move in any direction when a pulling force of twice the battery weight is applied through the centre of gravity of the battery¹.
AAC Pain-in-the-ass Offshore Standards
¹Before the engineers around here jump down my throat (with justification), I do understand (I think) that to actually achieve zero movement we would have to preload the containment to a bit more than double the weight of the batteries, which is probably not practical, so there will be some movement at least at the upper end of the accelerations we are planning for, but practical experience says we can, and should, reduce that to no more than an eighth of an inch (3mm) or so, and even less is better. (If I have that right, we can all thank Eric Klem and Matt Marsh, and if I have it wrong, it’s my fault and I would appreciate correction from the engineers around here.)
Figuring The Design
Now, at this point, wouldn’t it be cool if I could publish drawings and specifications for containment based on engineering calculations for all boats and situations?
Clearly, that’s not going to happen, because:
- I’m not an engineer, or even close.
- There are way too many variables in battery and bank size, as well as space available on different boats, to make a single solution useful.
The Ideal Solution
So in a perfect world we would all hire a professional engineer to custom design our battery boxes. And that’s definitely the best alternative, particularly when dealing with big banks.
The Practical Solution
But this brings up a general problem that we boat owners are faced with on a regular basis:
Many of the upgrades we need to do to our boats to make them offshore ready require quite complex design, but actually finding an engineer willing to mess with these small projects is difficult, and said design work will often exceed the cost of the project.
What to do? No perfect (or even close) answer, but here’s what I do:
- Learn everything I can about basic engineering.
- Recognize that, notwithstanding #1, I’m still pretty ignorant about how the forces at work offshore will try to break whatever it is I’m building.
- Listen with rapt attention when engineers comment here at AAC.
- Draw things out before I build them and really think about the forces at work.
- Overbuild the living crap out of things that really matter, like battery containment—Matt Marsh calls safety margins “margins of ignorance”, and I’m plenty ignorant and so need plenty of margin.
- Watch new things I build for any signs of impending failure (typically flexing) and improve as required. I can’t tell you how many gear faulures I have avoided over the years by being really vigilant about this—things seldom fail without warning.
A Team Effort
So how can I translate that into an article about battery containment that’s useful to you members? Not easily. In fact, I have been fussing about the best way forward for months before coming up with an AAC team effort:
- I will share two of the containment solutions I came up with and the challenges that shaped those solutions.
- I’m hoping you members will share your own solutions.
- I’m double-hoping that the engineers that give so generously of their time in the comments will identify weaknesses in our solutions and suggest improvements.
Let’s do it.
Nice job, John. But for 20 bucks might something like the photo have been easier?
From what I can see in the picture, that is a few orders of magnitude worse than John’s design. For one, it looks to only be attached with four screws/bolts through the small plastic tabs in the corners.
Hi Erne,
That’s what I see too. They claim ABYC compliance, but I would have to wonder if those tabs would support twice the weight of a Group 31.
Hi All,
Honestly, I wouldn’t be surprised if that technically meets the ABYC requirement. From an engineering perspective, even at 2G, all of these loads are actually pretty small. The question with this is what kind of plastic is it made of and have they gotten the details right. For example, the mounting tabs do look a little thicker than everything else and they are gusseted so there is hope. The question is whether they tie into the rest structure well enough and whether the material is one that holds up over time (anyone remember the UV degradation of early ABS seatbelts?). I don’t know if they are threading directly into plastic or have inserts but that is something to watch. It certainly does not look overbuilt to me and when you don’t leave a lot of margin like that, you need to get the design right and have process controls on the manufacture so that you don’t have a situation like a purchasing guy quoting the base with a different molding vendor who changes feeds and vents and doesn’t do mold-flow analysis or strength testing.
Would I use it? Maybe on a coastal cruiser if I could actually see it and feel good about it. No way on an offshore boat. And I would definitely be real careful that nothing else could get loose and hit it. If something like an improperly stored emergency tiller were nearby in the same locker, that could easily spell trouble.
Eric
Hi Eric,
Very good point that something that is minimally designed to just meet the standard, even if it archives that goal, does not belong on an offshore boat.
Hi James,
As it happens, I looked at exactly that unit but rejected it first because I really did not think it was strong enough, although, admittedly, for my mostly inshore use it probably would have worked, but the big problem with all of those prebuilt options is the space that several of them side by side would take up. In my case three would not have come even close to fitting in the available locker. The other issue is they would have added way too much height.
A light-duty plastic tray and crossbar like that is not appropriate for an offshore boat. It’s an improvement over the “just set it in the bilge and maybe put a buckle strap over it” approach used in most <20′ runabouts, but would have a hard time passing muster in a car or in a severe-service boat.
In well-built cars, you see substantial stamped-steel trays under the battery (either welded to the vehicle structure, or bolted to it with a few 3/8″ cap screws) and removable stamped-steel crossbars above it, with the crossbar tie rods (typically 1/4″ or larger) pre-tensioned so that the battery movement is indeed approximately zero.
A lashing or strap will probably work well enough, but is unlikely to restrain a battery as securely and rigidly as a good metal or composite (not injection-moulded plastic) crossbar and tie rods.
If the battery is moving, at all, then its wires and its case are probably chafing on something. There’s a grid of ribs moulded into the bottom of the battery case to absorb that chafe. But I still see a worrying number of batteries where those ribs are chafed away and the case bottom is now at risk of being breached. (Usually, these mechanically poor setups are seen in conjunction with electrically poor setups, so the batteries die of sulphation or plate damage and get replaced before the motion has enough time to wear through the case.)
Hi Matt,
Good point about wear on the battery itself, just makes it even more clear that the NMEA standard is very poor in this regard.
Hi. I have little knowledge on the area, but from my time working on bigger ships offshore, it was always a big issue if any construction was done that impacted the constructions ability to flex. On your design, once you’re gluing your very strong and rigid battery frame to the hull, will that not induce new stress-areas in the hull? I don’t mean to pick on your design, quite the opposite! I need to do a major electrical job myself in not too long, and find these articles very interesting.
Arne 🙂
Hi Arne,
Given that there are bulkheads and all kinds of other stuff that are at least as stiff glassed to the hull all over the place, I did not worry about it. I guess I might worry on a single skin boat, but the J/109 is double skin and Balsa cored, so pretty stiff.
Even on a single skin glass boat it’s pretty standard practice to to glass stuff to the hull, and I have not heard of problems.
Be interesting to see if the engineers think that there are potential issues here: Matt, Eric?
Hi Arne and John,
Provided that a little caution is exercised, I suspect John is right that you will not cause major issues by bonding to a hull skin of most cruising boats. Ideally of course you would run the numbers but that is hard even for an engineer as the layup is often not known. A few thoughts on what caution means to me:
One other way to do this that may make sense for people is to glass in a few landing pads on the hull and then bolt a box that you make separately to that. 3 or 4 pads is really all you need, just make sure that they mate nicely to the box and you don’t need to shim or something. It is certainly possible to make this stiff enough to cause a stress concentration on the hull but it is not super likely as you have to know how to transfer that stiffness through and I suspect most home-brew solutions won’t do that effectively.
Eric
Hi Eric,
Thanks for a great explanation. All makes sense to me and adds a lot to the article, just as I hoped.
I’m in general agreement with Eric’s response above. The key is to stay away from existing stress concentrations and try to avoid creating new ones.
If you lightly tab or bond something stiff to a hull skin, it’ll peel or crack as the hull flexes.
If you want it rigid and don’t want it to peel or crack, then what you’re adding needs to be effectively another structural member. The tabbing / bonding needs to be large enough and stiff enough to withstand that. And, critically, it should be tapered / feathered out to avoid creating a new stress concentration where the reinforced area ends.
The alternative is to soft-mount it, and expect some motion or flex to be absorbed at the joints.
Hi Matt,
Thanks for coming up on that. Makes sense on tapering. Amazing how often I see a something tabbed in that is not tapered at all.
We have an old book by Ian Nicholson in which he suggests fitting tapered plywood flat onto the hull and then tabbing the bulkhead to (and beyond this). This to avoid creating hard spots on the hull.
We have used this when adding new watertight bulkheads and a new chain locker in our forecabin. Hard to do unless part of a large refit due to the impact of the surrounding area.
Hi Dave,
I too have Ian’s book (somewhere) and it is indeed a great resource.
Thanx to all three of you, John, Eric and Matt! Very good and helpful answers! Even though I have an aluminum boat, I suppose a lot of the same principles would apply. I have a battery box that is welded in aluminum and fit my current batteries so well, that I only need a vertical restraint, but I won’t be able to do that for my next batteries, so I need to make something new.
Hi Arne,
My next article on installing a new bank in our aluminium boat should be useful as you plan that project.
We changed our minds a few times but have ended up building a watertight box on top of the encapsulated keel. We have the 8 LiFePo4 batteries in two layers (4 x 120Ah on the bottom, 4 x 300Ah on top).
The 18mm ply outer structure is glassed to the bilge sides with dividers around every battery (no room to move at all, but there are some ventilation holes within the compartment). Each battery in the lower section has an 18mm ply lid that will be secured by multiple 5mm bolts. The top is two pieces of 18mm ply (aft section is slightly higher due to narrower hull at that point). The lids are going to be bolted onto a 3mm x 50mm neoprene seal. The forward ply forms the cabin sole, the aft is behind the companionway (wet locker has a separate floor just above).
The 4 cables go through watertight glands in the aft end into the electric motor space, each bank has an ANL fuse in the motor compartment (cable length 150mm which I think complies with ABYC).
We have put in new bilge drains on both sides around the battery box leading to the sump.
Hi Dave,
That’s interesting, although the challenges involved in housing and retaining a drive battery bank, even lithium, are way past anything I have ever had to contend with.
Maybe but the logic of your article is still helpful 🙂
My bug bear is people not protecting their battery bank from water (especially when they put it in the bilge). Obviously ventilation needs depend on battery type but I wish more care was taken to ensure that the first water sloshing about the bilge doesn’t short out the electrical supply to the electric bilge pump etc.
Hi Dave,
Good point on water around batteries. That said, it’s worth pointing out that lead acid batteries don’t seem to mind getting wet much. I have actually seen a bank submerged for a short period without ill effects. On the other hand the thought of salt water getting into a lithium bank is, I think, pretty scary, although I don’t know the specifics of what would happen. Matt?
On most boats the answer is simple :don’t install batteries in the bilge. Again, this is an area where everything changes with electric drive because of the size of the bank required and the need to keep it low, so beyond the scope of this article.
Lithium battery cells have hermetically sealed cases around the reactive parts. Water can’t penetrate unless the cell is already badly damaged.
If it’s fresh water, not much would happen. If it’s salt water, you’d get a current flowing through the water between the terminals, which would discharge the battery and cause a mess of corrosion. In other words, pretty much the same as happens with sealed lead-acid cells.
Metallic lithium touching water is Very Spectacularly Bad. But there should be no metallic lithium in such a battery unless it is severely discharged beyond the point of permanent damage, and even then, it’s inside a hermetically sealed case.
In general, you should keep batteries out of the water. I’d only install them in the bilge if the boat had a sufficient sump and pumps below that to ensure that the batteries remain dry at all times.
Hi Matt,
Thanks for the fill on that. One caveat, I think: I understand from Rob Collins that the containment on a lot of the no name drop in batteries is pretty sketchy, as is the internal wiring, so any water on those might be a bigger problem?
Thanks, helpful.
I’m happy with our choice to put the batteries in a watertight box and ensure that the cables come through watertight glands with the fuses as high as the 150mm max cable length allows.
We do have a big sump and the rest of the bilge will drain around the battery box. This should ensure that our pumps etc can run reliably for as long as possible should we get a severe leak (of fresh or salt water).
I commend, for your readers consideration, the battery box design documented in chapter 3 of “The Boat Owner’s Mechanical and Electrical Manual”, 4th Ed., by Nigel Calder.
In use for about 30 years on my boat, with good success.
Bill Willcox
Hi Bill,
while I do not feel qualified to criticize Nigel Calder, I did notice that his design leaves the battery free to move in the vertical direction. Neither the battery, nor the box’s lid are fixed against shifting in the event of a capsize.
This doesn’t seem ABYC compliant to me.
Alex,
You are absolutely correct. For my installation I epoxied two 2x4s with horizontal slots to the floors under the box and then strapped the box and batteries through the slots and over the tops of the batteries. Have been in some interesting seas on the way to Mexico outside the Baja peninsula with no issues. Nigel was focused on containing and ventilating multiple battery banks. I suspect he avoided the mounting details since all boats are different.
Hi John,
This looks like a good solution for your situation. Like you, I have noticed a lot of disaster reports mentioning the danger of stuff flying around. Batteries happen to be heavy items but at least they are an easy to deal with shape, doing all the other large items like spare anchors can be quite time consuming.
I agree with your take on the best way to secure batteries depending on the form factor. In design, I generally like to bolt stuff to a flat surface whenever possible but sometimes the aspect ratio calls for more support. I don’t know the answer on battery acid resistance of dyneema but UHWMPE has pretty good acid resistance so I am optimistic that it is good. RC recommends cam straps like this https://www.nrs.com/nrs-1-hd-tie-down-straps/p4yc in one of his articles https://pbase.com/mainecruising/flooded_battery_orientation and I assume he has checked acid resistance of those. I have seen them set up that way several times and never seen a strap that look weakened.
My start with custom battery boxes was doing them for the homebuilt electric cars I used to do. The biggest single box housed 20 Trojan T145’s at 72 lbs each for a total of just shy of 1500 lbs and I think that the rules required a safety factor of 4X and a maximum movement of something like 0.050″ if I remember right. 2 things quickly emerged as the hardest parts of the design which were securing the box to the vehicle as nothing it was right next to could take much point loading and the second thing was securing the batteries in the box. Building the actual box was quite easy, it was a bunch of welded angle iron with fiberglass panels. To limit battery movement to meet the rules, we constrained the batteries both on top and bottom. On bottom, there were cleats that fit the batteries tightly similar to what you did. On top, there were hold down bars going all the way across the box which bore both on the top and the sides of the batteries and were reinforced on top by steel crossmembers.
I have built a few battery boxes and have generally just built smaller and lighter duty versions of the ones I did with electric cars. The best have probably been boxes made from something like Coosa that are then glassed up. In the bottom, I have glassed in angle stock just like you used to constrain the battery. Since I have made the boxes go all the way up the sides of the battery, I have always also constrained the batterys on top. For this I make a frame that pushes down on the perimeter of all batteries at once and then put little pieces in between to keep the batteries constrained in the horizontal plane. The trick with something like this is getting it to install at the right height. I have done 2 things here. The most straight forward is to just run a few pieces of threaded rod vertically in the box and thread on some nuts pulling this top assembly down in to the box. The other thing I have done (and what is on our current boat) is to install captive nuts in the frame and then slot the sides of the box so that it can be bolted from the outside at the correct height. The reason I did this was that not all corners at the top are accessible but I can do all sides. Sorry, I don’t have any pictures. I have also done something similar to what RC suggests for a small skiff and it was fine for that, more battery movement inside the plastic box than I would want for a cruising boat though. One box I built on a commercial boat was lucky enough to have some structural members not that far above the 16 GC2’s we were trying to constrain so the box was not a self contained unit, the top was braced up and the bottom mounted down.
Eric
Hi Eric,
Great stuff, as usual. Good to hear I have the geometry thing right, particularly since my opinion was based more on intuition than knowledge.
The biggest take away for me is that some kind of top held down with threaded rod would be better than the spectra lashings I’m using since it could be preloaded more reliably and consistently. The whole idea of preload and how important it is to anything we are trying to hold together is probably the most important thing I have learned from you and Matt over the years—I’m now a collector of torque wrenches and torque data.
I should try and write an article about preload some time. Not at all sure I would get it right, but the discussion and correction process would be enlightening for all of us, just as the whole process of getting right about jacklines was.
Thanks for the RC links Eric.
I am now pleased that the man who built my yacht in his shed 35 years ago mounted the flooded-cell battery with cells running port to starboard. He must’ve known something (or got lucky)
After my ratchet strap deformed the battery casing I replaced it with three of the cam straps you linked. My one concern is that I don’t feel I was able to get enough tension with the cam system. I suspect my battery would move 1/2″ or more if subjected to 2G.
What did you do to ensure that the box is gas-tight and vented to the outside?
thx
Hi George,
Neither are a requirement under ABYC:
To comply with this I installed a vent as seen in the photo above and there is a solar vent directly above the battery area in a hatch. Note “other means” in the rule above.
Actually, I would be leery of a gas tight box with a single outside vent since if said vent were in any way blocked there would be an explosion risk.
On a practical bases, in my case, and pretty much any battery area I have ever seen, I’m pretty sure there is enough clearance in the lid joints to vent hydrogen. In fact most battery areas on most boats don’t have any purpose built venting at all. For example ~350 J/109s were built with no venting. I just added the vent shown to be compliant, not from any conviction that it was really needed.
Keep in mind that, if I remember my long ago physics classes, hydrogen is almost impossible to contain being the lightest element on the periodic table.
In all my years of doing this I have never seen a yacht with a gas tight and outside vented battery box and I have never seen or even heard of a battery hydrogen explosion.
All that said, given the huge banks we are seeing these days and the different chemistries, none of what I write above would be definitive in those cases and if dealing with such a case I would want to consult with the battery manufacturer on required venting—that was CMA!
In the industry that I work in (offshore oil and gas), there have been hydrogen explosions reported from battery banks. These reports are for smaller batter banks somewhat analogous to some sailing yacht set ups: –
https://www.imca-int.com/safety-events/lead-acid-battery-explosion/
https://www.imca-int.com/safety-events/lti-person-injured-by-a-battery-explosion-on-vessel-deck/
https://h2tools.org/lessons/hydrogen-explosion-battery-compartment-dinner-cruise-boat
The second link certainly supports your observation that the lid must be vented, otherwise hydrogen gas concentrations will build up.
The risk is easily reduced to a low, or improbable event by adding a vent to the box if the batteries are a type that can vent hydrogen.
Hi Alastair,
Interesting stuff, thank you. In reading through all three the impression I get is the problem was that the battery enclosure were too well built and vapour tight. My guess is we mostly get away without proper venting on yachts simple because the battery areas are not that well built in the first place and so vent through cracks in the lids.
For example, on the J/109 the lid to the battery compartment is just plywood dropped into place and has a finger hole in the middle. No way I can see that’s going to contain hydrogen even with a cushion over the top.
That said, having read reports, I’m happy I added the vent!
One other point, in the reports they recommend replacing lead-acid with AGM. A common error, but of course what they mean is replacing liquid filled with AGM, since, as I know you know, both are lead acid. The other point is that AGM and gel can both gas off if overcharged, so still worth having a vent. And further, liquid filled gassing can be reduced a lot with the use of recombining caps.
Jaguar XK120’s had two 6v batteries mounted below the floor behind the seats. They vented into the cabin. After a few years the fumes caused the headlining material to deteriorate.
Hi P D,
Sounds like poor charging profile to me. British cars of that age are famous for their terrible electrical systems built by “Lucas, Price of Darkness”. Also in a car there are no vents directly overhead.
I have been living with lead acid batteries on boats, liquid filled, gell, and AGM, for over 40 years and have never seen anything like that.
I wonder if battery manufacturers specify the strength of their casings, especially in respect of securing them in place. One benefit I perceived with the standard hold-down tray was that it spread the clamping pretension over a fairly long section of each side’s top edge. By contrast, a spectra strop would apply the same load over a much smaller area. Is the battery’s case manufactured to tolerate that much long-term, point-load along it’s top edge? If there is a manufacturer’s casing strength specification it might help us design matching securing systems.
I thought of this when I noticed that tensioning my boat battery’s securing ratchet strap had put a bulge into the battery side. (I released the tension somewhat and installed a couple more straps to spread the load across. If it ever comes out or moves, or worse; if the battery case fails, I’ll let you know.)
Hi PD,
Good point. I think the best option is the one that Erik Klem proposes further up the thread, rather than the standard hold down tray that has other issues, also discussed.
This seems to raise a question for the A40 engineer(s.) Do they design the battery box(es) to perfectly secure a specific battery chosen and recommended because it was found to have the best casing structure (among other advantages,) or is a generic box built that will secure any battery(ies) of the size specified.
One of the A40’s attractions is that so much is specifically specified (no options) and that a great deal of experience is going into the selection process (and that nothing will be present that hasn’t proved itself over 10, preferably 20 years.) Perhaps there is a case for including specific battery(ies) in this specification. Although there will need to be some flexability in case the specific battery isn’t available in some remote locations where owners might need to acquire a replacement.
Perhaps Eric Klem has already provided the answer.
Hi P D,
I also like the “conservative” spec system for the A40, but I think battery systems is an area where it should be as open as possible. The reasons are the obvious ones: The right choice for battery type and size will vary widely between owners even in one given moment. On top of that, battery tech develops faster than almost any other tech. Loads of seemingly realistic and dramatically improved solutions are already moving towards the consumer market. In 10 years, we will all definitely want completely different battery types than what is available now. The A40 cannot possibly be ready for all future options, but locking into one specific option might become a problem.
Hi PD and Stein,
There’s really no way to do a “generic Box” that I can think of. My recommendation will be that the A40 come with a conservative lead acid bank, but that the battery box be easily removable from its fastening points so owners can change to other battery types if they wish. I would also recommend that the batteries used are one of the standard sizes like 4D or Group 31 which are available just about anywhere.
The A40 will come with hard points for owner-mounting future options such as radar, Jordan Series Drogue, etc. I agree the standard boat would come with an engine battery and one or two 4D or G31 house batteries. What we are learning here about securing battery boxes to the boat’s structure suggests that it would be beneficial for the A40 to have suitably engineered points for securing an additional house battery box for owners who want to add extra capacity.
Hi PD,
I agree, a very good idea. Probably in the utility cabin area, I’m thinking, although weight distribution needs to be thought about and a lot will depend on where the standard bank ends up.
Yes, tricky situation; designing for something very heavy that might or might not be installed. Perhaps a space low down where users could install an extra water tank, diesel tank, OR battery bank. Although I’m not sure what the owner who needed none would do to maintain the ship’s balance and stability. Also, lead-acid is way heavier than water or diesel.
Alternatively, perhaps ship the A40 with somewhat more than reasonable lead-acid house battery capacity. Then users who want lots of electricity can head down the lightweight lithium path. As you point out elsewhere, they will need to add a duplicate charging system and other complexities, but at least the large lead-acid backup will already be in place. And they won’t be looking for somewhere to put perhaps a 1/4 tonne of extra stuff.
It might be an interesting idea to treat lithium as another charging source for a lead-acid system. This would seem to be virtually the same as the equivalent capacity increase, but simplified because the lithium system never has to be effected by the house devices (or them it.)
Hi PD,
Hum, your comment made me take a step back:
I think we have to be very careful not to lose sight of the A40 fundamental here: this is supposed to be a simple boat. I have not done an energy budget, but guessing a lead acid bank of around 300-400 amp hours at 12 volts should be fine, and someone who wants more can simply replace said bank with lithium and still have room in the original box for a single lead acid backup battery. Given that, I’m going off the idea of having an allowance for an extra bank.
So I’m now thinking that we should just think about the lithium upgrade path when designing the battery box, and forget the extra box idea.
Also, I’m not a fan of the charging lead from lithium idea. To me it makes no sense. My thinking is either go lithium and do it right or stick with lead acid.
Hi P D,
I think that’s a good point. I’ve also seen batteries showing clear wall distortion. I don’t like any of the ready made battery strap down solutions I’ve seen, but perhaps inspiration could be found in how separate lithium cells should preferably be clamped?
They should be kept in compression. Normally one would put the cells next to each other and have strong plates, often aluminium, on each side. Often also stiffener bars across the plates. Then clamp them together by at least 4 threaded rods. The cell pack is then strapped or bolted down using the clamping plates for attachment, or at least support for the cell walls.
Especially tall batteries seem suitable for this. Like 2v cells or 6v batteries. I don’t know how smart it is to clamp lead acid batteries at all. At least it seems possible to exaggerate. Anyway, maybe worth a thought?