

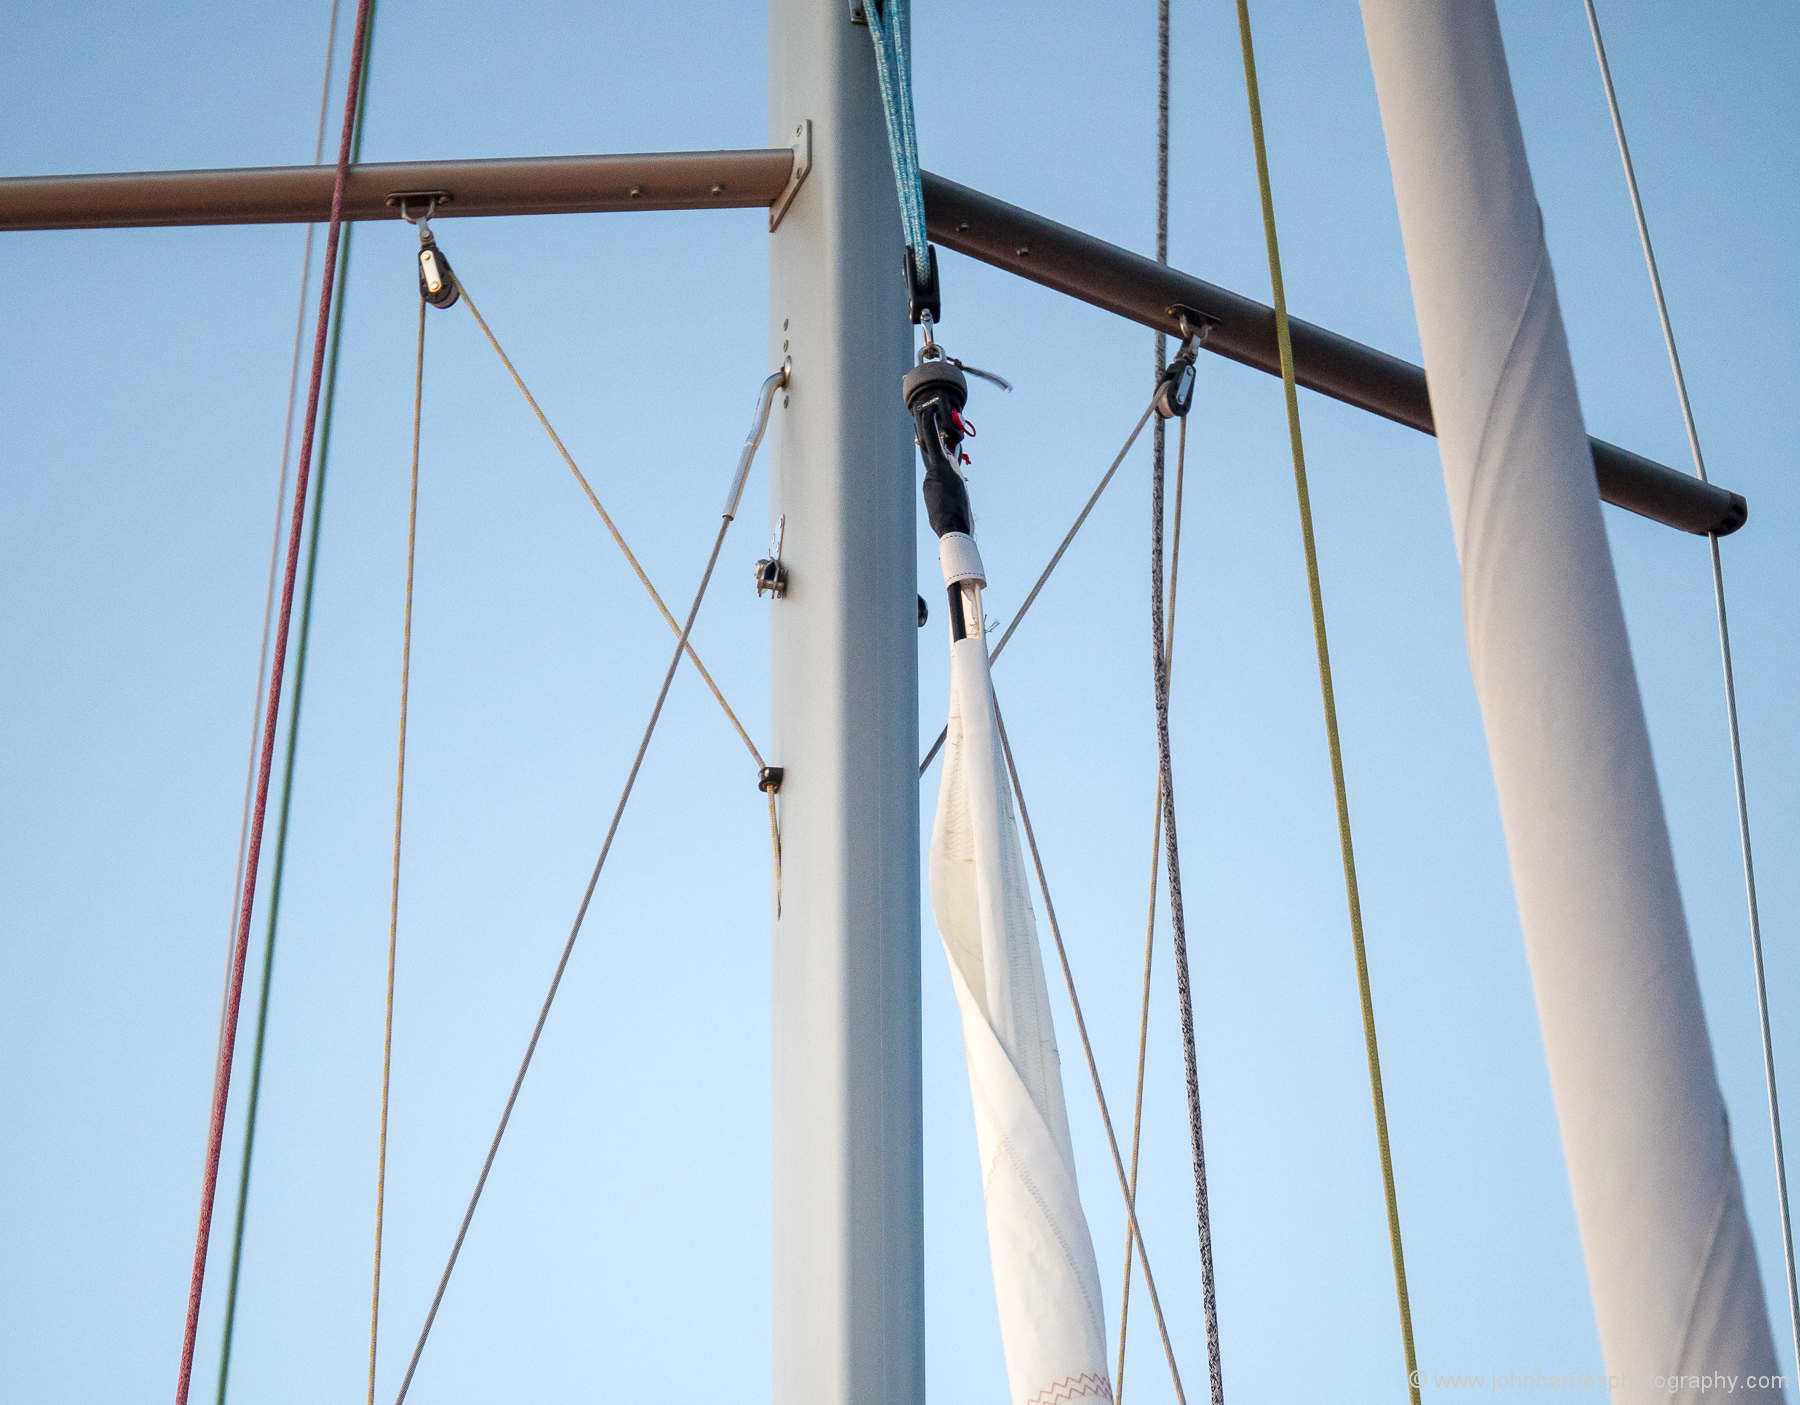
Last summer I was standing on a wharf in Labrador admiring a good-looking expedition boat, but when I looked up, my mouth fell open in horror—and that’s a look I try to avoid at my age.
Take a look at the above photo, which I took at that time. It illustrates two dangerous mistakes. Both involve making a change to the rig without really thinking about the loads and the possible unintended consequences.
Hi John,
Excellent reminder of an important consideration in all projects: the law of unintended consequences, and I appreciate being reminded of using the “fuse” metaphor when working out projects and systems.
Which brings to mind boating etiquette: commenting on someone else’s boat. My personal guidelines are to comment when I see choices where there may significant damage to boat or crew. I usually preface the comment with exactly that as a pre-amble and mostly the critique is received well or at least received with consideration, but not always. I have found that, generally, the bigger/more expensive the boat, the less likely the comment will be received well and the more hands-on the owner is, the more likely the comment will be received well. This I attribute less to money/boat size than to the fact that owners who are hands-on are more likely to “get it” and the bigger more expensive boats are more likely to have had someone else do the design and execution and the owner wants to believe that his/her money was well spent (and has not needed to think out the problem on their own).
My best, Dick Stevenson, s/v Alchemy
Hi Dick,
I have to admit that I chickened out on giving rigging advice to two very large and tough looking sailors. You are a braver man than I!
Hi John,
Oh, I do not always share my thoughts; some judgment is prudent and if I judge my thoughts unlikely to be heard or would cause a fuss, I may not bother. I don’t like letting it go however.
Ginger is sure I court death by shooting (at least in the US) by challenging those abusing handicapped parking (my father was handicapped) and those dumping their automobile ashtrays in the middle of parking lots among other transgressions of everyday life. Kind of like telling a fellow cruiser that he should pay his/her mooring fee even if the boat can slip away before the staff arrives. Again, for both, I try to use judgment, but generally try to push myself to speak up.
My best, Dick Stevenson, s/v Alchemy
Agree wholeheartedly with a ‘weak link in the chain’, which should be the easiest to repair, replace with least equipment t damage, particularly when underway.
Our rule is to pin the jacks back to the mast once the sail’s up and before it’s loaded. So using the lazy jacks to influence sail shape wouldn’t be something we would likely do unless We were powered off and trying to reef or furl the sail.
We have a mid- boom aluminum saddle on both booms (ketch) as a part of the boom and have a 2’ canvas saddle made for each boom to allow preventer stretch under loads. To the point of the article- we want the failure to be with the preventer line itself- not the tackle. We take the preventer to a block then to a winch aft in the cockpit. Once you jibe It is good to be able to safely release the preventer from the cockpit- all of which is usually going on in excessive or fluky winds.
Great article and comments from everyone.
Ping me with other thoughts , wisdom and experiences, please
Wow, that top photo made me cringe. My signals / flag halyards are more or less string, and not HM string, either. There’s very little downward pressure on the hoist to the lower spreader’s halyard blocks (which are themselves tiny) and if the loose knot flies upward, I hook it back. The idea of lazy jacks done this way just doesn’t make sense to me.
Hello,
Good article.
When doing your picture quiz I saw that the removable cutter sail is just over the spreaders and much lower than the frontstay. And you can see the toggles for the running backstays are not attached. With the considerable tension on the jib it will bend the mast forward at the spreaders. This cutter sail is made to go upwind sometimes in big seas that will give the pumping effect that can fragilize the whole rig.
Am I wrong ?
Regards
Denis
S/Y Hibernia II HR46
Hi Denis,
I’m embarrassed! I didn’t even notice that the running back stays were not connected, assuming that’s what those fittings are for, which would seem likely. Unfortunately I cropped my shot at just above the spreaders, so we can’t check if there are any runners further up. That said, I suspect you are right.
First of all, I agree with your points about not loading a column in the wrong direction, be it a spreader, boom or pole. I just want to point out that using uncovered spectra / dyneema for the lazy jacks, does have a purpose other than the HM rope craze you talk about. As the rope is very slippery it tends to reduce chafe on the sail. I can’t really see if the rope is uncovered in this case, but if it is perhaps that was the intention? Again, I agree that the system should have been ‘fused’ as you point out.
Hi Lasse,
Yes, I keep hearing that reason for using spectra, but we have had normal Dacron lazy jacks for years and we never move them back to the mast, but we have not had any problems at all with chafe on the sail. Anyway, not a worry if you prefer spectra as long as there is a weaker point somewhere in the system to act as a fuse.
Hi John, Lasse, and Christopher,
For decades, my lazy jacks have consisted have consisted of vinyl covered wire supporting a 3- fall lazy jacks made of Dacron for a fully battened sail. We never carry our LJs forward for storage underway. Once set at the beginning of the season, they are rarely adjusted again. Chafe has never been a problem.
The wire is shackled to the tang of the lower spreaders at the mast, so the gap to raise our sail is narrow. The discussion about the pitfalls of obtaining a wider gap to make hoisting easier, reminds me of how important slippery mainsail track is. Those raising the sail slowly with winches, electric or otherwise and those who must raise their sail slowly because of track friction will experience much aggravation with the sail getting hung up on the LJs. Those who raise by hand with slippery track can get the sail up just below where the sail can catch the LJs, wait a moment for things to line up, and then raise the sail quickly past this point. No big deal at all.
Now, I am doing this on a 40-foot boat, but I believe that John is doing the same or similar on his larger boat so I do not think boat size is a consideration.
My best, Dick Stevenson, s/v Alchemy
The main point; we pay the engineers and architects for a reason. Let’s not screw it up with oversold add ons.
As I kept looking at the running rigging on my boat, thinking, is there a way to make this easier or ‘cleaner looking’. I realized that after 35 years the original setup had held up quite well. There was reason it was done the way it was.
Hi Myles,
I agree, there’s a lot of wisdom in “if it’s not broken…”
Going with the idea of ‘splaying’ out the lazy jack to avoid hoist problem, why not go the whole hog and put the fixing point at the outboard end of the spreader. Mind you it should always be in light(ish) line.
Hi Ian,
Moving the lazy jacks to the ends of the spreaders is a no go on this boat, since, as John mentioned, the spreader ends can easily slide down on the shrouds. If the shrouds are terminated on the spreader ends, so the position is absolutely locked, that trouble is removed, but there’s another issue:
The spreaders are designed for perfectly aligned loads. Pulling them slightly out of alignment will make them unable to carry the huge loads. Lazy jacks pull mostly downwards and mostly not too hard, so it will mostly work fine on the ends. Still, here we’re dealing with serious consequences if things behave somewhat abnormal. A lazy jack does quite often pull quite a bit at an aft angle. If something happens. It could pull a lot more aft. That will certainly pull the tip of the spreader aft. Quite small force is enough to make it deflect at the root. Very risky!
In my experience, moving the lazy jacks out on the spreaders is a solution to a problem I don’t have. The height on the mast and the hoisting routine makes it easy. If movin the lazy jacks apart is needed, I’d prefer doing it at the boom, by having racks or such. Then the sail folds a bit better.
Hi Ian,
I would agree with Stein on this one. Spreaders are just so vital to the mast staying up that I would not want them compromised, or even potentially compromised, for any reason. As I said in the post, for me the benefits are just not worth it. Particularly since our lazy jack system works very well without attaching to the spreaders: https://www.morganscloud.com/2013/09/03/lazyjacksmainsail-handling-made-easy/
Hi John,
Very interesting article, but forgive my lack of knowledge but what is a ‘HM rope’?
Hi Serge,
Whoops, sorry, I should have defined the term.
Hi Serge, No need for forgiveness. HM = high modulus and is short for the assortment of ropes that are of exotic materials and are as strong or stronger than wire. So HM rope has no “fuse” component and should not be used where one wants a little “give” in the system.
My best, Dick Stevenson, s/v Alchemy
3mm (1/8″) amsteel lazy jacks on our boat – love the low mass, low chafe, low noise, durability, and when we do pull them forward to the mast not much to rattle about once snug, and they stay snug… and… reading this illuminates that I should reconfigure the line holding the the mini friction ring we use in lieu of a pulley up on the mast (not the spreader) to be weak enough to serve as a “fuse” connection – I feel better having confessed.
Hi John,
You are about 3 weeks late, I just redid our lazyjacks. Seriously though, you make good points. I elected to install eyes about 2′ below our lower spreaders (don’t want any more holes in that high stress area) and used HM line for the piece that is permanently attached to the mast and regular double braid for everything else. I will admit to being interested in HM throughout at the time but decided not to as it seemed overly strong for the same reasons you state.
I am always amazed by how lax some people are with regards to spreader alignment. There is a boat near us that has one spreader probably 20 degrees below where it should be and it has been that way for a few years, makes me think that they don’t actually sail the boat. I wouldn’t stand on a spreader on a smaller boat like you often see unless I applied load very close to the mast or there was discontinuous rigging to hold up the outboard end.
Eric
Hi Eric,
I agree on spreaders. Just amazes me how often I see them out of whack. I have even seen a couple of brand new masts with horizontal top spreaders (two spreader rigs) with no dihedral. Scary stuff.
Hi John,
I had the same thought about the danger of putting a point load in the middle of a spreader, especially using HM line.— and recall an unintentional jibe off the Oregon coast on a HR47 that encouraged us to go into port, re-adjust the spreader alignment, and rip off the remaining broken lazy jack line bits.
About 40 years ago I was asked to build the ultimate wood mast. For the spreaders I stack laminated 1/4′ spruce with a thin layer of carbon uni in each epoxy glue joint, Shaped it to the same airfoil shape as a standard aluminum spreader. Tested it by jumping onto the middle using my 240# and 2′ drop. Damn near broke my ankle, where the same test of a hollow aluminum spreader would have just nicely folded. But everybody knows that wood is only good for rotting—-.
Back in the same era I employed an old greybeard of a sailmaker who, understanding my permanent penniless state, came up with an alternative to the conventional methods of mainsail control. The topping lift doubled as a permanent spare mainsheet, fastened to the end of the boom. On it a number of 1″ rings were stacked. A light nylon line was led from each ring to an eye at the end of each mainsail full batten, leaving a couple of inches of slack. The main was about 360 sq. ft. , with a nylon track but no fancy ball bearing cars. When you cast off the halyard the mainsail landed on top of the boom with no fuss and never a lazy jack to try to play cat and string with. Hoisting was equally drama free: Just hoist away, and once you are sailing, ease the topping lift enough so it blows free of the main.
I can’t say that the rig was ever “Cape Horn Tested,” but it did serve flawlessly for 7 years. And best of all it only cost about $12.
Hi Richard,
Nothing like a crash jibe to get us looking at the rig with a critical eye!
Sounds like bomb proof spreaders. I have always been saddened by the fact that laminated wood seems to have fallen out of favour since it has always seemed to me to be among the best of materials—strong, light, easy to fabricate complex shapes. And for hulls, a good insulator.
An old friend of mine built a 28-foot voyaging boat out of strip planked wood edge nailed with ordinary hardware store nails and glued together with epoxy for $800. That was some 50 years ago and as far as I know she is still going strong with many ocean passages to her credit.
And that sounds like an interesting idea for main control. Did you mean the topping lift was a spare halyard or am I missing something? If so I can change that.
Hi Richard and John.
If I understand it correctly, what you described is a variation, probably an improvement, of an idea I’ve been thinking about for many years, without actually trying it out.
My thought was for a full batten jib on hooks. At the end of each batten is a small steel ring. A thin line is attached at the clew and goes along the leech through each ring to the top of the sail, where it turns through another ring or possibly a small block, to go down through along the luff through the sail hooks. When the sail is lowered it can be collected by pulling in the sheet and pulling in the thin line.
As I understand Richard, he has an additional set of steel rings loose on the boom topping lift. The same thin line goes zig zag upwards between the rings on the ends of the battens and the rings on the topping lift. While sailing, this line is slack. When dropping the sail, one tightens it up a bit, I guess, and the batten ends will be pulled towards the topping lift so they align on top of each other, at least as well as with lazy jacks, I’d assume.
I really like this system and think I’ll try adapting it to our cat this summer. The lazy jack system we have now is no good, so I’ll have to rig a new one either way. The leech ring system seems to have no disadvantages and offer the advantage of easier hoisting, better collection of the sail (?), no sail chafe and less less rope and windage around the sail. Since I haven’t tried this before, it will be a bit of an experiment, but one with very small risks involved…
This strikes me as a leech-line variant of the main downhaul line, which I recall John found problematic. I would be interested in hearing of the results of such an experiment, however. I can visualize how it would be constructed, but less so when it comes to how it would flake neatly.
Stein, I interpreted Richard’s description a little differently, with no zig zagging line, but instead a series of short lines coming off of the batten pocket ends (almost like leech telltales), each with a small ring attached to the aft end, and the topping lift going through all the rings. (This is a case where a diagram would probably be a more universal explanation than words.)
But I agree, that it’s a great idea for handling the main. Even if the boat has a rigid vang or boom kicker, a topping lift that can double as a halyard is still a good idea, as Richard and John pointed out. (Though some people dislike the clutter.) I wonder though, would this system still be possible on a sail with lots of roach?
I too have thought about strategies for controlling a hank-on jib without going to the foredeck. On a small boat, I experimented with using a thin line as a jib downhaul, tying it to the head and threading it downward through each hank, to a small block at the tack, and then running it unobtrusively back to a small cleat near the cockpit. I can report that it worked brilliantly to douse the sail, but when hoisting I was always a little uneasy that it would foul the hanks. Mind you, these were tests in a sheltered bay on a small boat with a fractional rig. So I can’t comment on whether it would be advisable with a larger sail or at sea.
If I interpret your idea correctly, instead of tying the downhaul to the head as I did, yours turns at a block and runs down the entire leech to the clew. To douse, one releases the halyard, keeps tension on the sheet, and pulls the “leech-luff” downhaul. The sail should then lower, “pinned” within a triangle of tensioned line (anchored aft by the sheet), and ideally flake neatly on the deck. Sounds great and worth a try! It could probably work even without full battens, if the leech attachments are carefully laid out opposite the hanks.
I have no doubt that in the days before roller furling headsails, short-handed sailors must have experimented with similar techniques. Whether they are worth the added complication (which is further magnified during a sail change), only further experience could tell. But it is good to know that there are low tech, low cost options for controlling loose sails both fore and aft.
Best regards,
Scott
Atlanta, GA
Hi Scott.
We’re maybe going too far off topic here, but it’s an interesting and somewhat related topic, so maybe still ok?
A separate line and ring for each batten would probably also work, but then one cannot adjust tension and force pull the sail into alignment. I’d think that might be a useful feature. Also, especially the lines at the top of the sail woul be far too long and hanging loose when the sail is up, since the distance from the batten to the topping lift increases a lot as the sail goes down. With a zig zagging line, as far as I can see, one can keep it tight.
You understand my initial idea correctly. I’m also convinced that it’s worth a try, but I think it will work even better when connected to a topping lift, as described by Richard, which will pull the right direction at an earlier stage of lowering the sail. It may even help reducing flogging.
Roller furling sails are indeed the standard on most types of sailing boats these days, but as a lover of simplicity, I’m not convinced that they’re always the best solution. “Just” rolling it in seems very attractive and easy, but dropping a hanked on sail can be at least as fast as the equivalent furler and it’s certainly way more reliable. Also the whole setup is a lot lighter, way cheaper and has much less windage high up, which influences behavior at anchor etc. A messy sail on deck is not as nice as the “sausage” on the stay, though, but with a quick stack system as mentioned, that might also be ok? Perhaps even with a lazybag-ish cover ready for it at the side of the deck? In the old days, racers had two head stays so they could hoist the new sail before lowering the old. If that was used on a cruiser, one could have two sails lying ready for use on deck. Much better than a “reef” in the furler, which I positively hate.
Well, I don’t think I can convince many to ditch their furling head stays, but I do think some boaters might find that they get significant advantages from it. Boat sellers and riggers will hate me for trying to reduce their incomes though.
Hi Scott and Stein,
For those interested, we have an article on the benefits of hank on sails, as well as one on the benefits of roller furling:
https://www.morganscloud.com/2012/03/08/hank-on-sails/
https://www.morganscloud.com/2012/03/23/handling-roller-furling-sails/
Stein, good point about all the excess line that would be needed for the upper battens. I hope you’ll try out Richard’s method and let us know how it goes.
I too am keen on simplicity, preferring “technique over technology” for many things, though not dogmatically so. As far as alternatives to roller furling headsails, I recall seeing photographs of an interesting configuration on one of Steve Dashew’s earlier boats. There was a split hatch directly aft of the forestay, and the forestay itself attached down inside the compartment below the hatch. The sail was flaked, rolled, and stuffed down into this compartment, all while still hanked on to the forestay. With the hatch closed, the foredeck was completely clear. It was quite clever, but if I recall, Steve commented that this setup was a tough sell to clients compared to roller fullers. Understandably, most cruisers seem to want to keep foredeck work to a minimum.
(This will be my last tangential comment in the thread, promise!)
Cheers,
Scott
I’ll also (try to) stop my off topic talking here by mentioning that I think a deck hatch probably looks great and is practical, but for me that adds complexity, weight and cost to reduce the advantage of the simple hank on system. There were various systems to ease the job with hanked on sails. I mentioned twin stays. I had an old cutter with roller on both stays where i removed the furler on the inner stay to fit a heavy weather jib and a storm jib. It worked way better and if I’d kept the boat, the other furler might have gone too.
The storm jib was, when at sea, always in a bag strapped at the side deck. The sheets and halyard were on and ready to use. The clew had its wire attached. It was meant to be hanked on above the heavy jib. I had put the hanks on a omega shaped plastic profile that held the pistol type hanks open. To hank it on, just put the profile around the stay and yank it up, out of the hanks. Finished. Very nice system. Haven’t seen that for a long time. When I build another boat, (extremely light ocean going catamaran) I think there will be no furlers.
The jib downhaul run through the hanks is exactly what Lin an Larry Pardy had on Taliesin to help secure the jib at the end of a 9ft bowsprit. It worked well and reliably for them over decades and a few laps of the globe.
David
Hi everybody:
Complication seems to be at the core of human nature! Since simplicity is the basis of my greybeard’s sail handling system that makes it hard to understand!
Start with:
Full batten mainsail and roach that clears the backstay. High roach multihull mains need not apply! (Perhaps Stein’s quite different system is the answer?)
A boom gallows or other system that provides a positive stop point for the boom height.
A pressed-in ring or other eyelet near the end of each batten.
A handfull of 1″ steel rings.
A topping lift consisting of a mate to the main halyard, but led to the end of the boom and down through the mast to a jammer. It can be a 1/4′ dacron messenger or a full strength halyard. You won’t need a winch until you have a really big main.
Stack the same # of rings onto the topping lift line as you have battens. If you don’t have at least 5 you might consider intermediate eyes on the main.
Drop the main onto the boom, held in place on the boom gallows.
Run a light line (-250# strength) from the eye at the end of each batten to a ring at the logical sequence on the topping lift . Half hitch it in place for trial hoist. You will end up with different length lines. The one I did was on a 17′ boom, but line length wasn’t a problem even for the upper batten.
Don’t like the view of those pieces of string blowing in the wind, but never fouling anything? Install lazy jacks and take them forward after every hoist and back when they pound against the mast. Or punch a whole bunch of holes in the main and install a Dutchman system and downhaul if you are a fan of complexity..
Hi Richard,
Sounds like an interesting system, and as you say, very simple.
One point though, we have lazyjacks and never take them forward to the mast, so I don’t think that’s a valid comparison.
One other thing I like about our system is that we have a rigid vang and therefore no topping lift, although we are set up for one. And I can’t tell you how great it is not to have the chafe of a topping lift, not to speak of the need to be adjusting it all the time.
At present the ‘fuse’ in my lazyjacks seems to be the sheer age of sail my cover material. 🙂
But seriously, if mounting them off the spreaders is not on, what IS the best place?
Hi Philip,
We have a complete chapter on lazy jack systems: https://www.morganscloud.com/2013/09/03/lazyjacksmainsail-handling-made-easy/
My bad for not reading the whole thread before commenting. Only recently have I paid attention to sail handling techniques and it’s fascinating how every boat I look at is different.
I just returned from a delivery of a First 35, and this boat had an interesting solution for keeping the Lazyjacks distanced from the mast without burdening the spreaders.
The top lines of the lazyjacks were mounted on the mast approx. 80cm (2.5′) above the lower spreaders, then guided through a bore in the spreaders. This bore was smoothened and had teflon rings so the lines wouldn’t chafe (too much). The bore was approx. 50cm (1.6′) from the mast, very effectively separating the lines.
Seems to me that this is a valid solution for the above mentioned issue. Unfortunately I didn’t think of taking a picture…
Hi Ernest,
I guess with the angle involved and downward load on the spreaders would be reduced. That said, I still would probably not rig that way, particularly since I think that boat has continues cap shrouds so it’s pretty easy to slide the spreader out of column. Bottom line, my paranoia about attaching stuff to the spreaders far outweighs any benefit I might get from separating the lazy jack lines, particular since, with our lazy jack system, I have really not had any problems that this would solve.
Thanks for a good item. I’ve had gaff cutters with wooden spars for most of my life; they do teach you to be careful… but a well rigged gaff boat has lifts to her spreaders to keep them where they ought to be…
You are correct. Saw lazy jacks connected to spreader with riveted on blocks. The fuse in this case. The block had pulled off during a storm. The wind force on the line alone tripped the fuse. The boat was at the dock with the sails stowed. The owner asked me where he can get stronger rivets, maybe stainless steel or bolts to make it stronger. Its a case of moving the fuse to the spreader and adding galvanic corrosion if the aluminium spreader and stainless rivet or bolt is not isolated.
Hi Jack,
Yes, just another example where just assuming, as is so easy to do, that stronger = better can get us into trouble.