

When thinking about anchoring, it’s easy (and kinda fun too) to just focus on gear, but good technique can contribute at least as much to getting securely anchored.
Phyllis and I were sharply reminded of this a couple of seasons ago when we experienced several setting failures that were most assuredly caused by problems “above the boot”, as skiing instructors are wont to say.
So what contributed to a guy with a half-century of anchoring experience getting lax? Simple, much better anchors. Back in the day of the CQR and other old-style anchors, if our technique was not perfect, the chances of a secure set went to near zero, at least in some substrate types, which definitely kept us on our toes.
But technique is still vital with new-style anchors—even just half-a-dozen anchor setting failures a year are too many.
So here is a step-by-step reminder chapter for us all, that will be particularly useful as a primer for those new to anchoring.
One more thing, this is part of an entire Online Book on anchoring technique, so in this chapter I’m assuming that we have already selected a spot to drop the anchor (covered in the previous chapter).
Let’s get a solid set first time:
#1 Stop The Boat
This one is going to sound just too obvious, but it’s amazing how often I see fellow cruisers dropping the anchor while still moving forward, even though the engine is in reverse—it’s an easy error to make because it’s actually quite difficult to assess when all forward way is off.
Here are a few tips that will help:
- Don’t gauge forward speed by looking at the water surface right next to the boat. The reverse thrust from the prop makes it look as if we are stopped, or even moving astern, long before we actually are.
- Don’t look at a through-the-water speedo. Once we are in reverse, the water flow from the prop can cause a false zero reading while we are still moving forward.
- Don’t use the GPS speed. The damping set on most units means that we will actually be moving backward at quite a clip, not good either, before we get a zero reading.
- Do look at the shore abeam.
- Do look at the water surface abeam and about a boat length away. Very often a piece of weed or some other piece of flotsam will provide a reliable reference point.
This is doubly important for single-handers, since otherwise we will be moving way ahead of where we want to be while we run forward to drop.
#2 Run The Chain
You know those windlass up-down switches that are oh-so-conveniently installed on the binnacle of many modern cruising boats? They are one of the biggest contributors out there to failed sets.
Don’t use ’em. Slow veering of chain using the windlass results in dragging the anchor across the bottom, thereby hugely increasing the chances that it will foul on an obstruction and/or that the fluke will fill with mud, which can obstruct setting on many anchor types.
#3 Set a Waypoint
At the moment the anchor starts to run, the person at the helm should set a waypoint on the plotter or, better still, a drag alarm point; that is, if the plotter has a drag alarm feature that’s worth a shit…but that’s another article…and rant.
If you are singlehanded, press the button just before you scamper forward. As long as you have the boat stopped it will be close enough. Ditto step #4 (below).
#4 Know the Water Depth
And we should not assume that a reading we took earlier in the approach will be right. It’s amazing how often there’s a big hole just where we drop the hook.
#5 Know Our Prop Walk

In anchoring, like docking, it’s vital to know which way our boat’s stern will kick in reverse. In our case it’s to port (right-hand prop) so we always approach the anchoring point with the wind about 20 degrees on the starboard bow.
The result is that when we reverse hard, the boat is more likely to back directly (or pretty close to directly) down wind.
#6 Hard in Reverse
As soon as the chain starts to run, the person at the helm should hit the throttle hard in reverse—I’m talking hard here, half throttle or better, don’t be shy—for 5 to 10 seconds or until we are sure we have about a knot of sternway on, then go into neutral.
The idea here is to lay the chain out on the bottom, or at least the first part of it, away from the anchor, which speeds up the next step.
That said, don’t worry too much about the chain fouling the anchor. A lot of people use this worry as a reason to veer slowly, but in all my years of anchoring I have never fouled the rode on the anchor, even though I know I have screwed up a bunch of times by being slow with reverse and thereby dumping a pile of chain right on top of the anchor.
If you are singlehanded, this hard reverse step gets a bit tricky, so just make sure you have a little sternway on prior to leaving the helm, and stay forward running the chain until you have at least 5:1 scope out.
Yes, it will be a big pile on the bottom, but that’s not a huge problem, it just means the next step will take longer. And with a rope rode, you can just scamper back and forth from bow to helm, since the rope won’t run under its own weight.
#7 Don’t Worry About Staying Head To Wind
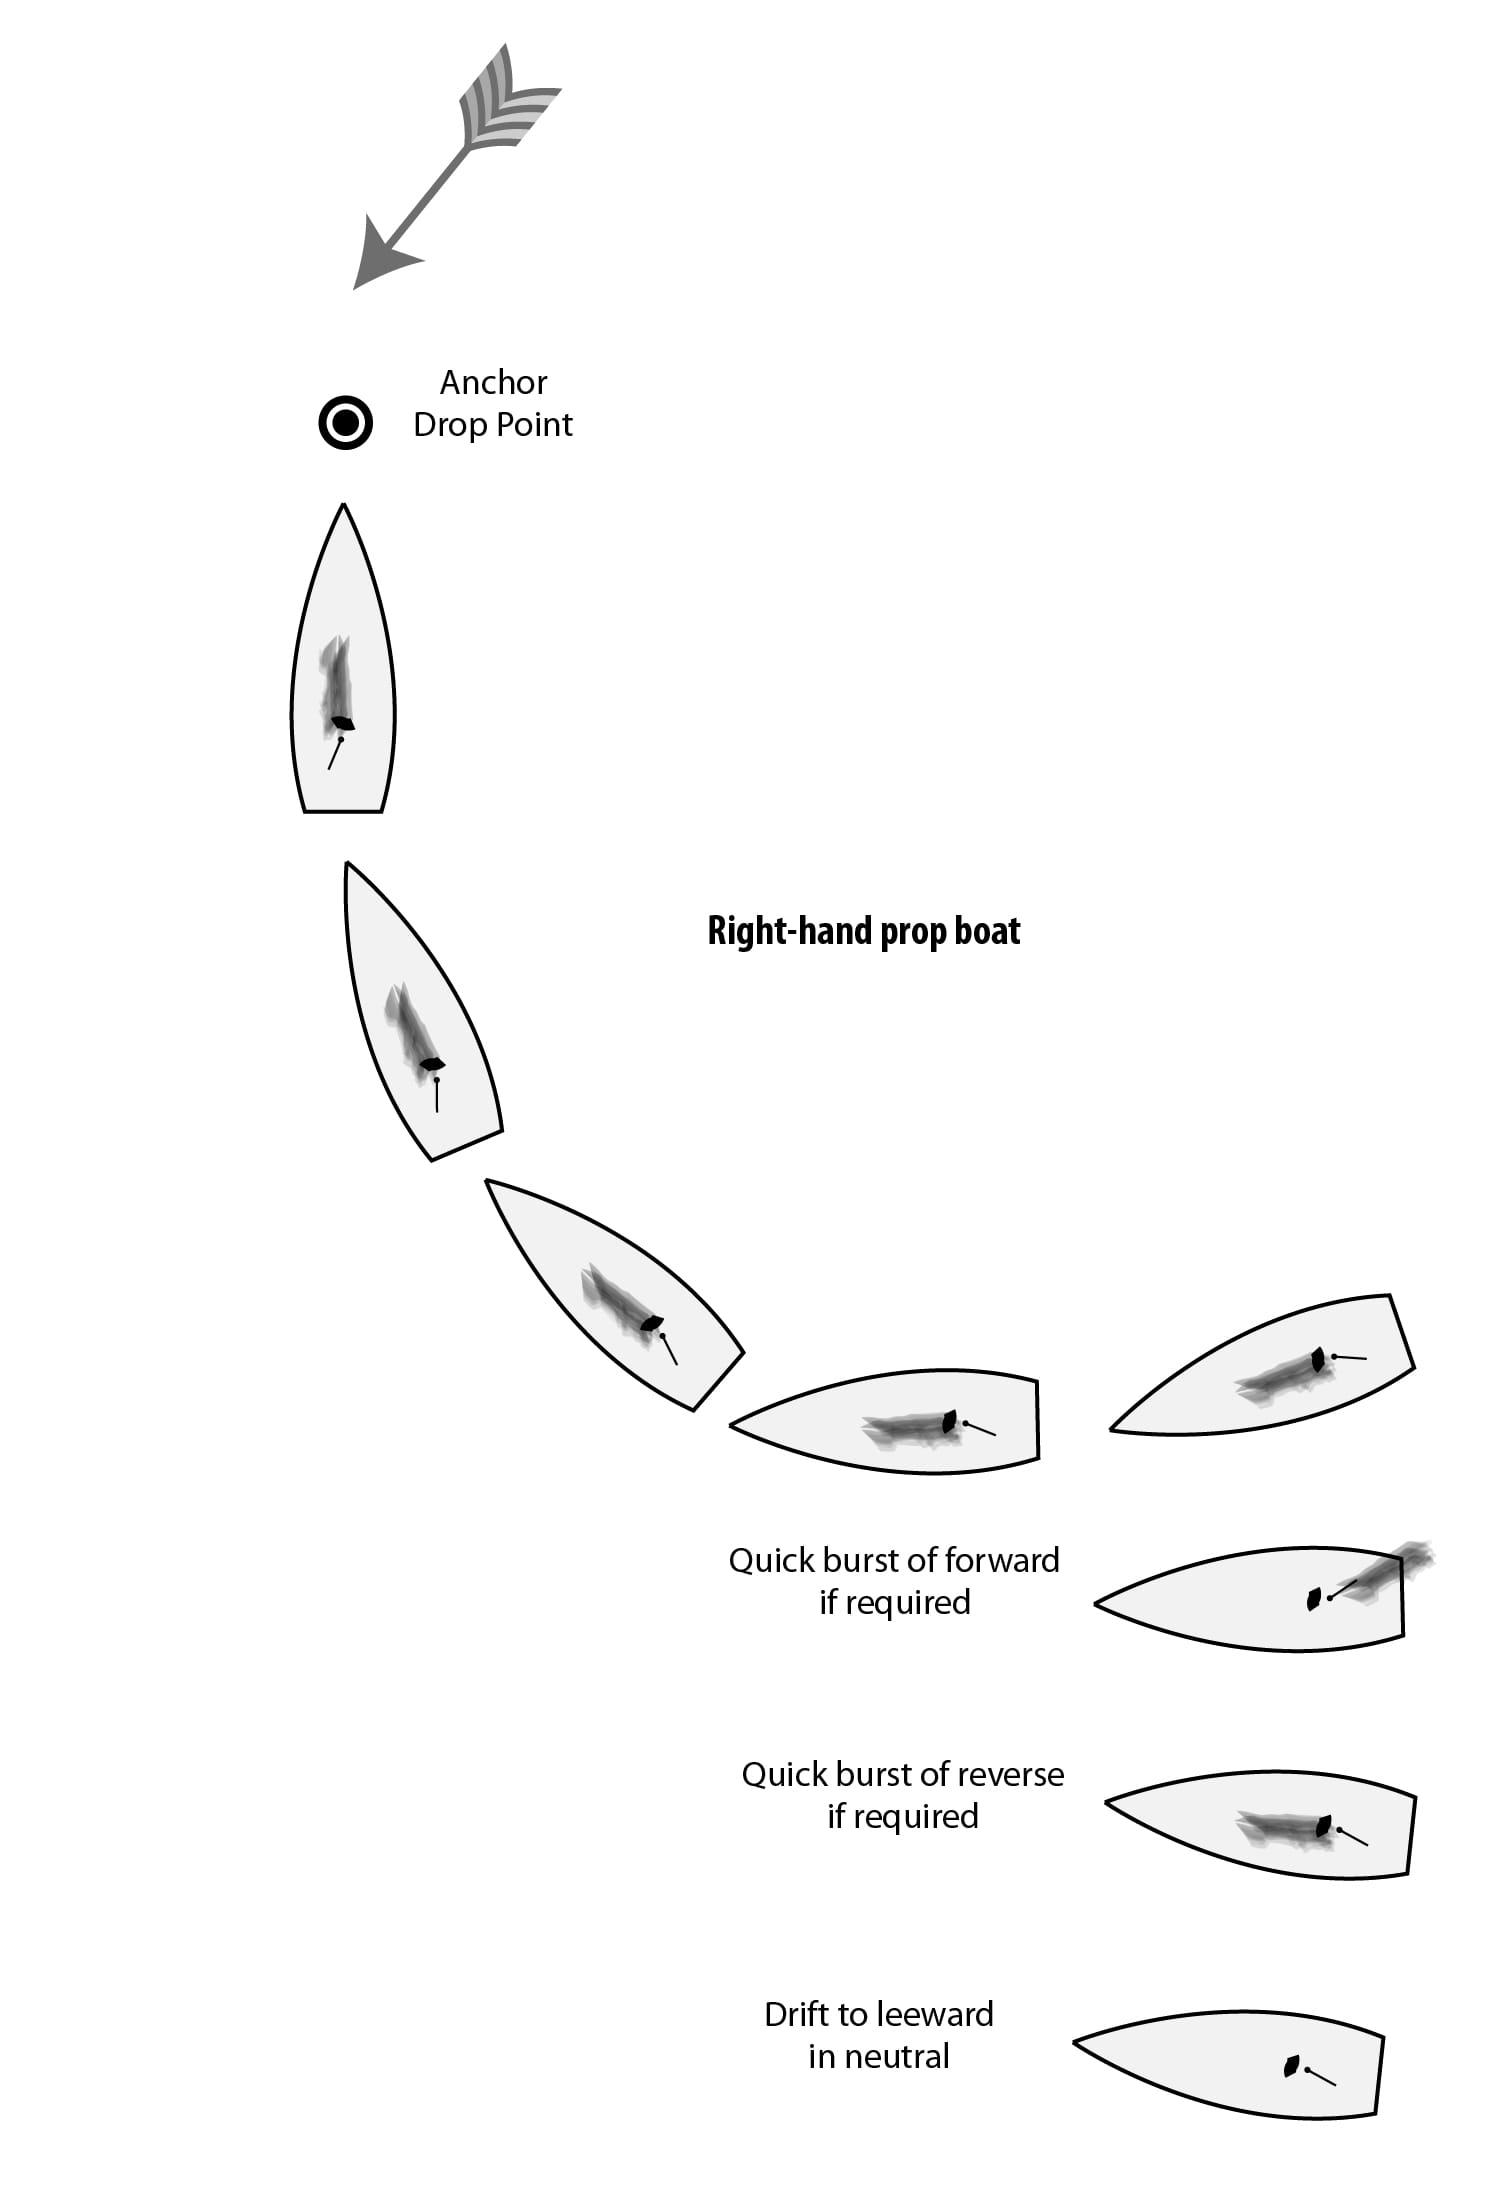
Despite steps #5 and #6, with most boats the bow will blow off to leeward, leaving the boat abeam to the wind or even slightly bow down. Don’t worry about it and, above all, do not check the chain or cleat a rope rode in an attempt to straighten her out.
I know, many of us are now worrying the boat will put her bow all the way downwind, or even do a circle and tangle the rode around the keel or rudder, particularly when anchoring on rope.
To stop this happening:
- Turn the helm to the stop as if steering the bow into the wind.
- Give a short burst in forward to stop dead in the water.
- Let her drift leeward, and the rode will gently straighten out as she goes.
Do not try to reverse out of this situation, doing so will just make things worse, although a hard burst in reverse without sternway (after the burst in forward) can help kick the stern to leeward—much the same technique as we learned in our Coming Alongside (Docking) Made Easy Online Book.
A tip that makes this easier:
- right-hand propeller boats are better off with the wind on the starboard side,
- and left-hand propeller boats with the wind on the port side.
This way both prop walk in reverse, and prop wash in forward, are working for, not against, us, so we need to bias our approach to achieve this—see step #5.
Of course, some boats steer well in reverse and so will obediently back down straight. And a bow thruster pretty much obviates the need to worry about any of this, since it can be used to keep the bow into the wind. If you have either of these, be happy.
One more time because it’s the key to reliable setting:
(I will cover chain marking in a different chapter, but suffice to say, we need to do that.)
#8 Bad Holding
At this point, if we are concerned that the bottom may be a poor substrate for anchoring (thin mud is often the worst), veering 7:1 or even as much as 10:1 scope may make setting more reliable.
We can always shorten up after the anchor is set, although if we do that we should recheck the set at the new shorter scope—see #15.
#9 Unload The Windlass
Eventually the boat will drift to leeward far enough for the rode to straighten out and pull the bow back up to windward. We are now ready to set the anchor. But first we need to unload the windlass, since setting against it is bad for the bearings and brake and can even bend the windlass shaft.
The best way to transfer the load is a good quality chain stopper but, failing that, installing the snubber will do.
#10 Stand Back
For years Phyllis used to stand forward while setting, to check if the anchor was dragging. A dangerous situation that was entirely my fault, because when she first came to sail with me she had little experience, so it was my responsibility to make sure she was not at risk.
Anyway, a few years ago the light finally went on in my brain about the risk of injury to the woman I love if something broke.
#11 Slowly Increase The Load
It is absolutely vital to start the set off very gently, and this goes double if the bottom is thin mud, one of the most difficult substrates to get a good set in.
If we start the set with too much rode tension:
- The anchor will tend to plane along on top of the thin mud, rather than set and burrow through to the dense good stuff underneath.
- The rode will be pulled partially, or even near-completely, straight, a bad thing since all anchors (except the Fortress) set better with the lowest possible angle (measured against the horizontal) made by the rode where it attaches to the stock. Note that it’s particularly important to be gentle when using rope rode with a short chain leader.
So how gentle? On no account start with any more than idle RPM in reverse, and even this will be too much if the boat drifting with the wind has not straightened the rode completely, so be ready to go into neutral if the boat starts to make appreciable sternway, otherwise, when she comes up short, there is a good chance of dragging the anchor before it can set.
And for motorboats with huge engines, idle RPM will still be too much, so go in and out of neutral to keep the load on the rode low.
#12 Patience
Once we are absolutely sure that the rode is straightened out on the bottom, leave the engine at idle RPM in reverse for a good 30 seconds, and as much as 1 minute if we suspect that the bottom is thin mud. This will gently rotate the anchor into its setting attitude and start it digging in without dragging it.
Some people advocate for “soaking the anchor” by leaving it for a much longer period with the engine off before setting, but I have never found this to work as well as the above technique. Probably because without at least some pull on the rode, the anchor will just be lying on its side.
#13 Know Where We Are
Next, use the plotter to measure the distance to the drop point where we placed a waypoint or drag alarm point. The answer should be just a little less than the chain length we have out. Accuracy will be surprisingly good with a WAAS-equipped GPS. Note that phone and tablet internal GPSs may not be accurate enough for this since most (all?) don’t have WAAS.
#14 Start Setting Slow
We are finally ready to put some load on the anchor. Very gently increase the throttle in increments of about 10 to 15% of the entire range from idle to wide-open throttle (WOT). For example, if we have an engine that idles at 800 RPM and has a WOT of 3600 RPM, a good increment would be 300 RPM.
Pause for 5 to 10 seconds after each increase of the throttle to let the anchor set deeper while keeping an eye on the land abeam to gauge if we are dragging.
Also, watch the distance to the anchor drop on the plotter. This will increase a bit as the rode straightens out but, obviously, if the distance is more than about 50-feet longer than the chain, we are dragging, something that can be surprisingly difficult to assess without the aid of electronics, particularly for those new to anchoring.
If the anchor does start to drag, it may be possible to save the set by immediately easing up on the throttle and then starting the process again, but even more gently. On no account should we just keep dragging the anchor backward in the hope that it will eventually set. It won’t and, worse still, by so doing we are taking a substantial risk of fouling the anchor on an obstruction.
#15 End Setting Hard
The next big question is how hard to set? Our rule on Morgan’s Cloud is that if we plan to sleep, the answer to that question is always at the same rode load as imposed by 30-knot winds with higher gusts. In our case that means 1800 RPM (WOT is 2350) on our 87-HP engine turning a big three-blade MaxProp, or a bit under 1000 pounds of rode load.
We can scale that down a bit for smaller boats, but on no account would I go under say 600 pounds for a 40′ boat. This generally equates to enough load to straighten a chain rode bar taut.
A useful, although pretty rough, rule of thumb is, assuming a reasonable efficient propeller:
rode load in pounds=HP x 22.5
Note that the HP variable is shaft HP, so we need to use our engine power curve to arrive at that from RPM.
And, yes, I know, it’s always tempting, particularly when tired after a long passage, to not set the anchor this hard for fear of dragging it and having to start again. This is a mistake because, even in settled weather, we can always get a thunder storm or squall, so better to have one firm rule and stick to it.
In fact, I would go a step further and say this policy is much of the reason that Phyllis and I have not dragged our anchor, once set, in over 20 years.
Conclusion
By combining the above step-by-step technique with a modern anchor, we can reduce our setting failures to less than one in a hundred, a rate where getting securely anchored becomes no more stressful than parking a car.
Good one, John. I learned several reasons for my often abysmal anchoring performance, and thanks for including singlehanded: I tend to get frustrated with articles that begin with assigning crew duties: bloody hard to do when you’re all alone!
I don’t have a heavy-enough boat to handle a pile of chain forward, much as I recognize the desirability: how about rode length for rope?
Hi Jim,
Thanks for the kind words. If it helped someone with your huge experience I’m indeed happy.
As to rode length for rope. My recent experiments with light chain have taught me that for light rodes a scope of up to 10:1 can be useful for setting. Obviously that means you need a pile of rope in deeper anchorages, but the good thing with rope is that you can always keep a long length in a bag and then add it to the normal rode when required. We do this with our kedge rode and can come up with as much as 500 feet if we need to.
Great idea!
Good thinking. I cut up a spool of 5/8″ line into four lengths for tidal water docking or even lines taken ashore purposes, but I also considered that “hey, this is the rode size I use for the Fortress with the five metre chain leader”. So if needed, it’s there.
Hi John
I am taking delivery of my new Dufour 460 GL end May in the South of France. Following your advice, and that of many others, I have switched from a Rocna (due to problems when swinging) to a Spade S120. Rod Heikell describes the SPADE as having ‘good holding but not very good in weed’. On the other hand I never had any problems with my Rocna on my Bavaria 38. Any advice/comment would be greatly appreciated.
Many thanks,
Julian
Hi Julian,
My experience has been that the SPADE works very well in weed, both in the grass over hard sand in the Bahamas and in the thick kelp we have in the high latitudes where the Rocna struggles.
I have not anchored in the Med, but it’s worth knowing that Alain, the designer of the SPADE, invented and tested it in the Med, and specifically because he was frustrated trying to get anchored there.
So, putting all that together, my thinking is that the SPADE should do just as well as the Rocna in weed. The one caveat is that the SPADE might like a bit more scope when setting than the Rocna, although I’m not even sure about that.
All that said, it would be great to hear from you with a report once you have tried the SPADE in weed.
Hi Julian and John,
I swapped out my CQR (an often ongoing challenge to get set) while in the Med for 5 years in 2007 for a Spade. This made the last couple of years in the Med far more enjoyable. The Spade was far better in weed and I rarely, maybe never, had issues after that.
My best, Dick Stevenson, s/v Alchemy
Hello Julian,
If it’s any reassurance, we had a bit of experience trying (and repeatedly failing) to set our Rocna 25 Kg in a weed choked local anchorage. (West Coast BC) We eventually gave up. We had similar problems with the Rocna in other locations with weedy bottoms.
After replacing the Rocna with a Spade 120, we tried the same anchorage at the same time of year the next year and it set first time without any issues. This is, of course, only rubbish anecdotal experience, (maybe just a fluke, pardon the pun) but in multiple anchorages since we have only really had trouble in what turned out to be rocky bottoms.
Our impression is that the Spade sets much more readily in weeds than the Rocna ever did.
-evan
Hi John.
Nice breakdown of the good elements for setting the anchor. I would just like to elaborate a bit on point 7, “don’t worry about staying head to wind”, especially for when we have heavy winds. The reason we feel we should be head to wind is probably that we know we’ll move astern and want to feel in control, or that we want to make sure we set the anchor straight down wind by steering. I think this feeling of control is an illusion. We can relax. No matter how we do it, if there’s a bit of wind, we’ll get aligned well enough.
Since I mostly sail catamarans, staying head to wind is very easy, but I only do that in light winds. With more wind I make it a point to stay about beam on to the wind when we drop, and then stay that way until the rode is almost stretched out. I keep the helm turned fully to windward. This orientation slows down the drift to a predictable speed. It also gives me precise control of where we drift. A small burst forwards or in reverse, no turning needed.
Even more important is that this orientation tells me very clearly when the rode is close to stretched out, because from the steering position of most boats I can then see the rode when it starts to lift, and also the bow will start to turn upwind. That clarity is important in heavy wind, since that’s the moment when the boat will load the anchor way too much for a reliable set. The side on orientation will actually load the anchor less than an aligned orientation, since the initial jolt will not need to stop the whole boat weight. The load comes on a bit more gradually than when aligned.
This isn’t enough in heavy weather, so, just as it starts to turn, I give a burst on the (leeward) engine to help straighten out the boat, prevent the jolt and reduce the pull on the anchor. When roughly aligned with the wind, I leave both engines on just enough to reduce the pull and allow a relatively gentle set. The helm then is centred, of course. I stay at the helm, adjusting orientation and power. The rest is as described in the article.
This sideways drift method is the only one I feel works in heavy winds. On a 86 foot scooner in Spitsbergen (80 degrees north, difficult bottom conditions, no wind or way too much wind) I struggled with getting a reasonably reliable set. Enough to develop new swear words and enhance my hate for its 240 pound CQR. 😀 It worked way better when I stopped aligning with the wind. It had a very powerful bow thruster, so aligning was no problem, but easing the jolt and setting load was very hard. Drifting sideways kinda looks out of control, but feels like the opposite. When anchoring without an engine, I think this drifting beam on method is the only realistic one. I’ve actually once set a small spinnaker in reverse to set the anchor. Small boat, light winds…. 🙂
Hi Stein,
Very good points. I particularly like your point of “easing the jolt” in high winds with a burst of power. I have done the same, although only when it’s blowing gale force or better, but then our boat probably drifts slower than your cat so there is not as much need to soften the blow.
Thank you, John, for a great article, and thank you Stein for the beam-on technique for catamarans. I think we’ve been doing fairly well with our cat and our Spade anchor except for some difficulty with soft mud. Hopefully, this will be the solution. We’ll start practicing in the Bahamas soon so we can be ready for the Chesapeake this summer.
Regards, Alan
Hi John.
The mentioned schooner was steel, ice breaker certified A1 and about 90 tonnes, but had two 30 metre masts and could really get some drift speed when it was very windy, which it was sometimes. Beam on the wind, it slowed down quite a bit.
Actually I think the sideways drift speed of our 40 foot 4,5 tonne cat with a 20 meter main mast and a 12 meter mizzen might be roughly the same. Aligned with the wind, that’s probably a different matter. The twin narrow hulls, making a combined 80 foot/ 24,4 metre water line, twin short keels and twin rudders create a lot of turbulent drag when drifting beam on the wind. Even when it blows stink, the drift speed gives time to plan and time to do both the drop and the helm single handed. I’ve done that when not alone, just to try it.
Different boats have different behaviour, of course, but it should be possible to adjust things so any boat drifts sideways reasonably slowly and in a reasonably stable orientation. A bit like heaving to. By the way, we have a Lewmar Delta anchor, which came with the boat and works, but isn’t my favourite. Will get a big Spade when our budget allows it.
Hi Stein,
That’s interesting about the drift rate on your cat, makes sense now you point the turbulence.
Hi John,
You have outlined an excellent way to do this. I know many people worry about dropping a pile of chain but like you, I don’t get too worried about it and find it much preferable to the alternative which is loading the anchor at short scope. The first time our Mantus didn’t set first try was in a shallow, grassy anchorage when we had a guest dropping anchor and they were really trying to keep the chain stretched out and not in a pile and I believe the issue was that they dragged the anchor at very short scope through the grass and fouled it before getting to real scope. We have only ever had 1 other experience of it not setting first try in probably 400 nights and a few more sets than that and it was the only experience I have ever had of the chain fouling the anchor excluding the literally dozens of times I have had it happen with a fisherman anchor. In this case, we were anchoring in a pocket cove under sail and moving ahead slightly when we put it on the bottom because we needed to nail the spot to get semi-reasonable scope and managing momentum under sail is a bit tricky. When we sagged back, the anchor dragged and upon retrieving it, the chain had gone under the fluke and hooked on one of the bolts for the roll bar.
I also agree that sagging back by drifting sideways is often the best course of action although our current anchor is so good at setting that I don’t sweat it if we end up going backwards a bit quickly. As someone who anchors under sail probably 3/4 of the time, the problem that we run into is that the main ends up against the shrouds and you can actually go sailing off if you don’t watch it. In many cases steering like we are going backwards first then when we end up sideways throwing the helm over the other way will deal with this. The luffing is also painful to listen to so in light airs, I manually back the main by pulling on the sheet and can steer the boat backwards but this only works on a smaller boat and you need to be ready to let it fly in a hurry and also make sure that if the boat falls off a lot the wrong way, you don’t gybe (I only made that mistake once but it was scary). In medium and heavier airs, I intentionally get the bow off one direction then flatten the main and crank the traveler to windward to kind of heave to. Where it gets really tricky is when you do this with a current at an angle to the wind and then the direction you fall off is really important as otherwise you can end up pinned with a full main against the shrouds. Once we are sagged back, we prevent the main out perpendicular to set unless the wind is really strong and if the air is light, we have to decide whether we then need to use the engine too. I realize that most anchor under power and that is certainly the safer thing to do but I think it is worth knowing how to anchor under sail and I actually really get a lot of enjoyment out of nailing a spot under sail.
Eric
Hi Eric,
Great description of anchoring under sail, but definitely a special interest activity, at least these days. I have to confess that I have not anchored under sail in years.
And good point about fouling fisherman. I used to be very careful of that back in the day when we used a Luke up north.
Hi John
Thanks so much for all the exceptionally well informed things you write about. The anchoring tips are a tremendous resource, I have upgraded all my anchoring gear to suit your recommendations (Spade and Fortress). Yeah for a better nights sleep.
One thing i see as missing …(is there a wish list for this site? ) regards low draw (Led) lighting /spotlights for coming into anchorages in poor weather and for checking at night just how far off the obstacles are when things change. I sometimes come into anchorages at night in poor weather, thick fog, rain etc. Often these same places in BC and Alaska are covered in trap buoys. Low draw high powered handheld and remote controlled spotlights seem indispensable yet i cant find reliable info on what works best . i would be delighted to hear your thoughts on this subject and read others experience.
Cheers
Jake Fraser
Soleil Sans Fin
Hi Jake,
I have to confess that, although we carry both a LED hand held spot light and an old but very powerful 12 volt unit, that I don’t have much experience on the subject since I have long had an abiding hate of night approaches.
My approach is to either heave-to offshore until dawn, or plan the passage to arrive after dawn. This often means doing an overnight, rather than a long day getting in at night, but Phyllis and I still find that preferable and less stressful.
Here’s a post by Colin on the same subject: https://www.morganscloud.com/2013/01/04/landfall-cape-verde-islands/
Hi Jake,
I also have had little use for my spotlights over the years, but also recognize the limitations of the venerable one’s I own. I would appreciate it if you could post what you discover in this realm and I will do the same.
Thanks, Dick Stevenson, s/v Alchemy
Jake, Dick,
For handheld led lights, I would look into these:
https://www.ledlenserusa.com
You will be blown away with the brightness and range.
For headlamps, Petzl is a quality product too:
https://www.petzl.com/US/en/Sport/ACTIVE-headlamps
For a solution that can be fixed on deck or a couple of meters up the mast like I have, check the lights sold for automotive auxiliary high beams – a lot cheaper than anything sold as ’marine’, low draw, amazing luminosity.
Quite easy to fix a mount that you can tilt and rotate.
One example from amazon:
https://www.amazon.com/Nilight-Driving-Waterproof-Off-road-Warranty/dp/B07D5S1SF5/ref=zg_bs_15730331_9?_encoding=UTF8&psc=1&refRID=MYH75HPBC1SRA06E8B2F
Good day John and thanks for another great article.
I’m happy to say our anchoring technique is virtually identical to yours, except that we don’t have a clutch on our windlass, so I do need to feed it. That said, I’ve become reasonably familiar with it’s speed an can achieve the desired result of laying down the chain without applying load under most conditions.
My question is actually related to the question: “…how hard to set? Our rule on Morgan’s Cloud is that if we plan to sleep, the answer to that question is always at the same rode load as imposed by 30-knot winds with higher gusts. In our case that means 1800 RPM (WOT is 2350) on our 87-HP engine turning a big three-blade MaxProp, or a bit over 1000 pounds of rode load.”
That has been a long-standing question for us!
We have a Hanse 400e (40′, 18,000 lbs displacement, Yanmar 3JH4E ~40hp)
Not knowing any better, I incrementally increase RPM until I hit 2,200 which I’m betting is a lot more than I “need to”
How do I determine that right number for us?
i.e. How do I determine rode load (mathematically, as I don’t have a strain gauge/load cell, etc.)
Kind regards,
Carlos & Maria
S/V Rocinante
Hi Carlos,
There’s a link under Further Reading to a good resource for estimating setting load.
Thank you John.
Once again, I have learned from your post. I always enjoy the comments from your knowledgeable readers.
Do you have words of wisdom when anchoring in the Mediterranean style. I had my first experience when chartering in Grease. Unless the wind was coming directly from astern, or directly ahead and (perpendicular to the cement dock) it is difficult to prevent the bow from shearing off when you need to place your boat in a spot that looks about 2 feet to narrow. The charter yacht did not have a clutch, so you could only let the rode out at the speed it wanted. I saw many timid sailors miss under good conditions. From on the dock it is very entertaining. On the boat less so. Slowly drifting back to set the anchor was not an option. I tried dropping the hook and decisively backing to keep steerage. Slowing the boat just before making contact, with occasionally a burst of forward thrust to save the stern. After securing the stern, I would then test the anchor with the windless. I did not sleep soundly if the wind piped up even a little. This worked for me but there must be some additional techniques to make it more secure and less stressful.
Best Regards,
Ray
Hi Ray,
Yes, med mooring is a challenge. Add in a windless without a clutch and it will be doubly so. One tip is to set the anchor further out than most people do so that you can set it prior to getting close to the other boats. That’s what I have always done, but it does require a long rode.
The other advantage of this is that once the anchor is set, you can have the foredeck hand check the chain to straighten the boat out if the bow falls off. Add this to an understanding of prop walk and wash (see the our Coming Alongside Book) and even a cross wind approach gets a lot easier.
Re “understanding prop walk” and Med mooring (in the Med we call it “roman-catholic” mooring…)
Given you have a right-hand prop, a straightened chain and prop walk will support you if the wind comes from port. When from starboard you need to account for this by going above the windward neighboring boat, thus possibly putting your chain across his chain…
I do not have a good recipe that always works, but what I usually do in such a situation is to accelerate backwards as much as possible, then idle out to remove the unfavourable prop walk and straighten out just by steering alone. But heaven help when the chain comes tout and stops me cold – no way to recover except retry from beginning.
Hi Ray,
Yes, Med mooring is a challenge and great entertainment for those ashore. We survived our 5 years in the Med, I suspect, with mostly luck.
A couple of thoughts:
Lots of fenders: boat to boat, the fenders do not take much of a beating and we had inflatables (although in actuality they are quite robust) which are quite light as well as the more common robust ones: 4 of each, all oversize on a 12m boat.
If other moored boats around, as a head set: think that you are rafting rather than trying to thread the needle between a couple of boats (pick the raft boat side depending on the wind). Threading the needle one can get cross-wise and T-bone with your stern: when you approach with rafting in mind, you are more likely to come alongside and work your way in with warps and manpower: less elegant and slower, but much safer and most skippers of the “rafted” boat had no problem with my doing so: they recognized the wisdom perhaps. And you are essentially rafted in the end anyway.
Med mooring is mostly a challenge because one is backing in. When I was in a protected harbor and thought the weather was settled, we sometimes went in bow first using our stern anchor. Were we to have committed to a full time Med stay, I would have significantly beefed up our stern anchor system (which also would have been a help in the numerous deep anchorages where you stern anchor and tie ashore), and made my bow much easier to go ashore from (some EU boats have a very convenient “walk-thru” pulpit). One down side of bow-in is that some of the fun is the community feel of having your stern right on the wharf where everyone is promenading and right next to the neighboring boat’s sterns where they can easily pass drinks to you: privacy, for sure, is enhanced however.
Good luck and enjoy the Med: they are wonderful cruising grounds.
My best, Dick Stevenson, s/v Alchemy
John, Excellent article!! Now i know why i’ve been misjudging my final resting point and end up to close too other boats,,,,i’ve likely been dragging anchor before it set!! –> Hey, you didn’t mention when you set your snubber in the sequence above. Do you add the snubber after your satisfied about your “set”. 30′ of snubber can mean 6:1; not 5:1. If your snubber is say 30′ and you want 5-1; would it be good idea to do 5-1 minus 30′; get your set accomplished, then add the snubber?? This article is very helpful to me and worth my year subscription!! I look forward to your response.
Thanks
Jim
Hi Jim,
We have a massive chain stopper, so we put the snubber on when we are all done setting. That said, we still use at least 5:1 and then, if adding the snubber would get us too close the another boat or the shore, we pull in 30 feet of rode and then set the snubber, so we end up back at 5:1.
Bottom line, we never want to be compromising proper scope during the set.
And thanks for the kind words. Always great to hear that an article has solved a problem.
Hi John, Dick, and Ernest,
Thanks for the additional feed back. I will try to get back to the Med one year.
Good advice as usual on AAC.
Best Regards,
Ray
All good advice that I often do not follow. When cruising in inland waters with crowded anchorages and very rarely wind in the anchorage, I rely on 4 to 1 scope with my spade and verring out more if the wind pipes up. I don’t sail in Newfoundland. I often set the anchor going forward, especially when anchoring under sail when there is insufficient wind to lay the boat back enough to set properly once we are head to wind. With plenty of wind, of course, we can set drifting astern with jib furled and main dropped. I would like to know the drawbacks to the first set going forward under power, because I do that regularly too and don ‘t want to appear lubberly.
Hi Terence,
I agree, with these new anchors doing everything as perfectly as I detail in the article is not required 90% of the time. That said, I think that at least knowing how to do it in a slow and methodical way as outlined is important since the day inevitable comes when a more casual approach does not work, particularly if cruising father afield. Given that, the reason for not going ahead while setting is that once that becomes acceptable where does one stop, how much speed is acceptable? Just better to be stopped before dropping.
Excellent basics. ONly one comment:
14. After straightening the line, in mud, I would not let it drag more than about 20 feet under light pressure before starting over. The reason is that I have dove on many, many set in the process of testing and writing my book. The most common cause of scatter in anchor testing data and dragging seems to be the anchor coming across a stick or other trash that deflects the rode up and prevents proper burying. The more the drag-in distance, the greater the risk. At least on the Chesapeake, if a new generation anchor dragged farther than 10 feet, there is stick under the chain or lodged in the fluke.
I know it’s a pain, but if the hook does not set quickly, either it fouled or the bottom is so soft that you may want to let the anchor soak for 10 minutes first, next time. In fact, there is demonstrated science that in soft mud, letting the mud consolidate around the anchor and setting in phases, 20-40 minutes apart, can pay big benefits in holding capacity and setting depth.
Staring at anchors setting has made me a big believer that if the anchor does not bit almost immediately, something isn’t quite right. Rocks are a different case.
Good point. I know with my Fortress (at least the bantam-weight Fortress FX-37 I used on my first boat would set quickly enough, but I would literally pull on the rope rode to “feel” it go in before backing down gradually. No failures. Harder to do with a 30 kg. SPADE, though.
Hi Drew,
I agree that there is no point in dragging the anchor around:
As to soaking, that’s interesting. As I say in the piece, I have never had a lot of luck with doing that, but then I have not tried it much either. The reason being that in our usage profile, and I suspect most wide ranging cruisers, we are usually anchoring at the end of the day with only a little daylight time left, so I have found it generally better to use that remaining time to find a better location. It’s amazing how the substrate can be completely different at another anchorage not far from the first. And with experience we have become reasonable adept at figuring out where to move to. For example, often a soft mud setting problem can be solved just by moving further away from the mouth of a stream.
Moving is good.
Regarding the effects of time, the affect of setting in stages has been studied by oil companies for platforms. They have also studied the effect of mud consolidating around an anchor over time; we have all observed that in mud they get better (more suborn?) overnight.
I did a bunch of tests where I set anchors either immediately, after a soak, by letting the wind work on them, or in stages. The latter two, particularly if the wind is a little gusty with 10-15 minute rests in between the stronger ones, are far more effective than immediate power setting or soak-only in soft mud. What I have learned for very soft anchorages is to let it soak for a few minutes (this just means taking my sweet time getting back to the cockpit), set lightly (a little over idle), wait 30 minutes, and then back down good. The down side is that if it fails the power set, you need to start over. Everything is a compromise. But not only does the anchor set more strongly, it sets in a far shorter distance, because it digs more steeply.
Yes, I could move, but often the muddy little cove is where I want to be. So I’ve practiced and learned soft bottom anchoring.
On Tumbleweed, when calculating proper rode scope, we take care to factor in the slope of the seabed. When calculating scope, instead of using the water depth at the point where we drop anchor, we use the maximum depth along the expected swinging circle (this is one reason we survey the full circle as John does).
Consider an example on a seabed with a 10% slope. The depth where the anchor is dropped is 10 meters so 50m is put out for an expected 5:1 scope. But at the deepest point along the swinging circle the depth may be 15m, resulting in an actual scope of ~3.3:1 should the boat swing that way.
Hi Morgan,
That a good point. We too are much more careful about scope if the bottom is sloping. That said I had never really thought about the mathematical effect. Hum, gotta think on that…
I guess the actual scope ratio only changes that way with slope if said slope is constant at the point the anchor is set? So for example, if there’s a flat shelf at the set point, as so often happens, the scope will not change. But then again, the slope might be steeper at the set point, making things much worse than a survey with the sounder indicates.
Either way, we really try and avoid steeply sloping areas even if it means anchoring further out in deeper water. And if there really is no other choice we will use shore fasts so that the slope becomes a benefit, rather than a problem.
How to Anchor a Boat in the Caribbean:
1-Before entering the anchorage remove any remaining items of clothing.
2-Motor to a point directly upwind of the other boats.
3-Drop the anchor and a pile of chain on top of it.
4-Go below and begin warming up her motor.
Thank you John for laying this out in such detail. Very eye opening. Every other piece on anchoring technique I’ve read (there’ve been many!) has focused on letting chain out slowly. And not once before has the equation been made between wind pressure force and back down RPM. This page alone is worth years of subscription fees!
Hi Chuck,
Thanks for the kind words. Also, I had not realized that other anchoring texts advocate for veering the rode slowly. That certainly explains a lot of the failed sets I see out there.
We have a bowsprit which increases both the windage and the effective lever arm on the headsail thus she always falls off the wind, sometimes rapidly. Add the complication that the current is usually not in line with the wind and it becomes a big challenge to keeping any semblance of control. Worse is if the rode is now putting a sideways load on the bobstay because of the angle. I have often resorted to letting the anchor load up “too early” to try to get somewhat oriented while falling back. I have not found a solution to this but am all ears for any advice. Thanks, Frank. s/v Grace, a Hans Christian 41T.
Hi Frank,
Near the top of this comment thread, I mention how I prefer to do it if it’s windy, which is to intentionally put the boat beam on the wind to reduce drift speed and improve drift direction. It also tells me very clearly when the anchor starts to grip and how good the first grip is (by the rotation of the boat). This may work on your boat too, but it’s not certain. Some monohulls, especially if equipped with twin furling head stays, tend to not stabilize beam on, but rather want to go on a reach, which won’t work well, of course.
Hi Frank,
Two thoughts.
First off, it’s only natural to want to keep “any semblance of control”. I get that. But in fact, as I say in the post, in most cases there is no reason to even try, other than using an occasional burst of power, as I also explain in the post. The point being that giving in to our natural desire for control is the cause of a lot of set failures.
Second, the key to managing the bow sprit is going to be making sure the bow falls off away from the side the anchor is stowed, so the chain does not drag across the bobstay. To do that you can make the approach with the bow a bit off the wind away from the anchor.
The other thought I had is that maybe you have the anchor stowed on the opposite side from the way the stern kicks (prop wash) in reverse. If so, things will get a lot easier if you move it to the same side. For example, if you have a right hand prop boat (stern kicks to port in reverse) you should have the anchor stowed on the port side of the bow sprit. Of course that might not be possible, but if you can do it, it will make things easier.
Hi John,
This is a delayed response to your article, but we needed time to try this technique which was new to us. I just wanted to follow up and report that since we began anchoring in this way, we have gotten a good set first time every time, even in a spot in the Chesapeake that has always proved difficult because of the soft mud.
Thanks,
Alan
Hi Alan,
Glad it worked for you. Hearing that makes the effort to write this kind of article all worth while.
Hi John. Great post! We’ll be needing your valuable tips because we intend to spend a winter on the coast of Brittany, France. In your post you mentioned you’ll be writing about chain marking but I can’t find it. I’m considering an electronic chain counter – wireless with control buttons for the windlass. Any thoughts on that?
Hi Rob,
Post on chain marking on the way in two days. I don’t like electronic chain counters because I think I’m right in saying they require the anchor to be let down with the windlass, rather than run fast with the clutch, a bad idea for the reasons I explain above.
I wonder about the formula “rode load in pounds=HP x 22.5”. With my 30 hp 3HM35F Yanmar engine turning a 17×10 2 blade fixed propeller and a transmission ratio of 2.14 in forward and 2.50 in reverse, I get a measured load of 300 lbf at of 3500rpm. That is similar to the result of Panope (post #106 of https://www.cruisersforum.com/forums/f118/videos-of-anchors-setting-155412-8.html#post2017280) who measured 375 lb at 3500 rpm with his 40 hp Yanmar 3JH3E.
Hi William,
That equation is a rule of thumb, not definitive. Way too many variables around props to expect it to be dead accurate. Still, I’m surprised that it would be that far off. It’s pretty commonly cited. I will have to look further.
Two other sources of measured sailboat reverse thrust data I know of are http://www.propelspecialisten.dk/download/segeln_magazine_test_2008.pdf
and
https://www.yachtingmonthly.com/gear/folding-and-feathering-propeller-test-29807
There is also a Cruising World article
https://books.google.com/books?id=yJv58Lx1rhIC&pg=RA6-PA63&lpg=RA6-PA63&dq=cruising+world+bollard+pull&source=bl&ots=BH-eCbeWsQ&sig=js4PTycRHPyenMSzbBzEudgu04w&hl=en&sa=X&ei=2bmVVYTjDMG7-AGVk6eIBg&ved=0CCQQ6AEwAA#v=onepage&q=cruising%20world%20bollard%20pull&f=false
I think the real problem is that in reverse the transmission ratio leaves the propeller turning more slowly than in forward.
Bill
Hi Bill,
I will take some time to look at the links. That said, note that I do say in the post that one must calculate actual HP going into the water using the engine/prop power curve, so that takes into account the reduction gear.
Don Jordon advocates anchoring from the stern on a bridle similar to the Jordon series drogue set up. (Without the drogue) in storm or hurricane situations. I have not seen it commented on or discussed anywhere else. Any thoughts?
Hi Davidson,
We have discussed it several times in the comments. General conclusion was interesting in theory, but not very practical for a whole bunch of reasons including rain driving into the companionway, and wave slap on the transom, as well as a lack of adequate cleats and fareleads on the stern of must boats.
The one thing we have difficulty with was not addressed, Once a spot is selected how do you stop on the mark? Under 2 kts there is no steering and the boat gets blown off the wind to one side or the other. I have no trouble with a mooring or dock where you will have an external force to keep you there and can hit the mark at a knot or so.
Hi Amanda,
Good question. I’m assuming that you mean before the anchor is dropped, not after, since I do cover the latter? And you are right that it’s hard to steer under about two knots, at least if the wind is over say 15 knots.
The key to this is to keep the speed at whatever you need to maintain steerage way until the very last moment before drop and then sting it in reverse hard to stop the boat. Most people are way too tentative with reverse throttle and that’s where the fundamental problem generally lies.
Or to put it another way, if we are willing and used to using enough reverse throttle, we can approach fast enough to maintain steerage way, without overshooting the marf.
Also, as explained in the article (#5), we need to compensate for the expected prop walk as we approach.
One final thought is don’t worry if you miss the intended spot on the first approach. Like docking, there is no shame in going around and starting again. I have often made at least three approaches, and occasionally more, before getting it right in a tight anchorage when it’s really snorting.
Hi there! Quick question about the setting process. My partner and I have a Catalina 350 with an electric windlass, 5/16 all chain rode, and a 30ft snubber. When we have set the anchor in the past on other boats, we have back down on it without the snubber attached yet. This current boat does not have a chain stopper (other than a small cleat in the chain locker which I don’t think is meant to be backed down on). Would setting the anchor hard using the snubber make sense here? Suppose we want a 7/1 ratio in 10 ft of water. We’ll let out 40, attach the snubber and let out the last 30. We’ll allow the chain to straighten out and then, when we are clear we are not dragging at light rpms, well let out some more chain to put the weight on the snubber and then follow your procedure to back down hard on the anchor. Does this sound reasonable?
Hi Andrew,
Sure, that’s a good solution in the absence of a chain stopper. Just make sure you stand well clear of the snubber in case it lets go.
Also, You may want to veer the entire scope and then attach the snubber, set, and then shorted up by moving the snubber, since if you do it the way you detail the boat may load the anchor on short scope while you are attaching the snubber and spoil the set.