

Those of you who have been readers for a while know that I’m a bit of a tool freak. That said, like most cruisers, I also tend to be conservative about stuff that costs money (cruising is expensive enough without being frivolous), takes up space, and adds weight to our boat.
And I like to think that after some five decades of maintaining boats, I’m pretty smart about balancing those conflicting needs well.
But this year I have been engaged in one of the most complex projects I have ever tackled—more details in a future article—during which I upgraded four of my tools.
And after using those new tools I realized that I should have bought them years ago, since they add to the quality of my work and make it go more quickly and easily, too—truly a win, win.
Here they are:
Knipex “pliers wrench”… Cannot imagine life aboard without them. A 5” size pair lives in on a strong magnet in the galley as the world’s greatest pot grips (we use a lot of no handle pots) and is constantly tasked with pliers and wrench like duties throughout the boat – marital harmony required a second pair (actually we have three different sizes in stainless aboard). One of those tools that once you have one, one can’t really imagine life before… Expensive but worth every penny: eg/see https://www.amazon.com/KNIPEX-86-03-250-SBA/dp/B005EXOK22/ref=asc_df_B005EXOK22/?tag=hyprod-20&linkCode=df0&hvadid=309811990469&hvpos=1o2&hvnetw=g&hvrand=16233023170579375023&hvpone=&hvptwo=&hvqmt=&hvdev=m&hvdvcmdl=&hvlocint=&hvlocphy=9057137&hvtargid=pla-491566793747&psc=1
Hi Christopher,
Looks like a nice tool. The only thing I worry about with tools like that is the temptation to use them in places where a properly sized wrench or socket is the right solution. That said, that’s more about self discipline and good tool skills, rather than the tool itself—definitely something I have had to work at over the years.
I whole heartedly agree with Chris. I am a plumber by trade and stumbled upon those Knipex smooth jaw pliers about 6 years ago. They are unique for pliers in that they have a high leverage cam engineered into the design. So when you are squeezing the handles to apply torque your squeeze on the object is multiplied. And you need that since they are smooth jawed with no teeth to bite. Not only are you leaving the work surface undamaged (huge plus!), but the added leverage makes rounding over corners a non issue. Add a hard chrome finish for rust resistance and you have a serious professional tool. In fact, they can almost replace adjustable wrenches. I can’t recommend Knipex enough, especially their “Cobra” line of pump pliers.
P.S. I own the 300mm version of the pair Chris provides a link to and if you can only buy one size, that is the one I recommend. Cheers, Marc
Hi Chris,
Interesting, I had not seen these. A sort of parallel tool that I really like is a locking crescent wrench. It is less likely to round off, you can let go of it, it is great for 1 person jobs and it is easier to take it on and off as you don’t constantly need to adjust.
https://www.amazon.com/Stanley-85-610-10-Inch-MaxGrip-Adjustable/dp/B00009OYGZ/ref=sr_1_8?crid=6PEUN7N211J9&keywords=locking+crescent+wrench&qid=1578332323&sprefix=locking+crescent+%2Caps%2C137&sr=8-8
Eric
I’m also a strong vote for Knipex. I find that often I need 2 wrenches of the same size and there’s only 1 in the set, of course the socket is somewhere far away or in use. I can keep 1 Knipex (personal fav is the 250mm) with the wrench roll-up and cover 95% of all use cases. To John’s point about the right tool at the right time, if you’re not turning with them and only holding your options are wide open.
Torque wrenches -truly indispensible for high performance and therefore highly stressed equipment. I moved over to an electronic one that sits between wrench and socket and was a much, much cheaper and also space saving solution. And before I atacked any crucial tasks I checked the calibration – spot on.
Hi Trevor,
That’s interesting. I did not even know there was such a thing. Could you link to an example.
e.g.
https://smile.amazon.com/ACDelco-ARM602-3-Digital-Adapter-Audible/dp/B004VYUKTC/ref=sr_1_2?crid=3VGX5I8XLFMBK&keywords=3%2F8+torque+adapter&qid=1578679484&sprefix=3%2F8+tourque%2Caps%2C213&sr=8-2
Hi James,
Thanks for the link. Certainly an interesting alternative. I think that I will stick with my wrenches though since I would worry that adding that gadget would make accessing some of the tighter areas on my boat more difficult.
Emphatic yes to 0.01g digital scales; this has made a significant difference to epoxy mixes (that and an eye-dropper for part B). My must-have tool? a “resin disk” to fit a brushless Ryobi 18V grinder—I have a wood boat and this $12 AUD tool, plus cheap 80 grit disks, is the wood-shaper sans pareil.
@trevor allen—can you link to the electronic torque ‘inter-wrench’?
Kit, there are numerous “torque wrench adapters” out there in the wild, just google for this term. They work based on a simple wheatstone bridge which measures the elongation of the wrench extender which is the main part of the adapter.
Note that these adapters give you a more-or-less accurate reading of the force you currently produce, but they will not stop you over-torquing the bolt as they just _show_ the torque, they do not limit it as a “real” torque wrench does.
You might want to look here https://youtu.be/XSsvcNtUGtA for a disassembly and explanation (had a good smile when looking at the video)
Hi Kit,
The eye dropper is a great idea. And I love the Ryobi grinder I just got. Have to look into the resin disk. Could you link to the one you use?
Hi John,
Nice addition to a niche of cruising where light is rarely shown.
Someone correct me if I am wrong as I am well out of my pay grade, but another reason for achieving the correct torque is that the accumulated sheer strength of numerous bolts holding, say a chainplate up against a fiberglass hull, is far less important than the friction generated between the surfaces of the chainplate against the hull: friction that is largely dependent on the torque of the bolts.
This flew against my assumed initial understanding (that the sheer strength of the bolts was the important element), but emphasized to me the import of correct torque.
My best, Dick Stevenson, s/v Alchemy
Hi Dick,
You are right, and like you I was surprised when I learned that. More coming in another article on the rebuild of my JSD chain plates that I just completed.
Dick/John,
You are correct, but it is far more complicated than that and depends on several factors. Realistically, with a chainplate on an FRP or Al hull you will never tension a bolt into it’s elastic limit without damaging the hull, so technically you are still in a ‘snug tight’ state, so the ultimate load capacity will be determined by some combination of friction and shear, though with adequate backing plates on Al you’d be close.
As John alluded to in the article, it’s very hit and miss trying to ascertain bolt tension from torque in the field on used equipment, outside of a controlled factory environment where thread condition, surface coatings (zinc is slippery under load), lubrication, ambient temperature, etc are all known, it’s really very much a guide only. Many bolt heads have popped off long before the supposed required torque has been reached, usually due to over lubrication.
As an aside, if ever taking the head off of your engine, always replace the bolts with new ones as these are factory installed with a controlled ‘torque plus angle’ method that takes them just past the elastic limit into plastic deformation, hence they are ‘overstretched’ once used.
Hi Dan,
Good point. I will be writing more about chainplates in the future and will look forward to hearing your obvious expertise then. (The only reason I dare write about such stuff is that I know we have members with real expertise in these areas who will correct any of my mistakes before damage to others is done.)
Trying to hold a shear load by the shear strength of the bolts is very bad design. In practice, it is very unlikely to get more than one or maybe 2 bolts to load in shear (run out of hole slop) at exactly the same displacement so any other bolts are just decoration.
And you can always design proper stretch if one is determined enough. This can run into things like necked down bolts to get a “soft enough” bolt. Remember a critical rule of bolted joints: the joint needs to be stiffer than the bolt. Therefore o-rings in grooves make for a better bolted joint than cork or paper gaskets. Ad nauseum.
Hi Dan,
In a straight section of an aluminum hull with a proper backing plate it should definitely be possible to clamp hard enough to hold by friction but I share your concern of doing it with FRP. FRP also has the nasty little habit of creeping so it takes some pretty careful design to end up with a sufficiently high tension over time.
To deal with the variability in K factor, I am a huge fan of doing some form of known lubrication and adjusting torque appropriately. When I was doing large industrial machinery, every fastener had a prescribed application of a specific anti-seize. With my current company, at the urging of a few of us, every single fastener gets a weak loctite unless something else like a strong loctite or a grease is required. The advantages are: better known K factor, greatly reduced corrosion concerns for service and less chance of a poorly designed joint having the fastener(s) back out (unfortunately there are way too many examples of this, bolt stretch length seems to be often forgotten).
Eric
Hi Eric,
That’s interesting. What K factor do you use for a light application of loctite? I ask because I’m a total fan of the stuff but was not able to find any good data on the change in torque for loctite.
On attaching a chain plate to GRP, what about attaching a good size G10 backer plate on the inside with epoxy? At least with G10 we know the deform load and it seems to me that this would spread both the crush load on the laminate and distribute the forces over a larger area of the hull. Should bond well to the hull too. Of course all core, if present, would need to be removed and the laminate built back up.
Hi John,
For the level we are talking, probably the easiest thing would be for people to use Loctite 243 as a general purpose. Some people switch to 222 for bolts under 1/4″. When applied per their instructions on a stainless bolt, a K factor of 0.2 is reasonable for calculations. I then combine this with shooting for 75% of yield strength of the bolt. Loctite actually publishes values for their anti-seize compounds and most have a k factor around 0.15 but there is some variability. Certain greases can get it down to about 0.1 but I haven’t ever seen lower than that.
When I am figuring out torque on a fastener, I look at a few things. Realistically, once you do it a few times and learn the rules of thumb, you can skip most of this and only calculate for the close cases.
– Bolt tensile strength (for most types you just look at shank stress but there are some you need to look at popping the head off)
– Bolt head torque capability (hex drive flat heads and pan heads typically are limited here)
– Bolt thread stress
– Mating part thread stress
On attaching to GRP, as you point out with proper design it is possible not to crush the matrix (most designs will always have a bit of local crushing). My concern is maintaining the bolt tension over time. The amount that a bolt elongates when tensioned is actually pretty small so a small amount of creep can take this tension way down over time unless the bolt is really long and the fiberglass really thin. 2 tricks that I have used when confronted with this is to require retensioning as part of a yearly PM program (preventative maintenance) and to put a spring into the system such as the appropriate stack of disc washers under the bolt head but both of these require calculations to make sure they will work. It is not that it isn’t doable but it is trickier to get right.
Eric
Hi Eric,
That’s great, thanks very much. Good tip on bolt tension over time. I just added and upsized the bolts on out JSD chain plates and had to set the torque four times over two days before it stayed at the desired setting. I’m guessing this was because I have a thin layer of BoatLife between the plate and toe rails for isolation. Based on your comment I have just made a note to torque again in the spring.
Another question: The more I learn about this, the more I understand that there is a lot of uncertainty and that only gets worse when laminates are involved. Do you have a feeling for a good safety margin on shear failure in these cases? I have found a good calculator online (see further reading) but obviously it’s only going to be as accurate as the inputs, so a hefty safety margin seems indicated.
Hi John,
Yes, there is a lot of uncertainty. A lot of the work that engineers do is to understand that uncertainty and make sure that in a reasonable worst case scenario, the uncertainty can’t cause a failure. Tolerance analysis is one example of this and structural analysis is another example, you should always run the nominal case but you also need to run other cases as well. Sometimes things are well known, when I did air compressors, the loads were just based on air pressure and there are multiple safeties to limit it whereas if you are designing something like JSD chainplates, the actual loads are not well known and you hope Jordan was conservative enough.
Is your question what we should use for a safety factor in a shear joint when the exact laminate is not known? Assuming I have this right, I generally do not apply a single safety factor to account for everything, I apply known factors as possible and then a much smaller safety factor that deals with the uncertainty.
The way that I work is to first understand my loads (converted into stress) and if fatigue, wear, corrosion or anything else is involved. Then, I understand my material properties and calculate a stress limit that represents the maximum stress you can apply before it would fail with all of the other stuff going on like fatigue. Examples might be if it is steel and in fully reversing fatigue, the stress limit will be ~50% of the yield strength and there may also be allowances for temperature, corrosion, wear, etc. Finally, I apply an appropriate safety factor between the load and my calculated stress limit. If the loads are well known, the material is well defined, and the part(s) are reasonable to analyze, I might run a safety factor as low as 1.5. Other times it might be 3-4. I have parts where my calculated safety factor is 1.5 and the static safety factor if you just look at stress and yield is over 5:1 and this difference is due to the knock down factors I am running on the material strength. Because I work in regulated industries, it is very rare to be able to run a static safety factor below 3 on anything but that is a pretty simplistic way of looking at it.
One rule that I work to with bolted connections is that I try to have the preload on the connection be double the expected separation force but there are times where I have intentionally run much lower numbers. If the force was not well known, then I would increase the preload.
Given the stated problem, I would tend to assume a pretty weak layup and then run a reasonable safety factor like 3 to yield and see where everything ends up. Sometimes you find that you end up with an unreasonable design and then need to start sharpening your pencil and moving past very general calculations and other times it is reasonable and you just build it.
Eric
Hi Eric,
Thanks, that’s exactly what I wanted to know. And well explained. What we don’t know, unfortunately, is what safety factor Don Jordan already applied to his design loads, so we may be piling safety factor on top of safety factor. Still, better that than the other. Anyway, the take away for me is that we need a big safety factor on the laminate sheer and pull through because of the uncertainty on said laminate is much more than on the chain plate or bolts where we can get a lot closer. That really helps.
Ballpark for endurance limit is 50% of ultimate tensile strength (UTS), not 50% of yield though. Good discussion otherwise. 👍
Hi John,
As you can probably guess, I am not a fan of the concept of a design load. For one, I am unaware of a standard definition of it and as such, it is unclear whether it incorporates a safety factor or not. Also, it tells you nothing about whether the the load is cycling or not. For the JSD example, you are mixing several materials and types of loading so a design load which applies 1 blanket static safety factor would yield a design which is quite uneven in terms of how close to failure all the parts are. For example, if nylon line is used, it has extremely poor fatigue performance whereas the stainless bolts for the chainplates are much better so this should be taken into account. While providing a blanket safety factor applied everywhere such as in a design load or in a SWL can make it easier, it does not result in the optimal design. Doing it the way I like to does take more time and also it can be tricky to figure out certain information like there are a lot of materials people use that do not have publicly available S-N curves or if you think that fatigue could be a concern, actually getting numbers for how many cycles at different loads can be tricky.
Eric
Correction: “many” head bolts are plastically deformed (also known as “torque to yield”). This should be specified in the manual and clearly denoted as single-use bolts. This can also apply to main cap bolts, rod cap bolts and other critical fasteners. But it also may not apply so RTFM or maybe buy an unneeded set of new head bolts.
“pliers wrench”… Cannot imagine life aboard without them. “ thanks Christopher. Did not know what they were but after looking them up I agree!
Hi John, great stuff. I get that electronic stuff is cool but I use dial calipers every day and we bought a digital one years ago from Brown and Sharpe. Maybe they are better now but it didn’t last long in the shop. Don’t get me started on the young guy getting out his phone to do simple math with oil everywhere. Argh!
Hi Carl,
I hear you on fragile solutions looking for a problem but I have now had my digital caliper for a year and it has been flawless. I would guess that someone like you who uses a dial caliper every day would get less benefit from the switch than an occasional user like me. That said, if you have a bunch of comparison measurements to a max spec to make you might find the switch to digital useful.
Hi John and Carl,
In the shop at my work, we have a couple EDMs that machine underwater, and Mills and Lathes which spray water based coolant all over the place, so we use these which are stainless steel with carbide jaws.
They’re more expensive but they last a lot longer in wet places. Many of the machinists and engineers around our shop have 10+ year old sets. (I’m not sure when they entered the market). Keep them in the plastic protective case!
Alternatively, cheap plastic ones, if used carefully are a fine option for people hang fitting things who don’t care about accuracy, but need them to last near salt water.
Hi James,
Thanks for the link to the more expensive version. Seems like a good upgrade in that it’s only ~$50.00 more than I paid for my Mitutoyo. Anyway, good to know that the brand lasts well in a tough environment commercial shop.
I found my electronic scales were too erratic for glue mixing at the marina. I think this is due to the vertical accelerations from waves adding and subtracting with gravity.
With West resin I use pumps which are left permanently in the bottles. On the last pump they can be locked by twisting the nozzle to reduce space and leakage from accidental pressing.
My resin use is infrequent so to avoid the first pump having the wrong volume, I use multiple very small pump strokes to prime them.
Always use the full range of the pump stroke. This can be derailed by the hardener being jammed. The West hardener is hygroscopic and forms a yellow salt in the nozzle. A supplier recommended rinsing with hot water if required.
Hi Mike,
Yes, very much what I have been doing for years. Interesting point on scales when in the water. Definitely something I had not thought of and will need to try before ditching my pumps. One thought, how much did you pay for your scales? Could it be that they were just not very high quality? For example I paid over $100 but I see that on Amazon one can buy them for a fraction of that. https://www.amazon.com/KUBEI-Upgraded-Digital-Precision-Electronic/dp/B07YKCFJHQ/ref=sr_1_3_sspa?crid=13IZTV7IDVNRC&keywords=electronic+scales+for+grams&qid=1578236708&sprefix=elctronic+scal%2Caps%2C375&sr=8-3-spons&psc=1&spLa=ZW5jcnlwdGVkUXVhbGlmaWVyPUE3UTJNRURINFZOQTMmZW5jcnlwdGVkSWQ9QTAzMDA1MjgyQ0IwNzMyQ1BYOFpSJmVuY3J5cHRlZEFkSWQ9QTA2OTM4OTUzU1NKN0lNQzlOQVZFJndpZGdldE5hbWU9c3BfYXRmJmFjdGlvbj1jbGlja1JlZGlyZWN0JmRvTm90TG9nQ2xpY2s9dHJ1ZQ==
I’ve used the same kitchen scales displaying to 1gram for several years.
It was definitely a “floating” problem. I immediately went to land and the display was steady as usual.
What I observed at the marina was the displayed weight (~100grams of resin) erratically increasing and decreasing several grams. The hardener was about 1:4 ratio so this was unacceptable. (I had a strength-critical job and accuracy is important)
I’d also recommend some clear plastic bags or sheets to protect the scale….. and anything else that you touch….. from drips of wet resin.
And plastic drywall taping trowels, 4″ to 10″ wide, a dollar or two each. I’ve had much better success wetting-out fibreglass and epoxy with those than with any of the fancy grooved rollers, etc. that are supposedly meant for this purpose.
Also, a spray bottle of vinegar, which arrests the epoxy curing reaction and makes clean-up much easier.
Hi Matt,
Great tips from someone who has cut more epoxy out of his hair than most. That said, maybe you are neater with the stuff than I am!
West system make a small batch repair kit that includes a small digital scale for about half of what you paid. It is a good up to 100 grams I think. It is great for small jobs (6 – 9 grams) but I have used it for bigger jobs too…..I have my wife mix a batch of about 60 grams while I work on the job and just ask her to mix more as needed finishing off with a batch customized to finish the job with minimum waste. The greatest plus of using a scale as opposed to pumps is no more sticky, drippy pumps which are impossible to store on a small boat without making a mess.
On a separate subject I’m surprised no one has yet sung the praises of one of multitools – I have a Rockwell Sonicrafter with a variety of metal cutting and wood cutting blades which is very versatile in tight locations and because it oscillates instead of spinning is also safer.
Hi Martin,
I didn’t know that West sold such a kit. Way cool. Could you link to it please? That said, the scale would not have worked for me because I was mixing some larger batches of Chockfast.
Can’t find the link but it’s a West System 320 Small Batch Epoxy Scale. On closer inspection the capacity is 600g x 0.1g
Hi Martin,
Looks way cool. Here’s a link to it for others who are interested: https://www.westmarine.com/buy/west-system–320-small-batch-epoxy-scale–8960015
Hi John
I am a tool junkie, and tried to hold off commenting. Didn’t last long!
One of the reasons I need a bigger boat is to allow me to carry more tools. My two suggestions for your list would be:
1. Dremel multitool, cordless version. Not used often, but it can do things no other tool can. Main tool used is the metal cutting disc.
2. Makita cordless angle drill. Up to now the only way to drill/drive in a tight space has been my Festool drill with the right-angle attachment. The Makita allows drill/driving in even tighter spaces, uses the batteries I already have, and costs a fraction of the Festool. It might even be possible to adapt it to use on a winch/windlass.
With difficulty I’ll stop there. ?
Yours aye
Bill
Hi Bill,
Totally with you, perhaps we could start some meetings?
And yes, I have both of those, although different brands.
I bought something called a Milescraft Orbiter that has saved my bacon more than once by allowing me to use either of my Makita drills in tight spaces. The picture says it all. https://www.homehardware.ca/en/orbiter-angle-drill-attachment/p/1210251
The Marina angle drill is great except when the battery gets in the way, – it sticks out a bit so in some situations I can’t place the drill where I need it.
Sorry , spell checker ..
Makita, of course
Make sure to buy digital calipers from good brand and test it. I once got a “software bug” in more affordable ones, when numbers just jumped around.
Hi Taras,
Good point. I have learned the hard way to always buy commercial quality tools. Saves money in the long run.
A worthy subject to be sure, the thing with cruising vessels and tools is you can’t carry every tool, so you need to be selective and choose those that afford you the most bang for the real-estate they take up, and weight they add.
I own four torque wrenches, both inch and foot pound and traditional and digital display. It’s not something I use every day, but when tightening critical fasteners it’s indefensible. These include coupling bolts, head bolts (usually nuts actually), alternator pulley nut, any fasteners associated with steering. I’d recommend using a torque wrench when ever the substrate is aluminum, i’e’ just about everything on an outboard. I’m a dyed in the wool fastener fanatic, I wrote this article on the subject a few years ago, https://stevedmarineconsulting.com/wp-content/uploads/2014/03/Fasteners117_04.pdf and last month, while in Taiwan, I was able to visit a factory that manufactures not only fasteners, but the machines that make them as well. It was fascinating.
I own a version of the Knipex water pump or ‘slip-joint’ pliers as well and would not be without them, ideal for grabbing round surfaces, the design is ingenious, unlike ordinary channel locks, the harder you turn these the tighter they grip. Slip joint or water pump pliers have been around in one variant or another since WWII (mechanics used them to tighten fan belts on vehicles coming ashore at Normandy, they were intentionally left loose to ford the deep water between ramp and beach, preventing fans from “screwing” their way through radiators). Yeah, I’m a tool enthusiast as well.
I too love my Starrett dial caliper, but it hardly ever leaves its case since I bought a General Tools digital caliper, one of the most useful features of which is its ability to switch between several scales, imperial, metric and even fractions.
I’ll add a few of my own, flare wrenches, these encircle a fastener with one additional flat, they are designed for turning hollow flare fittings, and prevent distortion, and for that they are very useful, as well as other stubborn fasteners on which you can’t fit a socket. https://www.amazon.com/GEARDRIVE-10-piece-Standard-Organizer-Included/dp/B07T45MQVJ/ref=sr_1_2_sspa?keywords=flare+wrenches&qid=1578229277&s=hi&sr=1-2-spons&psc=1&spLa=ZW5jcnlwdGVkUXVhbGlmaWVyPUExMzBVV0dFQ083MDhHJmVuY3J5cHRlZElkPUEwODM4NDI3MzZPVTVYRDM3RUhNRiZlbmNyeXB0ZWRBZElkPUEwODk3Nzk4MjZWV0QzSTVSSk9CNCZ3aWRnZXROYW1lPXNwX2F0ZiZhY3Rpb249Y2xpY2tSZWRpcmVjdCZkb05vdExvZ0NsaWNrPXRydWU=
Flush-cut cutters, for cutting wire ties squarely, thereby avoiding the razor-like end. https://www.amazon.com/Cutter-Lightweight-Klein-Tools-D275-5/dp/B000GTMZHG/ref=pd_sbs_469_t_0/135-8683711-2659021?_encoding=UTF8&pd_rd_i=B000GTMZHG&pd_rd_r=69c23934-cf3b-4966-acd9-7f0943fd0368&pd_rd_w=KP9DY&pd_rd_wg=sMvEm&pf_rd_p=5cfcfe89-300f-47d2-b1ad-a4e27203a02a&pf_rd_r=SM7VS53KFMAQ1V7FSYXS&psc=1&refRID=SM7VS53KFMAQ1V7FSYXS
Blackhawk automatic wire stripper, I’ve owned a few auto-stripper and never really loved any of them, until I came across this one at the Boat Builders’ Convention, works right every time, and is rugged, others had fragile jaws that broke if stripping cold insulation, https://www.amazon.com/Blackhawk-Proto-PT-1050-2-Wire-Stripper/dp/B00D0BWAZO/ref=sr_1_1?keywords=Blackhawk+PT-1050-2&qid=1578229456&s=hi&sr=1-1
Hi Steve,
Great comment, thanks. I did not even know why flare wrenches where the way they are, so that alone is great to learn. And I will definitely be getting a pair of those strippers. Like you I have been through at least four of the cheap ones over the years.
Another vote for Klein tools. I’ve worn out a pair of their cutters, and need a replacement. I have also used the Ancor double-crimping tool and Klein’s wire stripper here is excellent for when you’re replacing runs. See https://www.kleintools.com/catalog/adjustable-wire-stripperscutters/katapult-solid-and-stranded-wire-strippercutter
Two items I would put in the “don’t leave home without them” category:
1. 5/16″ nut driver. I use a Craftsman brand (Sears), and it’s indispensable for adjusting most US hose clamps. When I was helping to build a 70′ race boat, one of the boat builders claimed it was the “boat maintenace worker’s #1 tool”.
2. Yes, the flush cut cutters for wire ties are very nice but even better is a wire tie tensioner-cutter, which tugs on the bitter end of the wire tie before cutting it flush. The tension on the tail of the tie causes it to snap back so that it cannot cut you open. They also allow you to vary the tension on the tie so you neither break them or leave them “flabby”. When I look on the giant mail order web site named after women warriors, I see a number of seemingly identical models in the $30 range.
Chuck Hawley
Hi Check,
Good to hear from you. And thanks for the reminder on the on the cutter for wire ties. I have long meant to get one. I suspect it will be another tool I should have bought years ago.
Hi John,
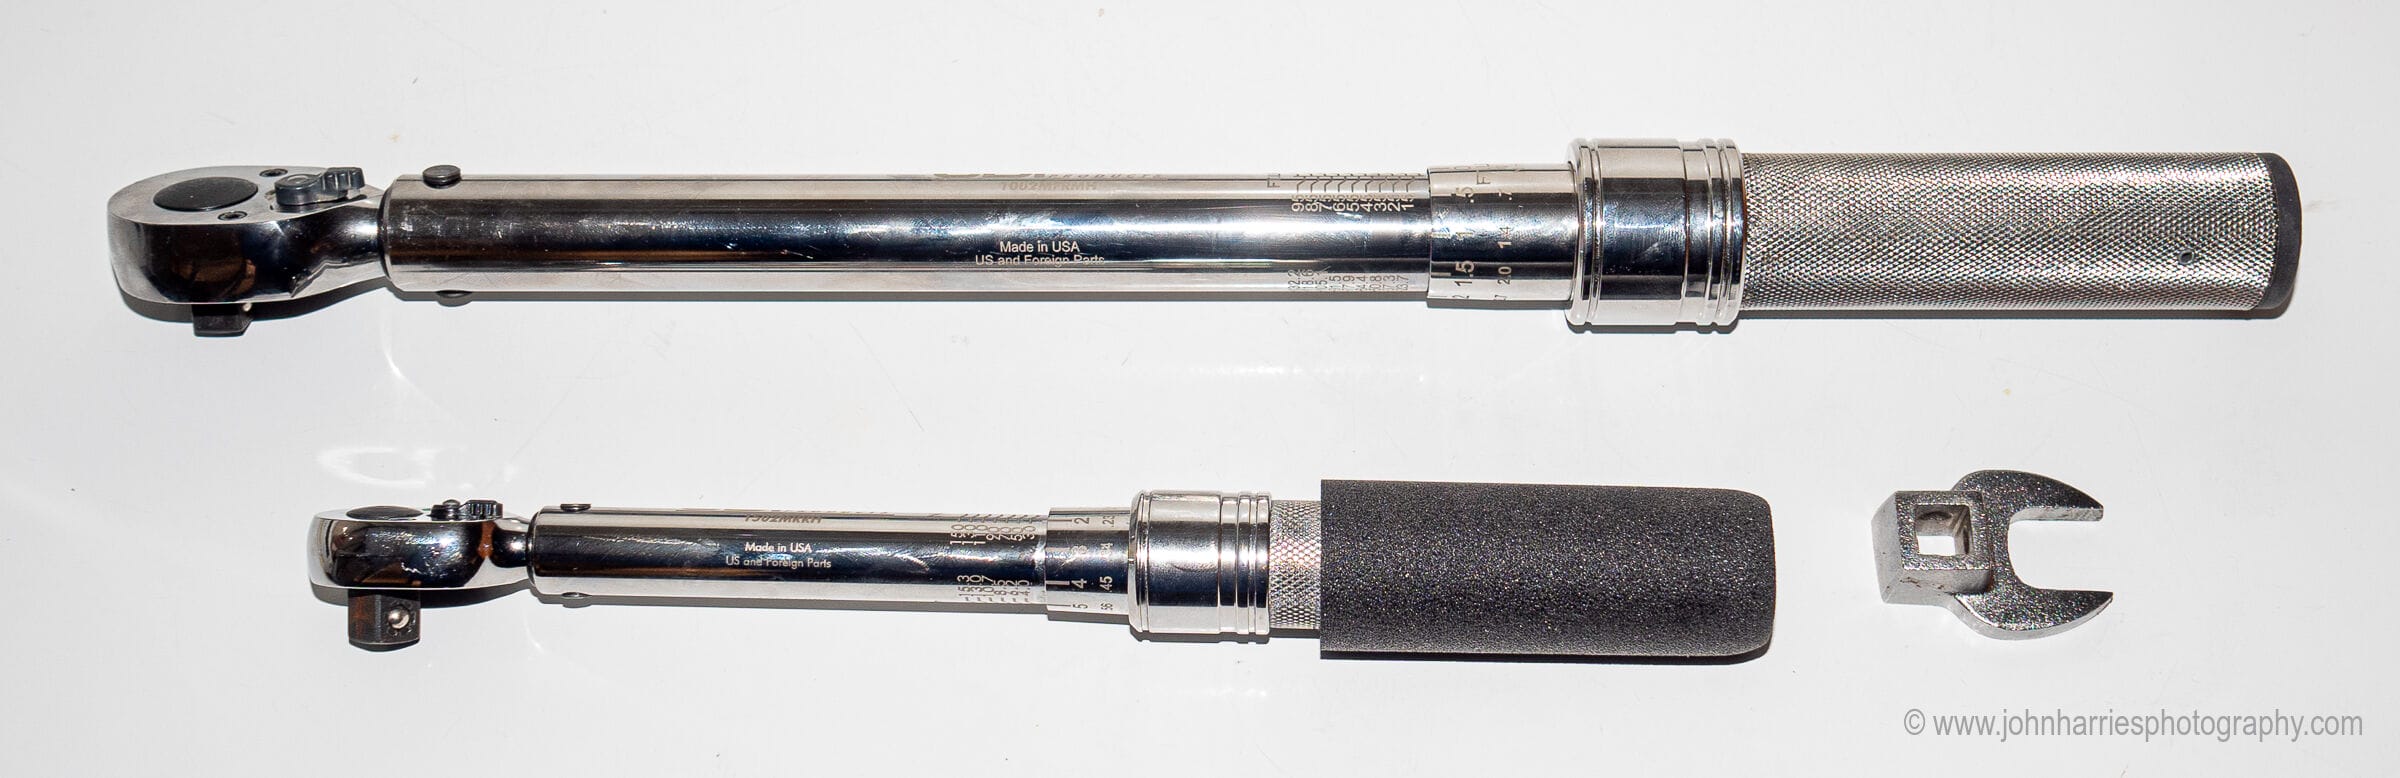
You know that I will agree with your endorsement of torque wrenches. Nothing drives me more nuts than people who point at their arms and say they don’t need them, it is always a sure sign of someone who should stay away from anything precision. The 2 that you have pictured both look like CDI which are the same torque wrenches as Snap On except for the ratchet head if I remember right and they are owned by SO. We run the clicker style 50-250 in lb and 20-100 ft lb CDI’s at work and I like them, for smaller than 50 in lbs, we use Lindstrom 5-40 in lbs torque screwdrivers. At home, I end up with 4 Armstrong’s as I have a bigger one that goes to 300 ft lbs and with these, I have been able to do all boat and vehicle maintenance. In previous jobs, we have had much bigger ones than that but I can’t see needing one for personal use unless you personal hobbies include owning a Cat D10.
Despite having a pretty good tool collection, I still often wait too long to buy something. Probably the worst offender for me was actually getting a high quality tap and die set. For years, I bought them on an as-needed basis because whole sets are so expensive but then I would end up with threads that needed to be cleaned up in a size I didn’t already own and I would be faced with the tough decision of cleaning it up as best I could with a thread file or whatever and then trying it or waiting the day it took me to get the right one. Just 3 days ago, I went to replace the front impact sensor on one of our vehicles and found that there wasn’t clearance for a socket and I have never previously needed metric ratchet end wrenches so a 20 minute job became 30 minutes as I turned the mounting bolt 90 degrees at a time so I guess I need to pick some of those up. Chuck’s suggestion of a 5/16″ nut driver is spot on as well, it took me way too many years to add one to each of the smaller toolkits (boat, each vehicle, etc) that don’t have a full nut driver set.
Eric
Hi Eric,
Glad I’m not the only one to wait to long, and I made exactly the same mistake waiting too long to buy a decent set of taps. That said, one of the things I love about McMaster Carr is that I can get exactly the tap I need in two days, even in Nova Scotia. For example I needed a 3/8″ bottoming tap not long ago, but I don’t think I would ever get to the point that I had a full set of bottoming taps.
McMaster Carr, how do I love thee, let me count the ways. When I managed a boat building shop we ordered from them daily, and I half-jokingly would say that I could build a boat using only materials sourced from McM. I marvel at their inventory, it must be massive, I only very rarely recall them saying they were out of stock on any order. Loved the paper catalog too, it was filled with useful information.
Hi Steve,
The day McMaster Carr go out of business is the day I change boats…to an Optimist Pram.
Hi John,
I too am a big McMaster fan. They had a good website and warehousing figured out so much earlier than anyone else. Around here, it used to be that orders to businesses that went in before 5pm would be delivered the next day and orders to residences would be 2 day so everyone ordered their personal stuff to work, there would already be several McMaster packages anyways. For several years now they have been doing 1 day to personal residences as well so I just get stuff shipped to home. It is worth noting that they are not alone in this fast shipping, MSC is 1 day to my house too.
My only real complaint with McMaster is that you don’t always know exactly what you are getting without calling/emailing them. It is true that a better price is often possible but when the whole package is considered, I find McMaster hard to beat.
Eric
Hi Eric,
I agree, and that goes double in Canada. Their logistics are simply amazing and shipping is a fraction of what it normally is to get something from the US, and they handle all customs brokerage. I think what they do is load a truck every evening with everything going to Canada, drive it to Ontario, arriving in the early hours, and then transfer to Purolator for final delivery. 48-72 hours anywhere in Canada, most often 48.
I’ll add another hearty endorsement for the Knipex smooth jaw adjustable pliers. I was never a fan of channel locks or crescent wrenches, but these are better than the best of both worlds. I have had two sizes on our boats for 15 years and they’re probably the first thing I would replace in my tool bag if it was lost.
Yup, if my tool bag went overboard I’d order two pair of knipex plier-wrenches and then make do with the rest of the tools aboard. Never met anyone who owned them and didn’t think they were the bees-knees / best thing since sliced bread / & Insert you favorite over the top aphorism here
For those of us who have little patches of rust to deal with, my favourite tool is an oscillating multitool with a tungsten carbide rasp tip.
Much less mess than grinding and works better on thinner steel than needle guns. Works best on small corners or patches .
Hi Philip,
Yes, I love my oscillating tool. Another one I waited far too long to buy and now would not be without.
The Multimaster knock-off I got from King Canada for $99 several years ago is still going strong. My next abuse of it will involve peeling old parquet off the pilothouse deck to replace with Lonseal. I’d buy the real Fein product if this was an everyday sort of job.
Retractable claw tool. I knew of this tool for a while, but I didn’t think I necessarily needed one onboard. Then, I had a specific need that no other tool I could think of could satisfy: in replacing the gooseneck fitting on my mast, I had to carefully guide 6 new fasteners through a 1″ access hole in the forward side, and into their holes and through the fitting on the aft side (I have a round carbon fiber mast, so there’s quite a distance to go). I used socket head fasteners so that I could tighten them at an angle, and to prevent them from falling into my mast, I used electrical tape to keep them attached to the very long ball end allen wrench I had purchased for this project. Of course, I totally overlooked the fact that once they were all in place, I would have to somehow REMOVE that tape before I could re-insert the allen wrench to tighten them down! After a hopeless attempt with my longest set of “long reach” needle nose pliers, I picked out a retractable claw on amazon. Once it arrived, I was shocked to discover that it lights up! A brilliant addition to such a tool. I’ve since used it to grab dozens of things that would have otherwise taken me far longer to recover. Definitely not marine grade, but when it rusts, I’ll happily buy another.
https://www.amazon.com/gp/product/B00275F5I8/ref=ppx_yo_dt_b_search_asin_title?ie=UTF8&psc=1
Also:
Bluetooth bendy endoscope camera. This made the gooseneck project possible. There are dozens of these available, IMO absurdly cheap given what they can do. As long as you have a smartphone handy, you can see the inside of pretty much anywhere on your boat.
https://www.amazon.com/dp/B07R424NZ9/
Honorable mention:
Thread checker
https://www.amazon.com/gp/product/B003FJW0GK/
Alligator clip multimeter leads
https://www.amazon.com/gp/product/B00M8VG8UA/
Butane pen torch
https://www.amazon.com/GOLDNCONN-Pencil-Welding-Soldering-Lighter/dp/B06Y2J74T8/
Hand impact driver
https://www.amazon.com/gp/product/B0002NYDRG/
Hi Joshua,
Great list. I too love my claw tool and would not be without it. Couple of others on your list I will definitely be getting. This article is going to cost me a fortune!
The retractable claw tool is a life-saver. Just spent a day prepping motorized winches for install and without it, a rather enjoyable task would have turned into a nightmare taking twice as long.
The thing that surprised me the most about the mechanic I hired this summer to fix my engine was the care and precision he took when he was re-installing my injectors (after thay got cleaned / repaired). One other surprising thing was that the tool set he brought to my boat was very limited (only about 5-6 hand tools), but they were the exact right ones.
He even had a home-made injector puller (a piece of fuel line with a few large washers at the end, and a large socket that he used for “hammering” up the injector). He told me “you have to be smarter than the machine”!
Hi Emile,
Yes, it’s a pleasure to watch the really good guys and a great way to learn. Years ago I had the same job done in Norway and the mechanic had made the same injector puller…and he gave it to me! Still have it and it’s one of my most treasured tools, both for it’s function and the wonderful way I came by it.
Hi John
I’ve found this tool thread extremely useful and my Amazon wish list for ordering in April is getting very long! Could you picture and describe this injector puller more fully?
Thanks
Best wishes,
Charles
Charles L Starke MD FACP
s/v Dawnpiper
Hi Charles,
It’s not something I have ever seen in a tool store. I think most mechanics that have them made them.
Hi John,
Kevin Kelly, the founder and editor of Wired Magazine has a good website called “Cool Tools” which reviews, well, cool tools. Here’s the link: https://kk.org/cooltools/tag/reader-favorites/ . To see his store on Amazon, here is the link: https://www.amazon.com/shop/kevin2kelly?listId=12BS5QWRSBC4C
It’s not all boating related, but still addictive to the tool addict.
Stan Creighton
I’ve been using reader safety glasses for a few years now and love them. I now wear them throughout every vessel inspection, and whenever I’m working in my garage, shop and for home and auto repairs, for both safety and convenience, and they are much more durable than conventional readers.
Hi Steve,
Now that’s a great idea. Definitely something that needs to go on my list.
Any suggestions for minimizing rust on hand tools in a salt water environment? Boeshield, wd-40?
Thanks,
Tom Hanaway
Each winter I look the tools over and, where needed, respray with Boesheild and let dry for a couple days. Tools that see infrequent use then get stretch wrapped so, on many the application lasts multiple years. Has worked very well for me but I am just a seasonal coastal cruiser so tools are not onboard 12 months.
Hi Tom,
I’m with David and really like Boesheild for that and many other uses.
I prefer CRC Heavy Duty Corrosion Inhibitor. It’s a little sticky but I realized after using if for this that that’s actually an advantage as you are less likely to drop the tool. This is my all around go to anti-corrosion product where staying power is required, it does not wash or wipe off without solvent.
Steve, have you got an idea where to buy this in Europe? CRC has no european dealers listed, and the only shop I could find in UK (plus Amazon) has it currently delisted.
I’m afraid I don’t, but let me do a little digging.
Hi Ernest
I use a spray-on “grease” designed for use in farming and construction machinery. Leaves a visible, waxy, slightly sticky finish when dry. Think WD 40 on steroids. I have used to protect expensive Japanese chisels, saws and plane blades when away for the summer, and for the less expensive edge tools on board. Wrapped the tools after treatment in normal baking/wax paper. Cleans off easily with most solvents. Bought from a tool supplier in Greifswald. Back home beginning March and can let you know what it is called if you’re interested.
Regards
Bill
Hi Bill, this would be great and surely of interest not only for me but for a lot of fellow subscribers here I believe. Thank you! and have a good time abroad 😉
Sorry if someone had already mentioned this (I am running out of time and haven’t read all the previous replies!)
I use 5, 10, and 20 cc plastic syringes for measuring when mixing epoxy.
They are very cheap and reusable (keep each in its own resealable bag).
I get mine from a vet.
This is for jobs up to about 200 cc.
Used to use electronic scales but found all the usual problems.
Tom
John: there is a typo in your two torque wrench sizes I think. In Nm they overlap. In ft-lb they do not. Decimal point somewhere?
I will support the idea of crowsfoot spanners. Great “get out of jail” card
Best wishes and keep them coming.
Hi Richard,
Thanks, I will fix it.