It’s amazing how many times over the years I have had to come up with a way to mount a piece of gear at a precise angle.
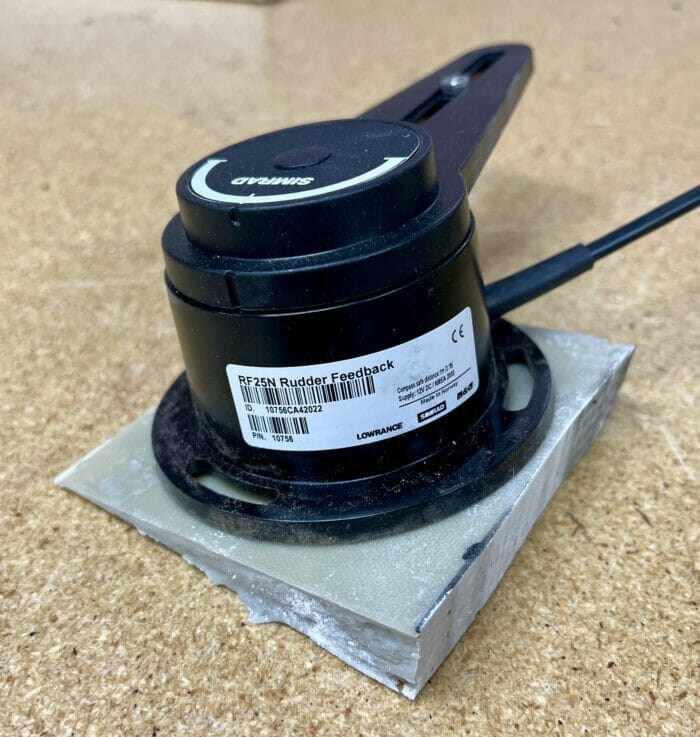
The latest being the rudder feedback unit on our new-to-us J/109, which needed to be mounted so it will operate in the same plane as the autopilot tiller arm mounted on the angled rudder shaft.
I guess I could have cut a wedge out of wood, but it’s hard to see how to do that safely and easily on a band or table saw, although I suspect that better carpenters than me—a lot of those around, I’m sure—will know a way.
Anyway, being a total fanboy of the stuff, when faced with anything like this, my first thought is WEST System epoxy.
How-To
In this case the solution was easy and took less than an hour, soup to nuts:


Hello John,
Great trick.
Is there a way having a gelcoat surface in case the custom wedge needs to be in sight?
How do you manage to drill perpendicular if the wedge needs to be bolted?
Thanks.
Denis
Hi Denis,
Good questions.
Epoxy can be coated with brushable gel coat once dry and sanded, so it’s possible, with some practice, to match the gel coat of the deck. That said, matching gel coat tint is a tricky skill, so if there is a good tech around who does that all the time, it’s worth getting them to do the matching for you. We are lucky to have just such a guy at our boat yard.
And drilling perpendicular to the bottom surface is easy on a drill press, so in this case I did just that for screws to mount the wedge, and then counter sunk those holes. And then I will drill another set of holes perpendicular to the top surface to mount the feedback unit.
However, if mounting something that needs to be through bolted like a winch at an angle, see my comment under the WEST system diagram in the article.
The key point being that the fastener heads, or nuts in the case of bolts, should be torqued down on a surface that is at right angles to the hole they are in. I have to say I was kinda surprised that WEST break that rule on the diagram since that will put a bending force on the bolt and could lead to a nasty failure under load.
Great article thanks John
I’ve done a bit of work on aircraft where drilling a hole at right angle to a surface is required, but the part is too cumbersome for a drill press. We make a drilling block out of a solid block of steel of aluminium (steel is best because its more durable, and the weight is an advantage). Make the base of the block as large as possible relative to the bearing surface to be drilled. That helps ensure it will stay flat on the surface as you drill. Make it as thick as practical too which will help the drill bit stay square. Drill a pilot sized hole (1/8th is a pretty good size, but if more bit stiffness is needed up to 3/16 is ok too) thru the block on the drill press so it is square to the block. My blocks have holes in the middle and in one corner which helps present the block to the mounting surface with maximum contact. Mark and centre punch the hole. Drill a very shallow hole on the mark free hand to ensure that the bit will positively locate in the hole when passed thru the block. Position the block with the appropriate bit going through the block into the starter hole. Hold the block flat and steady and drill the hole. The block will keep the bit at 90° to the mounting surface. Sometimes you need to change to a long series bit to complete the hole through the block, but always start with a short bit to minimise side loading the block/bit and causing wander in the hole. Once you are right through, increase the size of the hole to the right size going up in bit sizes fractionally, this will keep the hole round and ensure the bit tracks square. Jumping sizes can lead to hole elongation and other distortions. If a precise fit is needed use a ream to finish the hole.
Hi Mike,
Good idea, but in this case the angle was 45 degrees making that hard to do, so I took a simple approach, see the update in the tip.
G’day John
Maybe my explanation isn’t very clear. The approach I described works for any angle as long as you have a flat face to hold the drilling jig to. It wont set the base up for you, just makes sure you get a square hole relative to the mounting surface and through underlying material when you cant use a drill press. Still need to use your excellent method to make the bearing and backing surfaces the right angle to begin with.
Hi Mike,
Sure, I got that. It was just that in my case it was faster and easier just to enlarge the hole with a Dremel and four-in-hand than use more complicated methods.
Great idea! Been wondering how to do Just that. Thanks.
Merry Christmas!
Hi John,
A useful hack for release: Cover the surface with tape. The cheap tape used for closing packages you send by mail. It’s usually brown, but can be clear or any colour. Not duct tape.
You can wax it too, but it’s not really needed. Epoxy doesn’t stick to this surface. If the epoxy were to stick to the tape, the glue on the tape is also easily weak enough to pull the part off.
Hi Stein,
Good idea, particularly if the surface of whatever you are protecting from adhesion is a bit irregular. Thanks
“Squoze” LOL
Hello John,
I recently used a variation of the jack screw technique to set up a properly angled mounting surface for all 18 lifeline stanchion bases on my boat. The stainless bases came angled at 4 degrees, but this didn’t match the deck camber or the shear. I cut plates from 1/4” G10/FR4 to match the stanchion bases and drilled undersized holes in the stanchion base mounting pattern. Next step was to tap the holes to accept jack screws well lubricated using a toilet wax ring. Using a bubble level with a 4 degree shim underneath it, I adjusted the jack screws to dead level. I “primed” the deck and the G10 plate with unthickened epoxy, then put a large blob 105/206 thickened with 404 and a bit of 406 on the G10 plate and smushed (technical term, eh?) the whole mess into position on the deck. A final tweak of the jack screws and smoothing the edges with a fillet stick finished the install. Once cured, the jack screws were easily removed and the holes drilled out to accept the 1/4” fasteners for the stanchion bases.
I share John’s trust in West Systems products, I’ve been using them for nearly 40 years and they have never let me down.
Cheers and Happy New Year!
Barry
Hi Barry,
Sounds like a really well thought out and executed application of the technique. I too am a huge G10 fan, and the number of complex problems we can solve with the combination of G10, WEST and jack screws is amazing.
Hello John,
Great solution to a common problem and it’s an easy solution too.
There is one point I’d like to add.
The example you have shown with the winch base is a high load situation where the clamping forces are substantial and critical.
The interior nut in this sample is unevenly loaded against the off-square interior surface and if substantially loaded up will cause the bolt to bend at the exit point or pull on the threads on one side of the nut & bolt only.
I would suggest this type of installation requires both an external fillet as you have shown and internal fillet to ensure the clamping forces are square onto the bolt and the threads are loading up on the bolts evenly.
Hi Mark,
I agree, see the caption to said graphic.
Hi John
Belzona makes a variety of very high-quality products that are widely used in industrial and marine industries but not well known in the pleasure boat world. The stuff that would be useful in the application you describe is Belzona 1111 Super Metal http://www.belzona.com/en/products/1000/1111.aspx but it’s worth a roam around their website to see the other materials they have on offer. They have a strong distributor network and, in my experience, technical support is very good. It’s not inexpensive though.
Best wishes to everyone for the new year and keep up the excellent work.
Wilson
Hi Wilson,
That does look like very useful stuff. As you say, there are a lot of great products in the commercial world that don’t seem to make it over to recreational use. Thanks for the tip.
Hi all,
There has been talk about the qualities of West System epoxy all of which I am in total agreement with. I have used it frequently for bigger projects with great success.
For small repairs and quick repairs, I generally turn to J-B Weld. West also does small packets, but I found them wasteful (generally had epoxy left over), a bit messy, and expensive.
J-B Weld comes in small tubes making the amount used easy to judge. I eye-ball the amount to mix and it seems quite forgiving of any mis-judgement I might make in getting a 50-50 mix. I have used just the standard epoxy in quick set and in long set, but they also make a marine (never used) and, I think, a high temperature variety. I did a repair of a cracked weld on an engine heat exchanger on a vacation that I subsequently forgot about as it lasted as long as I owned the boat.
I have also recently learned that they make a J-B ExhaustWeld Wrap (for high temperature use) and a FiberWeld high strength fiberglass impregnated wrap that is activated by water.
Both might make for valuable additions in a trouble-shooting kit.
I have no experience with the last 2 items, but do experience J-B Weld as a good product/company and I know it as having a valued place for decades in my ability to deal with problems (along with duct tape and baling wire).
My best, Dick Stevenson, s/v Alchemy
Hi Dick,
I have never used J-B Weld but it does sound like a good alternative and those other products sound good for the emergency kit on a cruising boat, thanks for the tip.
In the spring of 2019 we developed a serious diesel fuel leak from the top of our high pressure injection pump. It appeared that the repairs in Marsh Harbour (Bahamas) would take weeks. I cleaned the area around the leak to spotless with dental picks, brushes, rags, and brake cleaner then buried it in two packs of JB Weld. That reduced the leak to a weep that could be managed with paper towels, and we sailed for New Bern, NC. There we had the pump removed, properly rebuilt, and reinstalled by Coastal Diesel Service. The stuff saved our bacon.
A crowd sourced “How I Got the Boat Home” article might be a source of entertainment, education, and inspiration.
Hi William,
Amazing that the stuff would stick there and get you home, a great endorsement indeed, thanks.
And a fun idea for an article. I will think about it.