
It was the spring of 1994, I had owned Morgan’s Cloud for three years, and had already made voyages each summer, the first to Nova Scotia, then Newfoundland, then Labrador, all this while still running my computer business in Bermuda. Life was busy…and a hell of a lot of fun.
1994’s project was the Newport Bermuda Race. I had arrived in Maine, where we winter-stored the boat in those days, with just four weeks to commission her, step the rig, get her measured (not trivial in those days of the IMS), tune the rig, and pass the required safety inspection before the start in Newport.
Fourteen-hour days passed in a blur of details and effort as I, pretty much single-handed, put the boat together. Two days before the safety inspection I read the requirements for probably the fiftieth time to see I was down to a few details, three to do with the companionway washboards, including a way to:
- secure the boards in position,
- keep them retained when removing them to access the cabin,
- secure the sliding hatch from either below or on deck while still being able to open it from the other side.
All requirements that any boat going offshore should meet.
The traditional way to comply with number one is barrel bolts on each door engaging with the fixed part mounted on the channels, but that would have required carpentry to build standoffs for the bolt on the door, or drilling a big hole in the teak channels for the bolt to engage in. Neither appealed because:
- The bolts would scar up the varnish any time the boards were stacked.
- The standing part on the channels would always be snagging stuff.
- The bolts I was probably going to find at the local hardware store would be ugly and probably corrode.
- And, most of all, I did not have time to be screwing with fiddley pieces of wood, or running to hardware stores.
But wait, requirement number two specified a lanyard to retain the boards from loss when removed, so I was also going to need to attach pad eyes to the boards for the lanyards. Great luck, I had the pad eyes in the box of miscellaneous parts every sailor has. I also had a bag of split pins.
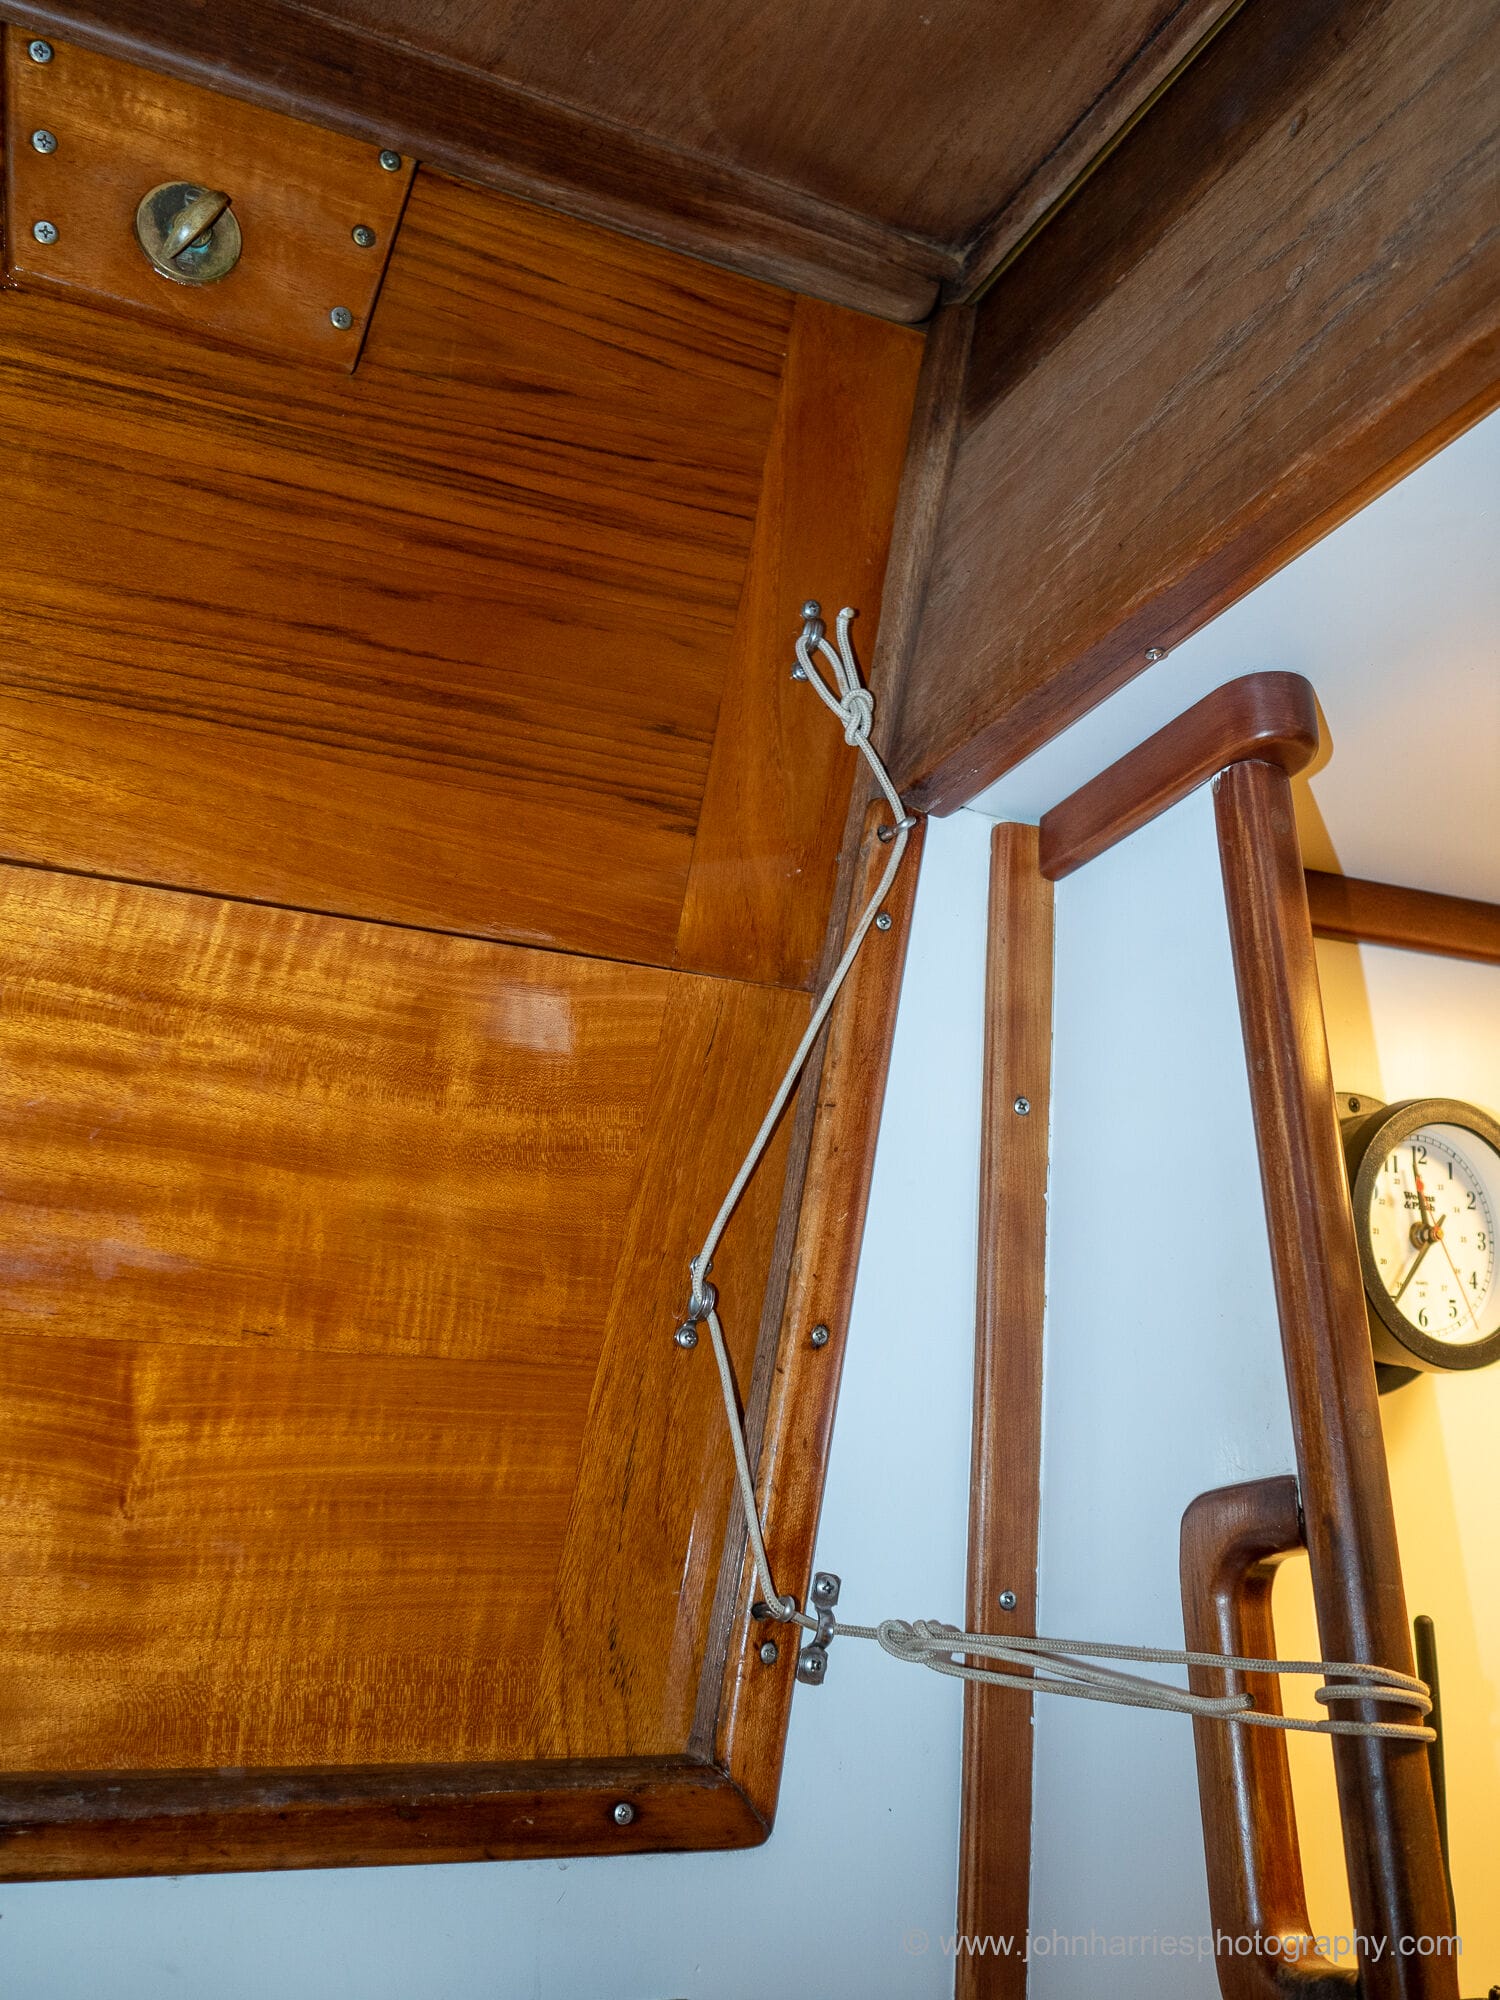
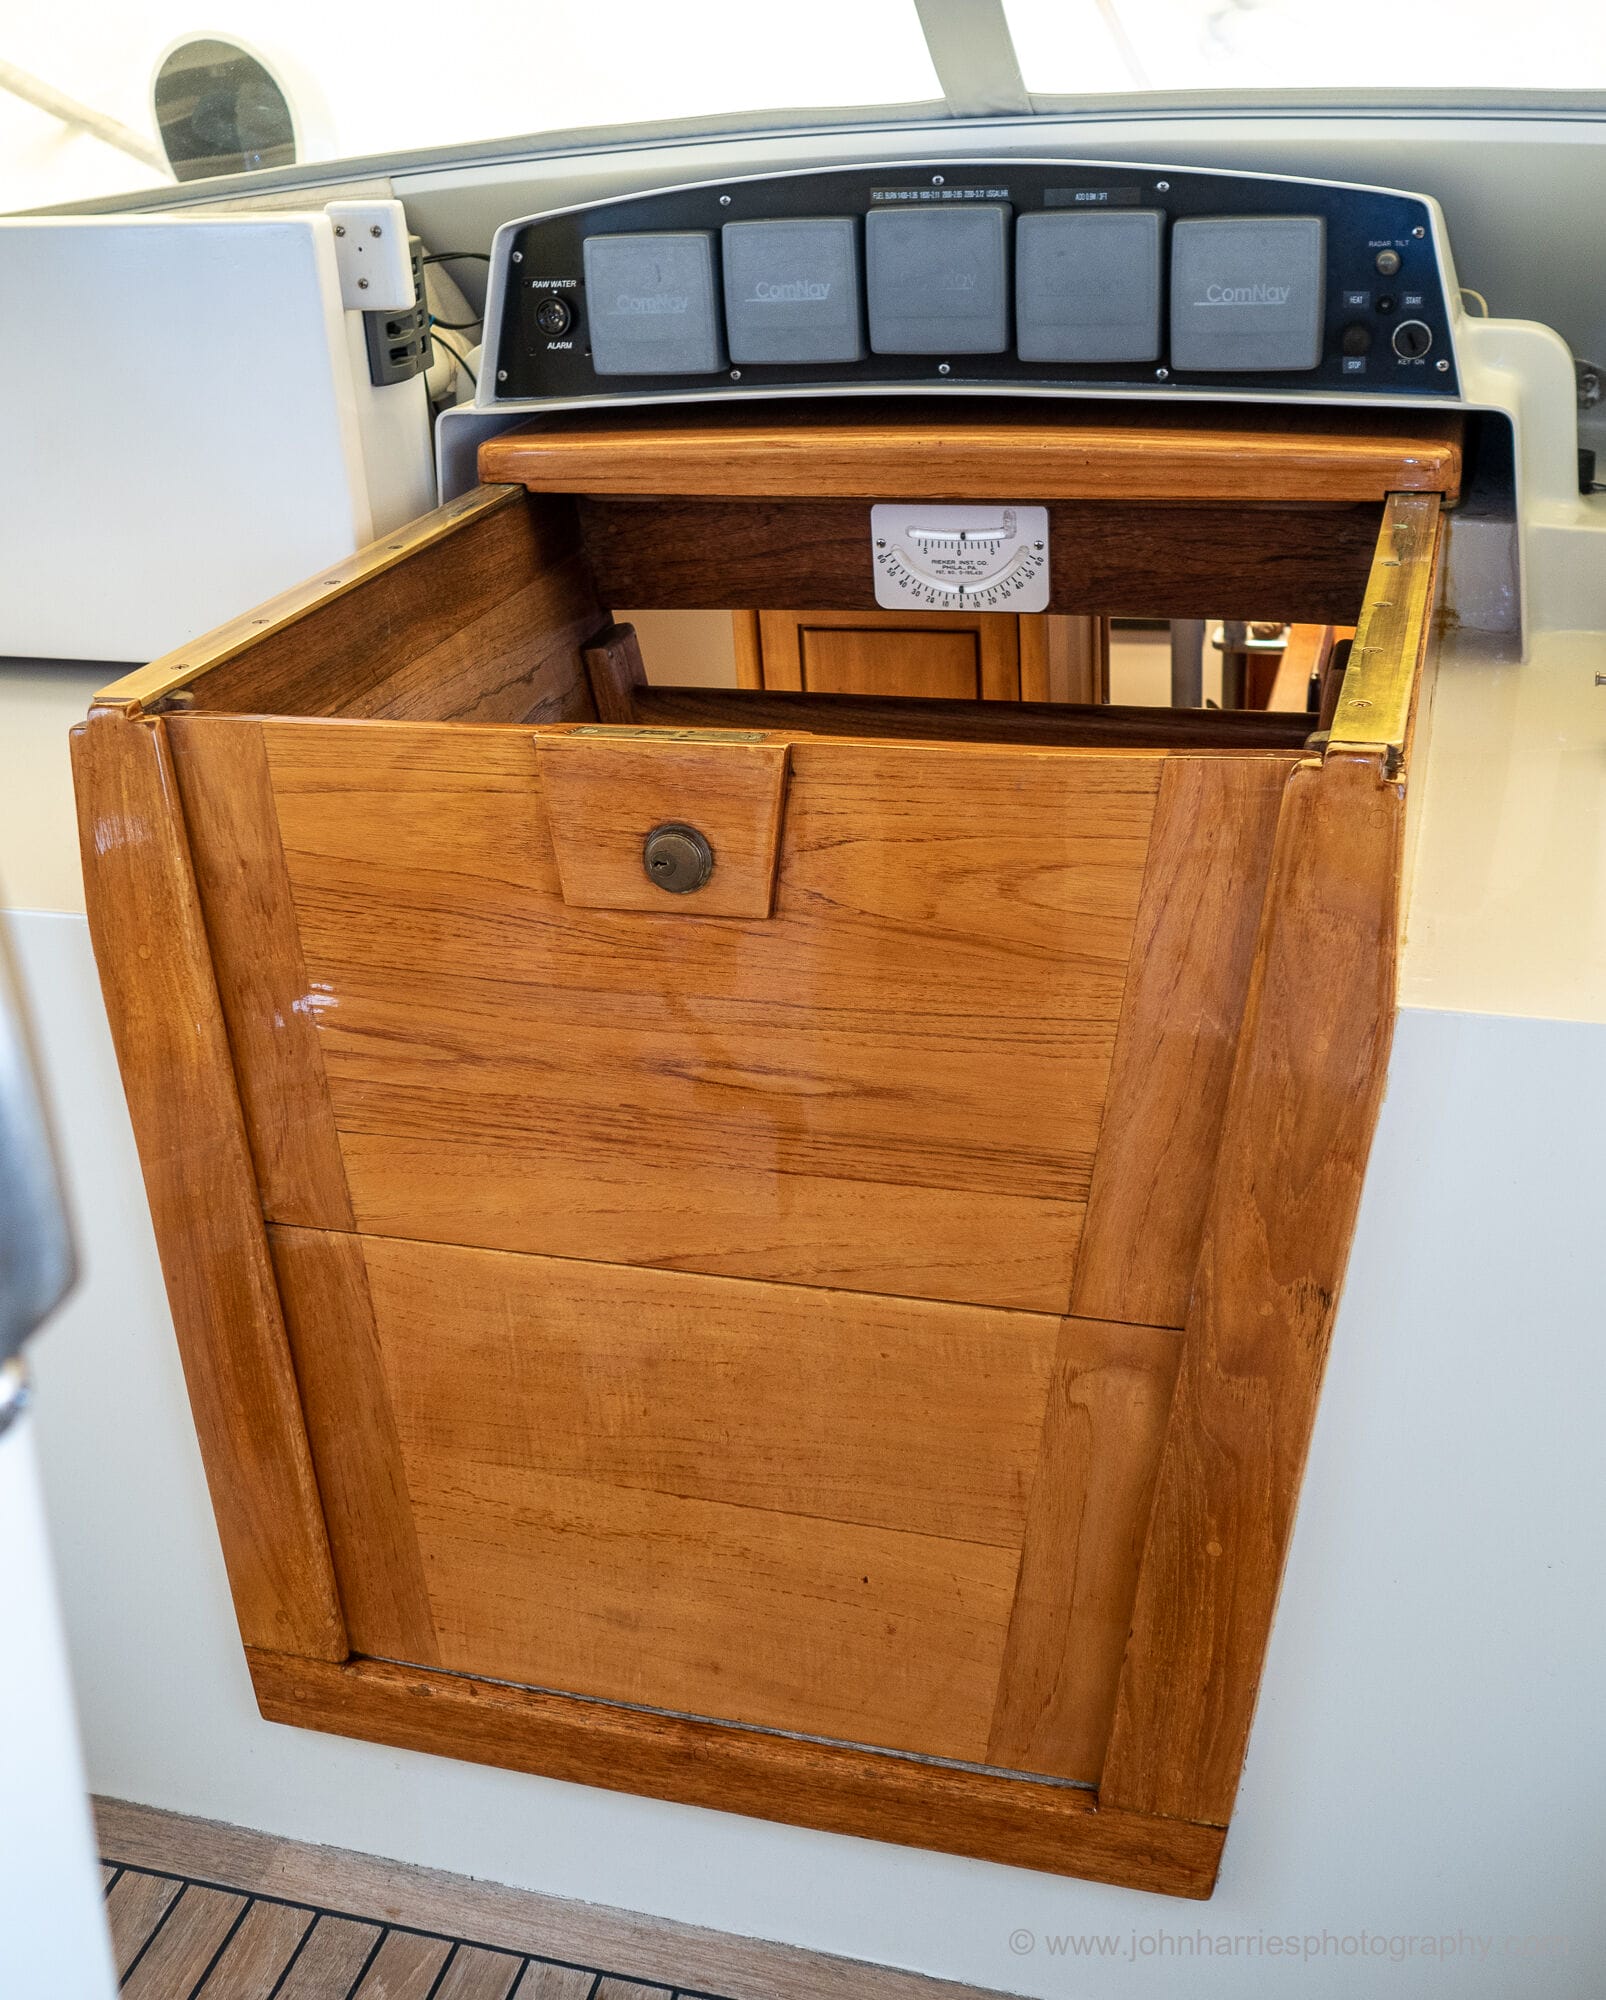
The boards are retained with split pins inserted in holes in the channels and boards, and the pins can’t fall out or be lost when removed because they are always threaded on the lanyard. The system can easily be changed to fit the conditions.
For example, bottom board secured and top board removable but still made safe from loss by the lanyard.
Half an hour later, the job was done. The inspector was happy, and it has served us well for over 25 years.

So am I trying to claim that:
- This is some kind of genius-hack?
- The best way to do this?
- Simple washboards are the best way to close a companionway?
Nope, no, and nope. But there is a greater point here. We made the start of the Newport Bermuda Race and over the next 25 years we made voyages most every year, many of them challenging, with a functional, flexible, and easy-to-use solution.
Done Is Better Than Best
Oh, and if you are wondering how I complied with requirement three, when the inspector asked I reached in my pocket, pulled out the key, and inserted it into the lock. Done and dusted. I even managed to keep the smirk off my face.
Priorities
Sure, over the years I have thought about changes to our companionway. Maybe a nice custom metal dutch door with a custom latch (see Further Reading), but it never got to the top of the priority list.
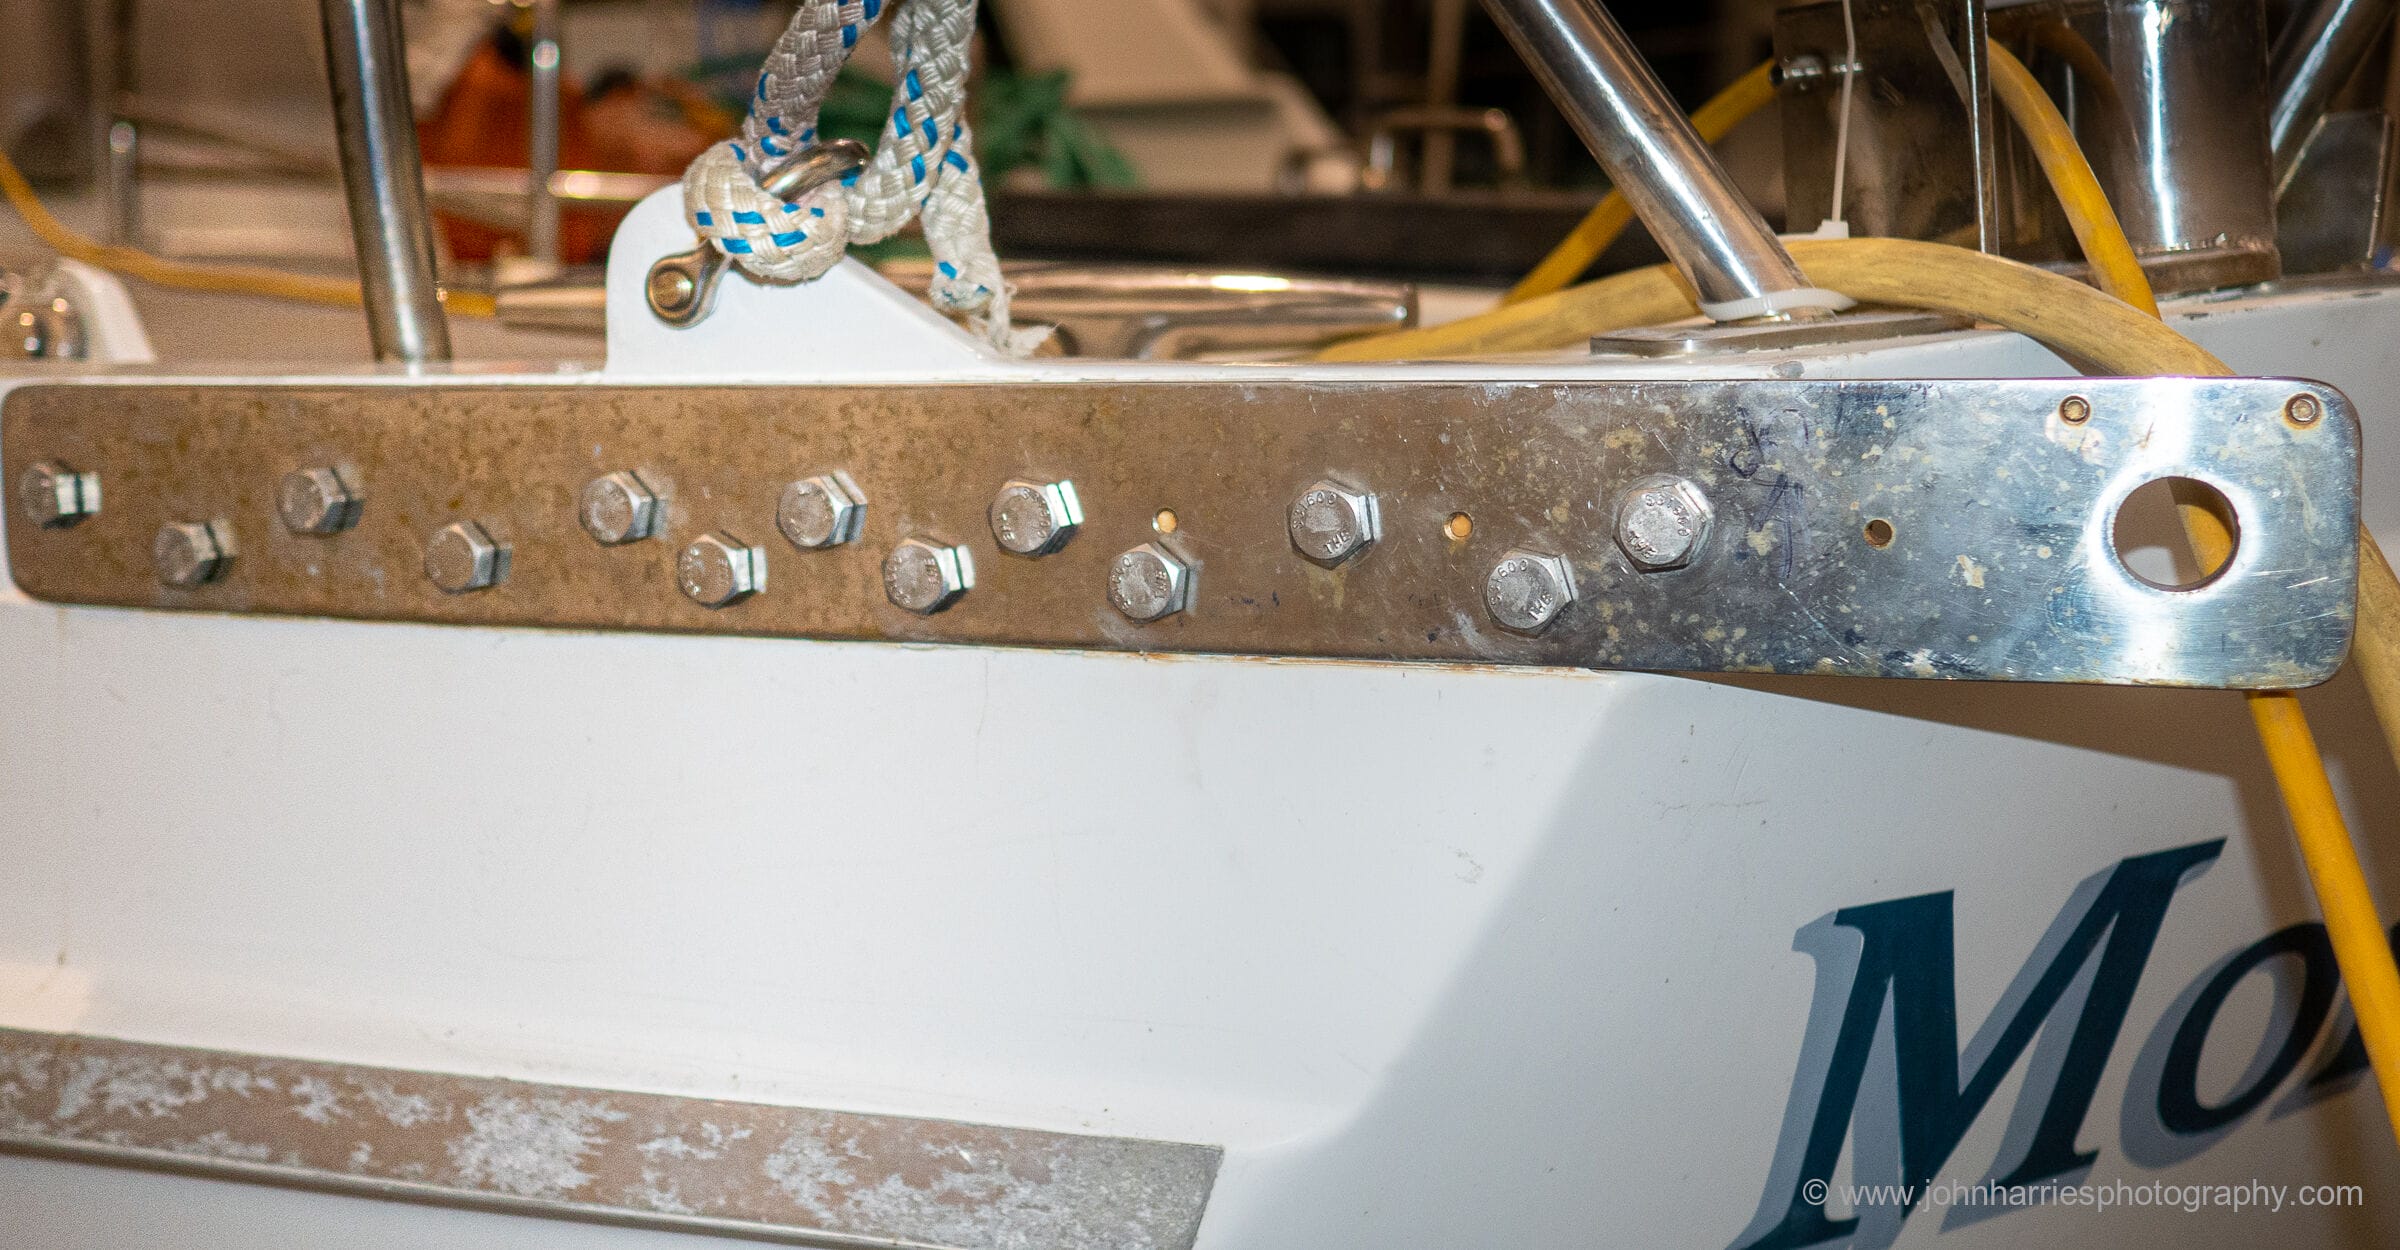
Instead we did many other storm survival related things, including installing a sea anchor using the Pardey Bridle system, and then changing over to, installing, and testing a Jordan Series Drogue…and then, when I found I had made a mistake on the chain plate installation, improving that.
And all that brings us to the second takeaway:
Think about that the next time that you hear the seductive siren call of induction cooking, electric drive, lithium batteries, or a cool fully-networked NMEA 2000 electronics system. All interesting projects, but the more of them we take on the less we will get out there.
That said, maybe having the coolest most technically advanced boat in the marina is your hobby. That’s fine, too.
My Priority
Mine? Always was, and still is, getting out there. And, no, that does not mean going to Greenland or some such. It’s just as real to me to coastal cruise in our immediate area, just as we will probably be doing in future years.
Storage
Enough philosophy, back to the mundane. One of the irritations of traditional washboards is what to do with them when not in use. Here’s our solution:
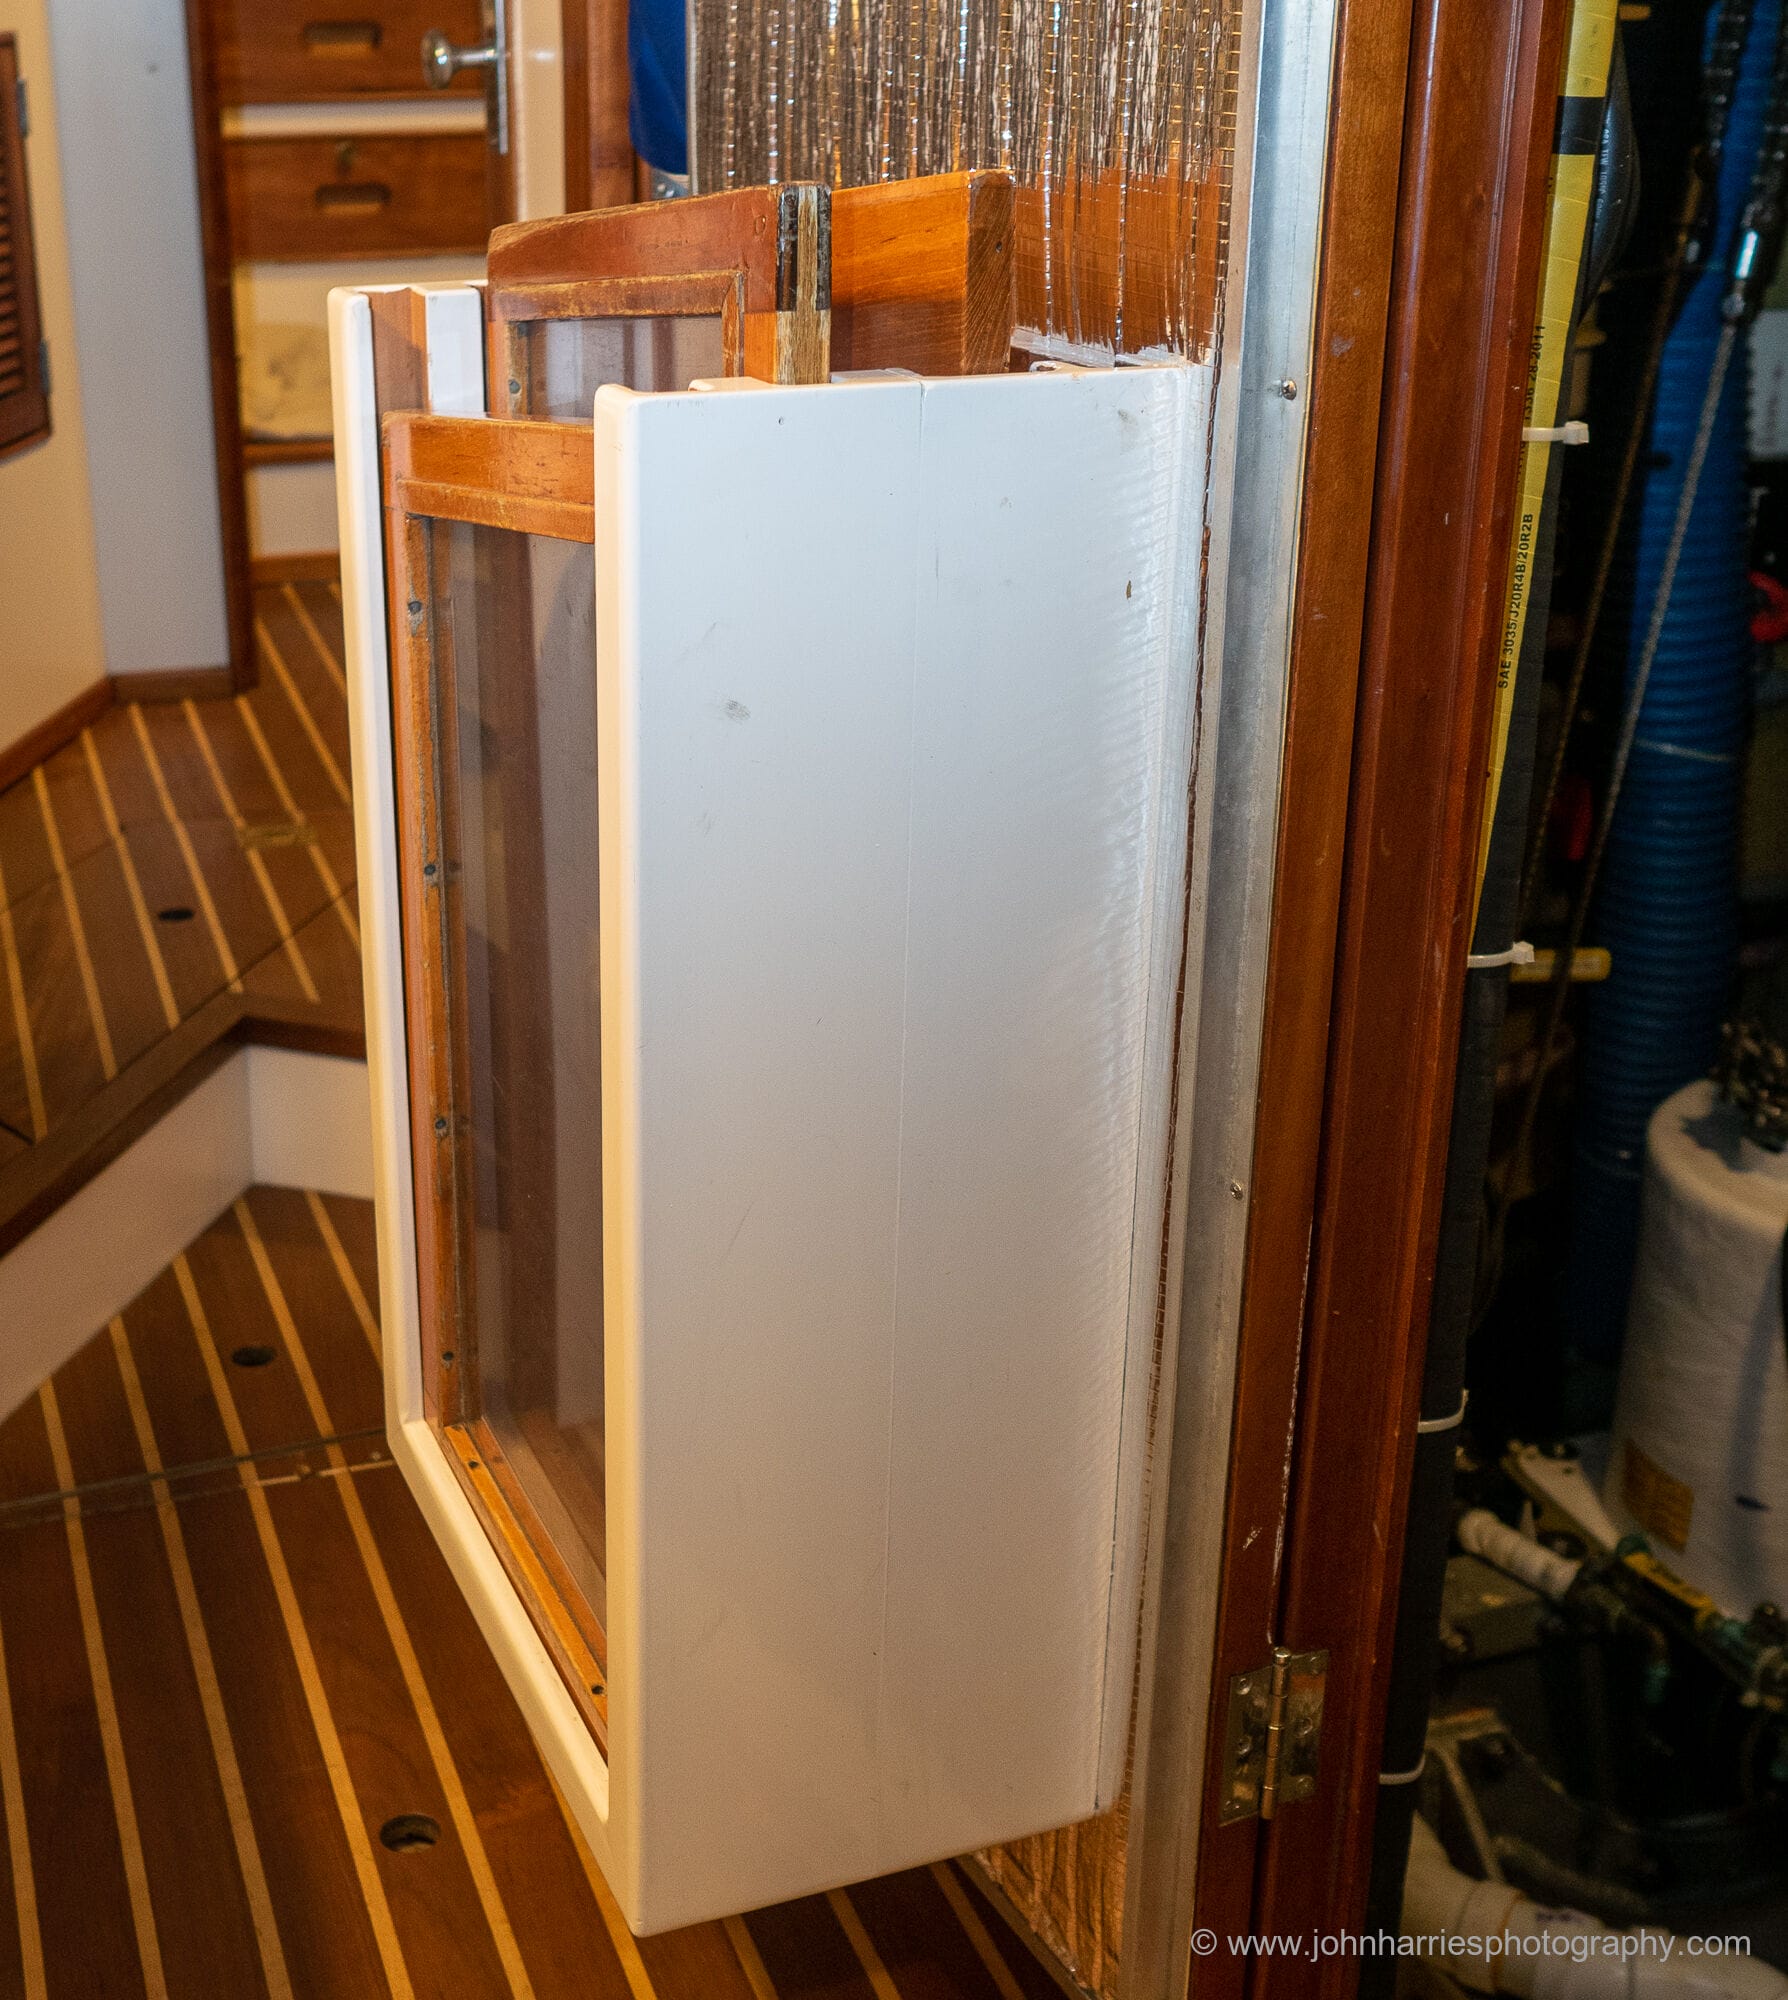
We also have screened ones stored on the inside of the forepeak doors.
Comments
I’m sure many of you have better and cooler solutions than washboards, pins and string, but what I’m really interested in is what cool hacks you have come up with to actually get stuff done and get out there, and not necessarily anything to do with companionways. Please leave a comment and a photo if you have one.
Further Reading
- A nice system for locking a sliding hatch
- Safe cockpits and companionway closures (with lots of photos of good options in the comments).
- Much more on storm survival
- Much more on how to actually get out there
- Safety is a process, not a destination
I saw this installed on a sail training boat, centre cockpit and copied it for my own centre cockpit, Rival 41C. A length of GRP electrical conduit pipe, 8″ OD, obtained from the workers installing the electrical supply into a new housing development. The pipe is mounted on the quarter of the push pit and has slot cut into it, facing aft, about 3″ wide, cut all the way through, this is my modification on the original idea. The GRP is stiff enough not to flex with this slot cut in it, as it is only 18″ long. The Dan Buoy sits in the pipe with the float resting on a home made clevis pin from 5mm stainless rod. The clevis pin passes all the way through the pipe, horizontally. The other end of the clevis pin is connected to a line that runs along my guard wires to the centre cockpit and terminates in a large toggle made from ply wood. If we have a persons overboard, the helm, or any one in the cockpit can pull on the toggle which removes the clevis pin from the pipe and allows the float to drop free and the pole of the dan buoy to pass through the slot as the boat moves forward. It works very well and basically was free as all the parts were made from stuff kicking about. It is possible to run the trip line all the way around the guard wire so that it can be accessed from anywhere on deck. The horseshoe life belt, with light and drogue, still has to be launched manually, hence the trip line just terminating at the cockpit. My horseshoes are easily accessible from the cockpit. Commercial Coding in the UK requires a dan buoy device, that must be easily launched. Very easy to make, quick and fast to install. Dedicated dan buoy mounting devices as sold in chandlers are usually not effective, expensive and require some custom mounting arrangement anyway.
Hi John and all,
Nice hack. It is so gratifying when a problem is solved with a minimal amount of work and an added bonus when some elegance is thrown in.
I wish to spin off your comment about “hobby” as I believe it to be very well taken.
In another venue, I have been responding to those who spend a great deal of time designing/installing/perfecting their instrument/computer/repeater/wifi systems. My interest was in attempting to sort through what efforts actually contribute to boat safety and what efforts are more of a hobby (efforts that are fun and interesting, but fall short of contributing to safety or to the efficient running of the boat). I believe an awful lot of time and energy in boat preparation can be most accurately described as “hobby”. And I fully agree with you that hobbies are great and that people should pursue hobbies to the extent of their interest.
But, I do have a problem when a hobby is portrayed as important to the running of the boat or to safety: especially when portrayed in this way to readers who are less experienced and looking for guidance. And also especially when it is a complicated system with all sorts of ways to go south on the skipper. And often these complicated systems may be fine for the knowledgeable designer, but not at all fine for a skipper trying to replicate the system from instructions found on the internet.
Random thoughts, My best, Dick Stevenson, s/v Alchemy
Hi Dick,
So true, I particularly liked this sentence:
I wrote something very like it here: https://www.morganscloud.com/2016/01/08/marine-electronics-system-recommendations/
You and I are closely aligned on this because we are all about getting out there.
Hi Alastair, Dick and John,
I love the danbuoy solution too. I think I’ll actually do it myself.
About the getting out there issue, my method to avoid wasting time on the wrong tasks is fairly simple, but works well. I use Trello for task lists. Absolutely anything I think of goes in there. Considering changing to the more versatile Notion. I use similar systems to organise everything in my life…
I look at the departure date and what the trip is like.
Then I put a colour on each task, inspired by traffic lights:
Red = If it’s not done, we absolutely can’t leave.
Yellow = Important, but can be postponed without critical consequences
Green = I want it to be ready, but if not, the trip will not be significantly less enjoyable.
The coloured items get moved into three lists with the titles:
In progress – First – Later
Everything else is sorted to other lists.
For me it’s important that the departure date must be non negotiable, for example by others planning their holiday around it. I also set up earlier non negotiable deadlines for when some important items must be ready. Hard deadlines and clarity help me a lot, since I’m extremely easy to distract, as my comments here may have proven, and enjoy digging into fun new solutions. This system holds me accountable.
Hi Stein,
Sounds like a good system. We use something very like it, although a different App: https://www.morganscloud.com/2018/02/23/apps-we-use-to-manage-our-boat-and-cruises/
And I agree: picking a departure date and sticking to it is the only way to get out there, even if others are not relying on you, particularly for you and me who love to dive down rabbit holes.
Hi Alastair,
Nice one, and just the sort of simple but elegant solution I’m hoping this post will attract.
Great idea! I am using it! About to make new boards and was trying to figure out how to do just this. Simple, reliable, easy, and cheap! Thanks!
Ralph
Hi John,
The hack that saves us most effort (& time) to go sailing is an inverted U shaped-crane for our 8HP engine. Custom fabricated for $80 out of 25mm SS tube and “off-the-shelf” Bimini parts. The feet are hinged and bolted high on the transom of our aft cockpit B473. We have a small, lightweight alloy RIB that planes easily with our crew (in a high and dry mode). We can launch the RIB and attach the motor in 5 minutes using the main halyard and electric winch. Retrieval is the reverse process. The key is two small SS prongs on top of the crane to engage with main halyard shackle as the crane goes outwards (or inwards on retrieval), and then channels the halyard (to prevent it slipping off the crane) as the motor is lowered onto the dinghy transom (or raised for retrieval). A small line each side prevents the crane going below horizontal. At sea, the crane stows neatly against the pushpit with a bungie cord, the engine is stowed on a push-pit bracket directly under the crane. As it is quick, we stow the engine and dinghy properly when making even short passages, rather than towing the dinghy which is firstly slow, but can lead to issues we have all witnessed or experienced (dinghy loss / prop wrap / dinghy inversion / engine immersion). Offshore, the halyard is used to drop the engine into the large lazarette directly forward of the frame, for stowage. Note also, the starport on the top of the crane, for our emergency stern light. Hope I have explained things ok?
Br. Rob
Another pic showing one of the prongs engaged with the shackle, to ensure the crane extends outwards or inwards under control. Rob
Hi Rob,
Another nice one, and neater when stowed than the outboard crane we have.
And I agree completely about how important it is too stow the dinghy aboard, rather than tow it.
One question: You say that you stow the outboard in the lazerette. I’m guessing that’s only for longer passages and that you carefully drain all the gas (petrol) first?
Hi Rob and all,
It has been decades, but a friend, a surveyor, told me that one of the insurance companies will deny claims if there is any deviation from the terms of contract and that storing gasoline powered equipment in the interior of the boat met that definition. This was in response to my proudly showing him a slick way of storing my 3hp in a sail locker thereby keeping it out of the elements and, more importantly, from being stolen.
He went on to say it did not matter if it was run dry and also included empty fuel containers, generators etc.
BTW, he said he was obligated to report this even if it had absolutely nothing to do with the claim.
He actually did not think it was a bad rule as he had seen too many gas fire/explosions and felt that it took very little fuel to make for serious problems.
My outboard went back on the rail with a beefed-up lock.
My best, Dick Stevenson, s/v Alchemy
Hi Dick,
I’ve heard similar statements. However, if say the boat ran aground and was partly flooded, and the insurance won’t cover damages, based on an outboard in the lazarette, they’re just trying a scam. That’s a major cost saving tool for them. Denying coverage on incorrect reasons and hoping the customer just accepts it. I’ve had that several times, (not with boats), and they accept it immediately if you resist them. They would not stand a chance in a court case.
Still, gasoline certainly is a fire risk, so it’s perhaps smart to not store it inside. We have the outboard and tank in the forward bridge deck locker with the propane bottles and main diesel tanks. There is no connection with the boat interior. Both fluids and gases will easily drain out of the locker bottom, or top, if the gas is light.
Hi Stein,
Agreed: they would be just trying a scam. This may easily not be fair, but my casual take is that insurance companies will go to great lengths to not pay-out and too often rely on difficulties they generate to discourage pursuit of reasonable pay-outs. And I would certainly do a lot to not go to court and, although I do it, I hate to even complain and take it up the decision chain. And, agree, with effort one usually prevails, but not always.
Also agree at keeping gas/petrol out of the interior. And I suspect (but in no way know whether this is accurate), that an engine run dry really poses little or no damage if stored in the interior.
I wrote merely anecdotally and as a heads-up that some “hacks” can have unintended consequences.
My best, Dick Stevenson, s/v Alchemy
Thanks John and co,
Yes, we stowed for offshore passages only, or where there is a chance of experiencing breaking seas crashing against the engine and bending the push-pit (I don’t think the engine would come loose as the teak mounting bracket is substantial). We also like clearing the cockpit surround of clutter to improve 360 visibility. Since we have only done the one SW Pacific circuit so far (~ 6 months), this isn’t something we have done frequently. There is no integrated tank on our Yamaha 8Hp to drain, and I had always run an outboard dry for stowing from early seagull experiences (where leaking fuel was easier than starting it). But an engineer buddy observing this, told me it’s a great way to wear out a 2-stroke as when the motor is being starved of fuel, so is it being starved of lube-oil. So I have been running until the first sign of fuel starvation then stopping. The lazarette IS reasonably well ventilated, and gasoline vapour being lighter than air should vent off OK. The hatch is large and so opening it after a passage well and truly vents the space. But it doesn’t seem so smart now – or from the insurance angle.
And there was me thinking I was being seaman-like…Rob
(detail pic of the prongs attached)
Hi Rob,
Just so others are aware, gasoline vapours are significantly heavier than air and so can pool in the bilge just as propane can.
Thanks for the added pic, that makes it really clear.
Hi John,
One of my favorite useful hacks I came up with is to take a sheet of the large fuel spill pads, and cut them into quarters. Then take each quarter fold it in half then in half again – take a pair of scissors and cut off the folded corner. Open it up and you have a hole to put over your fuel fill giving you have a nice spill pad for drips and minor bit of overflow.
Hi Keith,
Nice hack and particularly useful for those fills I do from jerry cans (with or without a funnel) where there is always the potential for a mess.
My best, Dick
Hi Dick and Keith
This is all well and good.
But!
Shortly after I bought my boat, I noted that the suction on the Racor fuel filter gauge reading rising. I changed the filter and that made no difference. I took the Racor bowl apart and found a mass of white filaments like a algae growth.
So I had the fuel polished and the fuel tanks cleaned. A fuel pad was found in the starboard tank at the outflow to the diesel line to the engine!!!!
Someone had wrapped a fuel pad around the nozzle and the flow had taken the whole pad into the tank!
Best wishes,
Charles
Charles L Starke MD FACP
s/v Dawnpiper
Hi Charles,
Owch! That hurts.
More unintended consequences.
Along those lines, I even got the recommendation to never use Teflon tape on the pipes carrying fuel as those little strands, if they get loose, can snake their way past filters, etc. and can cause a lot of mischief.
My best, Dick
I took my kid on a guided fishing trip for his birthday, and they had a bunch of “sabiki rods” for mackerel, with trolling reels fitted with depth counters. The design of the rod hides all the hooks so they don’t cause issues when stowed below, and it makes a really good backup depth sounder when fitted as usual with a 3oz weight. So it functions as entertainment, food procurement, and depth.
Hi Michael,
That’s a fun one. We still carry a lead line for sounding round the boat when in tight places, so definitely useful.
Hi John and all,
Speaking of lead lines (and this may not constitute a hack), I keep my lead line handy. When something goes overboard when anchored, it can be quite hard to find when the boat is moving about. I immediately throw the lead line overboard where the object fell with a long tether which allows the boat to keep waving in the breeze but still leads one close to the underwater object.
Over the years, this ploy has facilitated quick recovery of tools, glasses, a watch and precious children’s objects where tears flowed until recovery.
This is especially helpful when time is necessary to don a wet suit.
My best, Dick Stevenson, s/v Alchemy
Hi Dick,
Definitely a great hack, thanks.
I salvaged some lead window sash weights from a renovation for use as a lead line. Tallow plug at the bottom optional if you’ve remembered to trim the roast. https://www.historichouseparts.com/var/images/product/366.440/VWH061611-03.jpg
Not on my boat. An associate used a large 4 litre plastic milk container as a drip tray below the CAV Fuel Filters. The top was cut off and the front was cut out down to about 4″ from the bottom, leaving the sides in place, full length. This left a basin in the bottom of the container. It was fitted behind the CAV Fuel Filters such that the filters were inside the container, between the two sides, still allowing the filters to be unscrewed and dropped into the enclosed basin section. It worked a treat, a bit flimsy when touched but it did not need to be stiff and was out of site most of the time anyway and only had to do one job, stop fuel landing on the engine bay sole. I think it saved the day as well when the small o rings dropped out when fitting a new filter.
Hi Alastair,
That sounds like another good one. It’s really hard to change that type of filter without slopping diesel everywhere.
It’s not a hack per se, but when I tired of the mess dealing with the typically “side-mounted” oil filters on our Beta 60, I purchased and installed a bulkhead mounted oil filter assembly that keeps the oil filter vertical and means I can unscrew it with a strap wrench and (carefully) spin it off with a strap wrench without even a drop of oil hitting the engine bay bottom. There is no appreciable loss of oil flow or pressure that I can determine as the filter mount is below the level of the oil galleries on the block.
On our previous boat, I had rebuilt an Atomic 4 gasoline inboard. Atomic 4s have a large oil pan that is essentially a one-piece sump for both the block and the transmission elements. A friend told me while I had the engine out to drill and tap a 1/4″ hole in the oil pan, and to put in a 90 degree brass elbow, allowing a rated hose to go to the front of the motor to a hand-operated pump. This allowed “white glove” oil changes directly into buckets or, if the oil was cool enough, leftover 4L jugs. As far as I can recall, the elbow never leaked and is still enjoyed by the new owner.
Hi John. Our solution to the same issue with stuff on hand. Our drop boards used to rattle while at anchor if the boat was at all in motion. The jamb cleats allowed us to shore them up to quiet them down a little. Knotted the ends of the restraining lines for retention when offshore.
Hi David,
Nice one, very neat. I guess in really heavy weather I might tie the two ends together below the cleats since I have found it is very easy to knock a line out of a cam cleat like those.
Nice and simple.
I wonder if it could be made easier to reach from the cockpit to both attach and release? Would be an unbalanced stretch for us and we might not have anyone awake below to do it for us.
The left-handed bowline securing the top board is not so common.
Hi Tom,
Left handed? I always call them inside and outside bowlines. https://www.morganscloud.com/2015/10/14/a-cool-thing-i-just-learned/
That said, I can’t see it would make much difference in this application. Am I missing something?
Hi John,
I’m sure it makes no difference for this application.
Hi Tom,
I have just never been able to get that worked up about this stuff: https://www.morganscloud.com/2015/03/05/the-only-five-knots-you-need-to-know/
I have also never had bowline fail on me, even though I tied them the “wrong” way for most of 60 years and over 100,000 offshore miles.
Hi John,
Agreed, inside or outside, left or righthand: they just work and are both beautiful for their looks and especially for their functionality.
I will note that the 2 photos of knots show a nice healthy amount of tail. I suppose it is possible to have too much tail, but I know that knots fail as there is to little when they come under load.
My best, Dick Stevenson, s/v Alchemy
Hi Dick,
Good point about having enough tail. The other thing you see is the knot not pulled tight properly, particularly a problem in stiff rope. It’s interesting that the knot-police will often spend endless time worrying about inside or outside and completely miss those two much more important points.
At least here (Mid Europe) it makes a big difference, to some people…
We have been taught the “outside” version, noting that “inside” is wrong, as it “somehow” doesn’t hold, or the tail might chafe (both rubbish).
In UK I learnt the “inside” version, and been told that “outside” is wrong, as it “somehow” doesn’t hold, or the tail might catch something …
I’d say for some the bowline is a religion.
Hi Ernest,
So true, and did you know that they hold midnight bowline tying rituals at Stonehenge…naked.
You are referring to the dreaded bowline superspreader events 😉
At least one can stay reassured that regardless how you’re tying it, you are always right – or wrong. Might depend on current latitude.
Hi John,
When offshore I secure my companion way washboards with nylon straps. The straps are attached to the washboard on one side, and the boat on the other, and there is a release clip inside and out. If the strap is loosened at the clip it can be lifted up and out of the companion way slots (due to the taper) and stowed below, all while remaining attached to the boat. Here’s an image of one of the two boards strapped in place while underway (apologies for the mess!) https://photos.app.goo.gl/psy5aerz3qyNaC8dA After a lot of boarding water almost lifted the unsecured board off the boat due to a severe broach during a squall, I am very careful to keep at least the one board tightly strapped in place.
A trick I haven’t seen on other boats that use a wind vane to steer is to attach the control lines to a car on a track mounted to the tiller. You can see the car and track in the above image, with jam cleats on each side of the car for the control lines. Moving the car up and down the tiller track reduces and increases the feedback gain of the steering system and makes it pretty easy to minimize errors such as the swerving back and forth (due to underdamping) that is common with wind vane steering, especially when wind/swell conditions or the course setting change.
Another hack, a truly tacky one, that has served well is plumbing a one-gallon plastic candy jar in series with my fuel tank vent just under a lazarette hatch. If I prop the lazarette hatch open while fueling, I can see fuel splatter into the jar and stop before any fuel escapes out the hull vent into the water. The vent lines in and out are plumbed into the jar top, so if a substantial amount of fuel gets into the jar, I can easily unscrew the bottom to dispose of it properly. The most I’ve trapped during a refueling is about a cup – which would’ve been a real problem if it had made it into the water! When I installed the vent trap ~20 years ago, it was meant to be temporary….
Steve
Hi Steve,
Great hacks! I particularly like the track on the tiller idea.
That tiller car track is an excellent idea, and as we have a wind vane, I love the idea that just sliding along a pin track will “tune” the steering.
I replaced 12″ of the fuel vent (before the loop) with clear tubing visible through a port in a cockpit storage compartment. I can view this when fueling up to get a precise fill and in the winter I know when the tank is completely topped up ( minimum air exposure).
Hi Peter,
That’s an interesting one. Do you need to replace the hose often? I wonder if the fuel attacks clear hose?
it’s been a couple of years and so far ok and I am aware of this possibility. This is diesel fuel and a failure would not be catastrophic. Most of the time the fuel is below this point in the vent and is only above when I’m doing a carefully monitored top up.
I thought of this thread when using moldable plastic this morning playing with mini foil board prototypes. I bet having a jar of it could come in very handy on a voyage. It can be sanded, drilled, tapped etc.
https://www.instamorph.com/
Hi Michael,
Yes, agree, this is good stuff, and would be excellent for a number of projects on a boat, especially if your 3D printer is on the fritz.
Consider it also for “minor” medical needs: a thumb of mine is prone to tendon/ligament pain: a simple covering of this stuff; form fitted mid thumb to over the thumb/hand joint provides protection from bumps and support for use and is held in place with a little Velcro. It was easy to fabricate.
My best, Dick Stevenson, s/v Alchemy
Yes! I splinted my broken pinky with it once, and the doc thought it worked enough that he didn’t replace it.
Hi Michael,
What cool stuff! Gave me all kinds of fun ideas. Thanks
No problem! I forgot to mention you can also splash a mold on an existing part and thus make a new composite part! If you also brought mold release.