
Here’s a simple gadget that I built in a couple of hours a few years ago that makes a huge difference to the effectiveness of our freezer, by circulating the air so the stuff at the top and farthest from the plates does not thaw, while the food at the bottom and against the plates remains frozen, particularly when the freezer is packed tight.
The materials added up to less than $30 and over the years it has saved a lot of expensive food from spoiling; not to speak of protecting us from possible food poisoning as a result of partially thawed food—I get enough technicolour yawns from seasickness, thank you.
Here’s what you need to build one for yourself:
Materials List
- A 12 volt computer fan, something like this will do
- A length of about 1-1/2 inch (4 cm) ID PVC pipe—ideal size is such that the ID matches the diameter of the fan blades, or a little bigger
- Some scraps of thin plywood
- Epoxy
- Thickening agent for the epoxy
Method
- Build a small box with a bottom, but no top, sized so the inside will just allow the fan to drop flat into it so that it rests on the bottom. Make sure the bottom is sized to fit inside the sides.
- Make another piece of ply the same size as the bottom. We will call this the fan mount.
- Said box should be about 3 inches (8 cm) deeper than the fan is thick.
- Before gluing the box together with the epoxy, cut holes in the middle of the bottom and the fan mount the same diameter as the OD of the pipe. Now’s the time to buy that hole saw set you have been lusting after.
- Glue the box together with the fan mount at a depth so the fan can rest on it with the top just flush with the top of the box. Some clamps will come in handy here. Wear gloves too, epoxy is nasty stuff—of course that won’t stop you getting it in your hair, as I always do…just call me resin head.
- Glue the bottom flush with the bottom of the box.
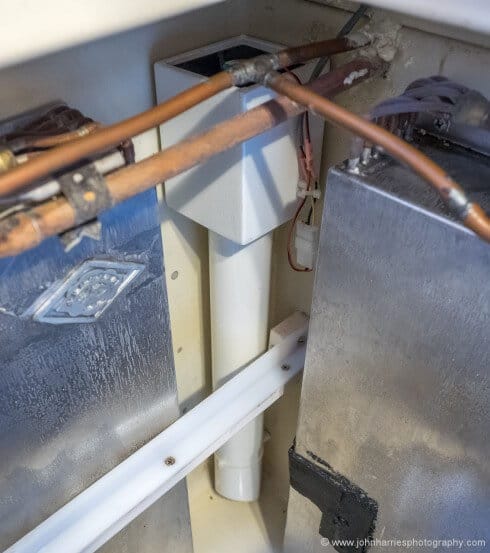
- Cut the pipe to length so that with the box attached to the top it will reach from the bottom of the freezer to the top as shown in the first photo.
- Cut the bottom of the pipe at an angle, as shown in the photo.
- Let the glued box set.
- Mix a thickened batch of epoxy about the consistency of peanut-butter.
- Insert the tube into the box so that the top is just flush with the top surface of the fan mount.
- Secure the box to the top of the pipe with a bead of thickened epoxy between it and the underside of the bottom of the box.
- If your carpentry is as dodgy as mine, after the pipe and box join sets, turn it back over and fill any gaps between the outside of the pipe and fan mount with thickened epoxy, so it does not leak air.
- Paint the whole thing with gloss enamel to make it easy to clean.
- Install gadget in your fridge with a couple of cable ties through mounts.
- Drill a small hole to run the wires out and, after threading the wires, use some spray foam to seal the hole around the wires.
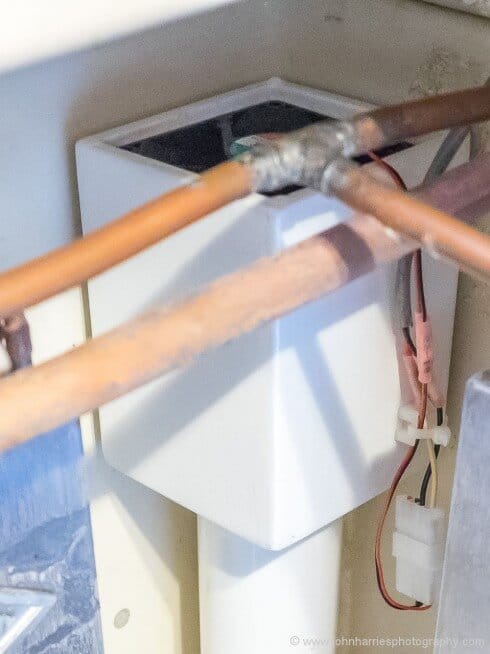
If all of this is confusing the hell out of you, this close-up photo of the box at the top of the pipe with the fan just visible will help.
The Cunning Part
OK, about this time the battery misers among you are bitching about the electricity used by this fan running all the time. Not to worry:
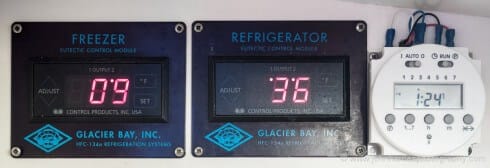
The gadget on the right is a cheap timer available from Amazon. How do they build this stuff for so little, I ask you? Come to think of it, I don’t want to know.
Anyway, hook up the fan to the timer and you can program it to your heart’s content. We find that running the fan for one hour every four hours seems to be optimal.
There you go, just call me MacGyver.
Oh yea, one more thing. We found it works best if the fan sucks cold air up from the bottom rather than blowing warm air down.
If you just drop the fan into the box and don’t fasten it down—you made the box a nice snug fit, being the craftsman you are…right?—you can try it both ways for yourself, simply by flipping it over.
Also, not fastening the fan down makes it easier to replace when it dies. We find they last a couple of years, so best get a spare when you order the first one.
Nice, John, and easy to create. The humble “muffin fan” is quite useful around the boat, I find.
Hi John,
Those with big freezers will benefit from any help they can get as, too often, the manufacturer has dropped the ball by only providing marginal insulation. I figured, in warm water, that 60-70% of our daily amperage went to our freezer. It is now less as we are in cold water, but it is still significant.
When we first got Alchemy, it was an AC boat with a big holding plate such as I see in your pictures. Once, sometimes twice, a day, it needed drawing down (for us off the AC genset) and, indeed, while it cooled the freezer over the subsequent hours, temperature distribution varied widely (even more so as my holding plate was at the bottom). I made a device very similar to the one you describe and it did help a great deal over the years.
Ten years ago we made Alchemy an all DC boat and moved to air cooled DC units using evaporator plates for cooling which we located high up on the freezer sides. This system cycles in a similar way to a household frig, on and off regularly during the day. We found that temperature distribution was no longer an issue and stopped using our muffin fan/pipe air distribution system.
I suspect that those with holding plates will greatly benefit from air being distributed in the way you suggest. Those with evaporator plates and constant cycling less so or, as we found, not enough to make the effort worth it.
Your design, by the way, is really elegant and functional. I went through a couple of iterations and mine did the job, but your design has some very nice features.
My best, Dick Stevenson, s/v Alchemy
Hi Dick,
Good point about insulation, although ours is custom built and very well insulated, but even so the fan helps a lot. I think the issue is that our freezer is huge and at the beginning of a cruise it’s packed with food. And the stuff against the plate insulates the plate from the rest of the food.
The whole evaporator or holding plate decision is an interesting one and one I might post on. Interestingly battery capacity in relation to freezer size is the governing factor on which system is best.
I think a lot of the reason that people have variable temps with holding plates is that either the plates are not filled with a true eutectic solution, or the superheat is set wrong and so they never truly freeze. Most refrigeration technicians around boat yards don’t understand superheat or how to set it and if you get that wrong a holding plate system will be horribly inefficient.
Hi John,
I will leave other comments about refrigeration till you do the article you were referring to. Our ploy with evaporation (and holding) plates and food resting against them is to use Dry Deck, the plastic snap together decking. It take up little space, allows air to circulate and prevents freezer burn which used to happen when we had a holding plate system. In fact, Dry Deck finds a multitude of uses on Alchemy, none of which have to do with decking.
Dick
Hi Dick
Dry Deck, what a great idea. Like you, we use a bunch of it, but I never thought of that. We will try it.
That fan molex connector is not watertight by any means, and they are not particularly secure either. Could be a fire and or electrical shock hazard.
Using some sort of grating would also help to encourage air flow around the freezer. Ideally you want a thermal mass of cold stuff with cold air circulating all around, well insulated. Not only does the cold air circulate heat to the plate – air is a relatively poor conductor of heat and will act as additional insulation (I realize that may seem contradictory).
Hi Brian,
The fan is only 12 volts and is fused, so I really can’t see a fire or shock hazard.
Another vote for Dri-Dek (I think this is the official spelling) which we use in the fridge, in the engine room (stand off instead of standing directly on the hull plates; “anti chafe” for water tanks) and to line some lockers. Something similar, if slightly thicker, can be used in combination with judicious drilling of holes to circulate air around mattresses or similar bedding, which reduces mildew and increases cooling air circulation. It’s handy stuff, and I got a roll of it cheaply.
I forgot: besides the obvious use over the outside helm cockpit sole, we also have a triangle of Dri-Dek in the anchor well. Keeps the paint intact from dropped shackles, etc.
We yanked the original Grunert system last year mostly as it was under the bunk and would startle you awake when it kicked in at 2am. I found out while stripping everything out that the lines run through the head had sweated so much the whole cabinet had to be torn out and rebuilt!
The dc system I cobbled together (BD50 and large evaporator plate) has worked well (also made the freezer 50% less) – and when I put in a divider for the fridge I used one of those minifans run by a digital thermostat (amazon $19) which works awesome. I like really cold milk and ice.
Which means more solar, etc . (Sigh)
Miami
SV Yume
I have done the fan arrangement in the past, but with a different setup.
The computer fan I used was 5 volts so I could power it with it’s own rechargeable battery of the type used to charge smartphones. I can get 4 days of fan use out of one battery, enough time for the second battery to charge via a cellphone solar charger. Battery is 15000 mah, caught on sale for $15.00.
Also, instead of building a box to house the fan, I used a 90 degree pvc (drainpipe) plumbing elbow, gluing the to an adapter with same hole size as blade diameter. A pipe fitted to bottom of adapter runs down to bottom of reefer.
Hi JimB,
Sounds like a great way to do it. Although I’m not sure my aging brain would do that well at remembering to change and charge the battery every 4 days!
The components for the project are expecting regulated 12Vdc, how have they fared seeing charging voltages of 14+ Vdc?
A simple regulator will prevent any problems but it means a little circuit board with a couple of capacitors and the complexity of the project really increases.
A regulator like this: http://www.jameco.com/Jameco/Products/ProdDS/889305.pdf
Hi Kevin,
I wouldn’t worry about a regulator. We typically get at least 5 years from a fan, and we have only had one timer fail in 10 years.