
In the last article we looked at non-destructive testing. But what if you can’t find anyone to do that for you, or, as is quite likely, the results are inconclusive?
Or maybe it’s just time to torque the keel bolts.
To Torque or Not To Torque
One idea I had was to torque the bolts to see if anything bad happens. Of course, if we have not yet bought the boat, it’s unlikely that the owner will allow that. But let’s assume we have bought the boat (or the seller is desperate).
So would I try torquing the bolts as a way to give myself confidence?
Absolutely. Even if I saw no problems, keel bolts should be torqued to specification before going to sea.
Risks
But I would also go into it with my eyes open, since there is a real risk of breaking a bolt or even crushing the fibreglass laminate and/or structural members the bolts pass through, if the boat was poorly built or has deteriorated.
Sounds terrible but, then again, if we don’t trust the bolts in the first place, how much worse off are we if we try this and it goes badly? I would argue not a lot.
And even if the boat was properly built we can still do damage if we are not smart about this. Read on for how to avoid that.
Torque To Use
The next problem is that as soon as we mention this idea to any sort of marine expert (Bill from Mars Metals included), their first words are:
Check with the builder or designer for the correct torque settings.
Eminently sensible…and totally impractical, at least in many cases, because:
- Many of the builders of the boats we are likely to be refitting are no longer in business.
- The designer might still be around but, even if they are, they may not have done engineering on the boat since many builders were not willing to pay for it.
- Even if the designer has the correct number to hand, how can we know that the builder put everything together as specified so it can withstand the specified torque?
Heck, in our case with the J/109, the recommended torque was for 1″ bolts, but on our boat four out of five are 1-1/4″, so I was not exactly filled with confidence.
Now what? Well, the good news is that we can calculate the correct torque with a handy dandy calculator that I have used for several projects including upgrading the series drogue chain plates on the McCurdy and Rhodes 56.
Not That Simple
Great, all set. Err, no. It’s not that simple:
- While the calculator can come up with the correct bolt tension not to shear the bolt, crush the laminate, or strip the threads in an iron keel, that assumes we know the strength of everything, which may be tricky for the bolt and keel and near-impossible for the laminate.
- Torquing a bolt is actually a very imprecise process with a margin of error when converting to bolt tension—what really matters and will govern whether or not bad shit happens—of plus or minus 25% and that assumes the wrench is properly calibrated and used.
- Just a bit of corrosion on the nut-to-bolt interface can result in far less bolt tension than desired at a given torque, and lubricating the nut can result in far more if we don’t account for that.
- We also must choose a preload to use, normally defined as a percentage of the bolt yield strength.
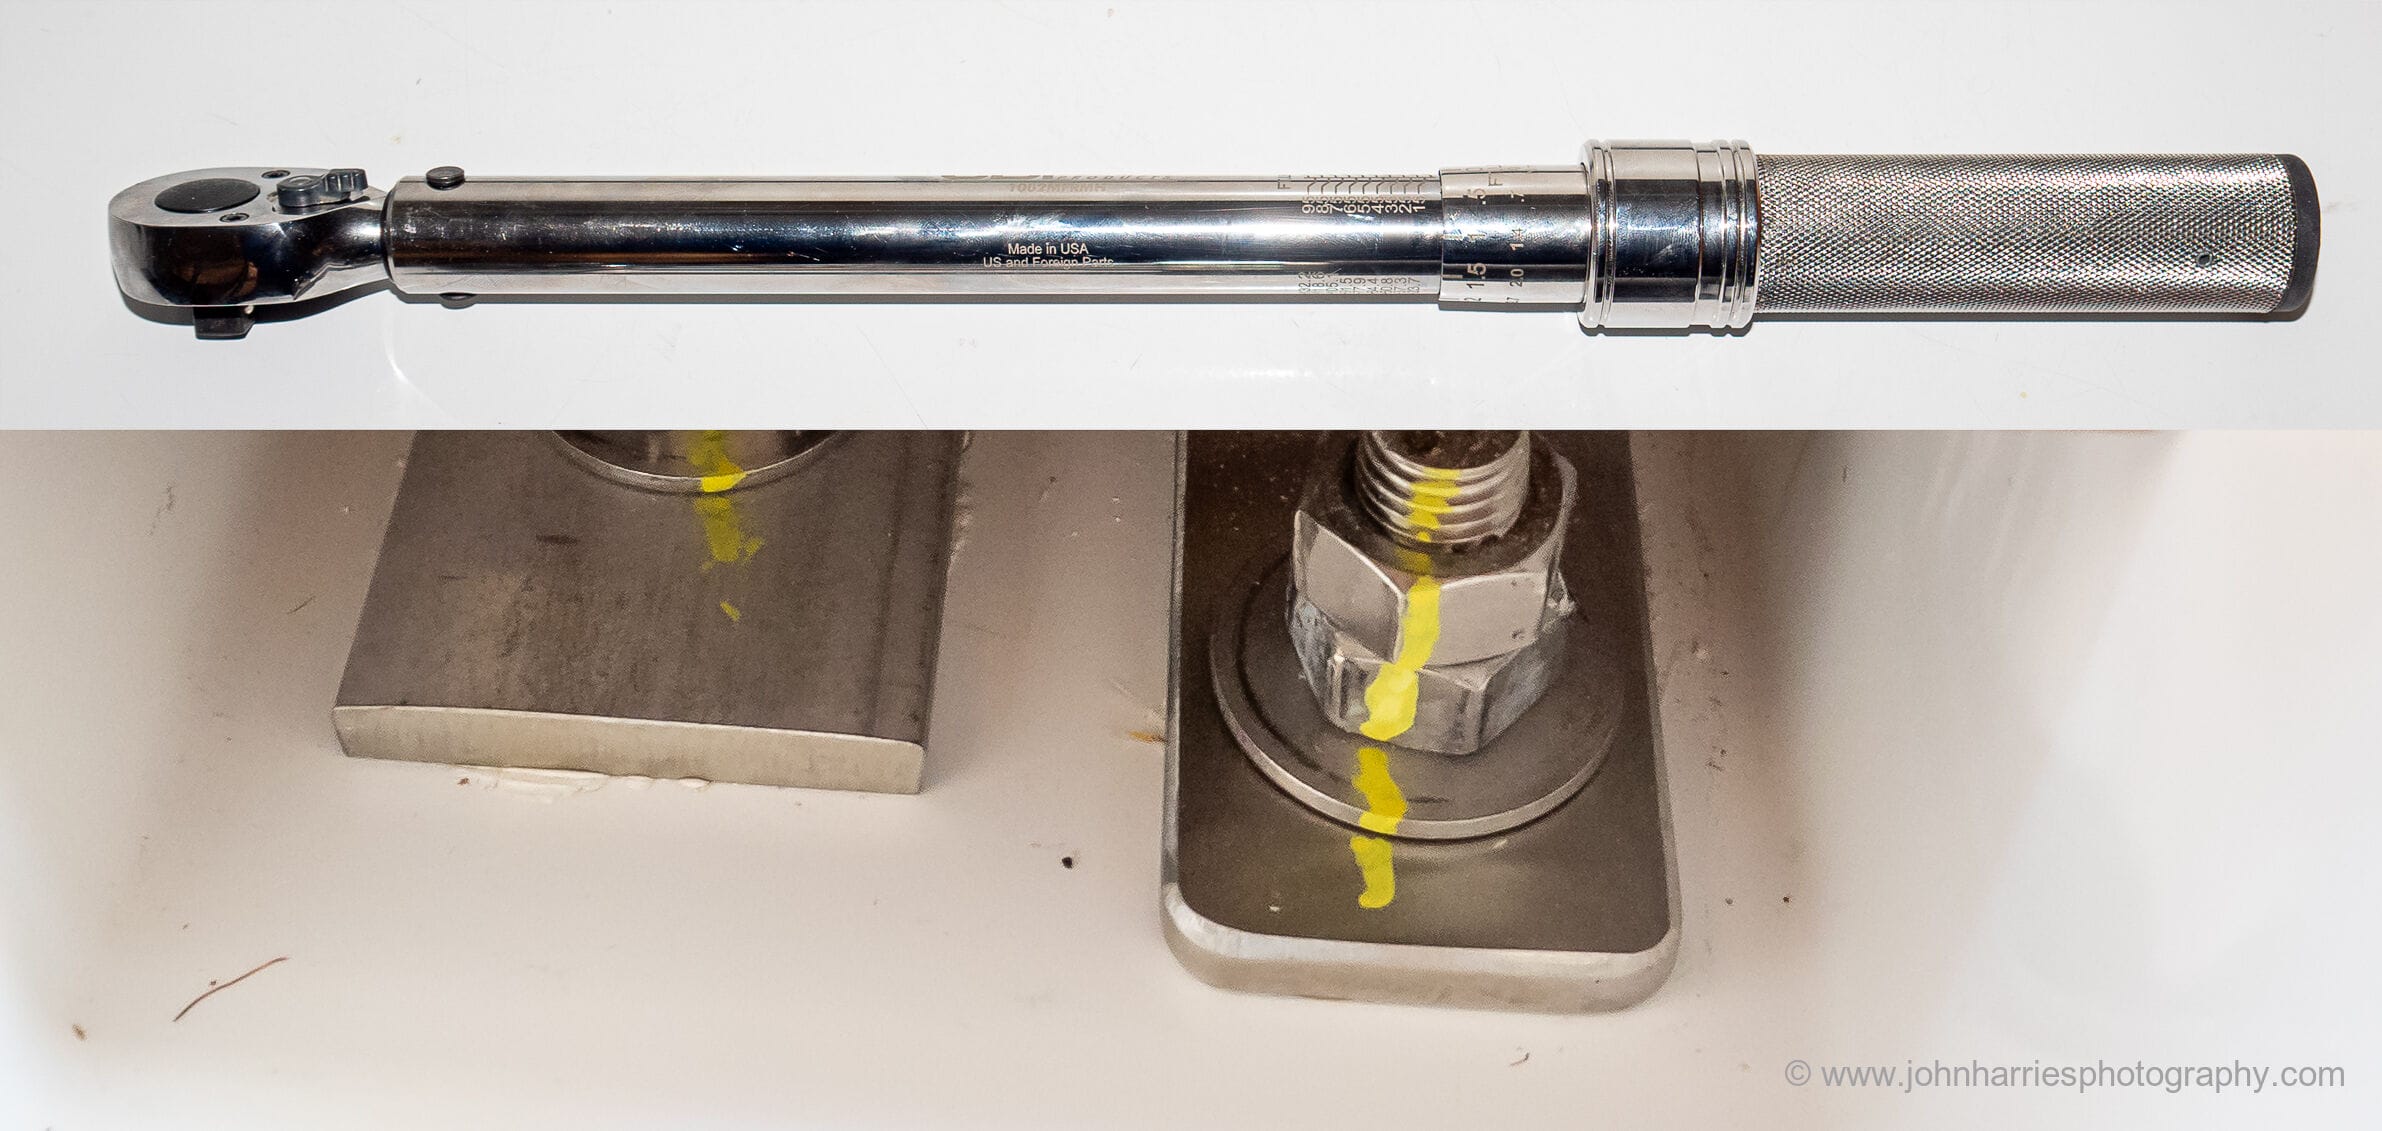
Process
Here is how I went about it when I torqued the keel bolts on our J/109:
On a related subject, a few years ago I was running downwind, mid-atlantic in a F7-8 with a fully developed quartering sea . Our hydrovane self-steering was doing a brilliant job keeping us straight as big waves pulled the stern one way, then the other. Until “Snap” – one of the M-10 bolts holding one side of the lower A-bracket snapped, leaving the hydrovane rudder waggling alarming and me wondering if the whole stern was about to be ripped off the boat. After an interesting 1/2 hour hanging over the stern with my crew sitting on my legs I managed to remove the hydrovane rudder without losing it and replace the bolt and we reached the azores without further ado.
On examination of the snapped bolt, it had the classic markings of fatigue failure – lots of little parallel lines across 2/3 of the bolt and then a straight tensile snap when it finally gave way. Fatigue in situations like this – and keel bolts, and engine heads – happens when you there is not enough pre-load on the bolt. If there is enough pre-load on the bolt, it will remain in tension at the same stress throughout the loading cycles with the variation taken by the reduction in compression on the surrounding material. Without pre-load, all the variation is taken by the bolts and they suffer fagiture accordingly. Hence the reason the torque values and sequence on engine heads is detailed in such a thorough way.
Reaching the Azores, I bought some new bolts and researched how to improve matters. I found: The Hydrovane installation instructions suggest torque values between ‘tight’ and ‘very’ with no numbers at all. Looking at M10 bolts, the suggested tightening torques vary between 55 and 95Nm depending on grade of steel used. For me this is “quite” tight – but I’m pretty sure that when installed the hydrovane i went to “very”, which probably pulled the bolts into plastic deformation – thereby drastically reducing its ability to withstand cycle loading.
We tightened the bolts to 60Nm and set off back to the UK. They came loose within 24 hours, and we used the autopilot.
My current boat has a WindPilot.
Takeaway points from this are:
– bits that are subject to variable loading (such as keels) need to be capable of taking thousands of loading cycles. It’s this, as opposed to 1 big load that is most likely to cause failure
– you can’t assume that anybody in the yacht industry understands this
Hi Robert,
Good point on the dangers of not preloading enough. I had not emphasized that enough and have now changed it, thank you.
And I agree, the marine industry, and boat owners, are woefully ignorant of the complications of torquing a bolt even half way right. Me too up until a few months ago, and I still have plenty to learn, I’m sure. Based on my own experience, I’m going to guess that a good 20% of all failures on yachts are, at least to some extent, the result of not torquing bolts properly.
Hi Robert,
Yes, the importance of getting to appropriate tension is so true and so often misunderstood.
I wanted to add that the key to keeping that tension constant can lie in making sure that the bolt is acting as enough of a spring. If you look at big old industrial machinery like knee mills, you will often see that the base casting has a raised area where the mounting bolts go. This is to make sure that the distance between the head and where the threads engage is longer to lower the spring constant. As a result, there is more stretch of bolt for the same tension so if the material underneath creeps (yes, composites do) or something crushes or shifts, not as much tension is lost.
Applying this to keel bolts, they almost universally have less length before the nut to stretch than I would generally like to see. In cases like this, the other game you can play is to use a disc (belleville) washer under the head. Taking a 3/4″ stainless keel bolt where we might want to preload to something on the order of 10,000 lbs, looking at McMaster there are at least 2 stainless options where you could use 2 stacked in parallel. No, I have not done this to my own boat and don’t currently feel the need but it can be a good trick in certain circumstances both to prevent fatigue and to keep a bolt from backing off.
Eric
Eric,
That’s an interesting idea on increasing the bolt spring length with washers.
One thing I would say to others is that I had a huge personal leap forward in understanding after one of Eric’s comments, some months ago, finally got it through my thick scull that a bolt is actually acting as a very stiff spring. Once I had that sorted out in my head, all the other stuff like the relationship between preload and how much actual load the bolt is required to take came clear.
John,
I would seriously consider bolt tensioning using a machine that stretches the bolt to the required tension and then allows the nut to be made up and flush before releasing the tension. They eliminate all the doubts around friction factors, dirt and any galling. They fit in very small spaces, such as in your picture, as most high pressure flanges in critical bolting applications, have very little space between the nut and pipe wall. The down sides are that keel bolt material specification needs to be known so that the correct stretch length is applied and it would be more expensive than a calibrated torque wrench. Having said that, a keel bolt in good condition, of a known material, with the correct lubrication and a calibrated torque wrench would be more accessible to the majority of people. Still merit in investigating if a keel refurbishment and bolt replacement is on the cards.
Just some thoughts,
Alastair
ps for a laugh. On old API bolted derricks (drilling rigs), the torque specification on the manufacturers drawing was ‘the weight of one man on a flogging wrench’.
Hi Alastair,
Good idea, but I’m mystified how said machine would grab the stud or nut. Also there’s the issue of what the machine’s base would push against. Could you link to one of these machines?
There are many suppliers of bolt tensioning equipment.
One example is https://www.nord-lock.com/boltight/products/standard-bolt-tensioners/
with an illustrative video here: https://youtu.be/4ntz-biBWo8
Svein,
Thanks for answering John’s questions about tensioners.
Alastair
Alastair: you might have an alternative provider of bolt tensioning equipment (it has become a rather generic tool). I hope my link was satisfactory.
On a different note: there are some alternatives for ensuring that the required bolt tension has been achieved (and is maintained). For instance a direct tension indicator: https://en.wikipedia.org/wiki/Direct_tension_indicator
which has an ASTM standard https://www.astm.org/Standards/F959.htm
Hi Svein,
That’s interesting too, thank you.
Hi Alastair and Svein,
Of course Eric’s comments make sense, that said, what a cool tool. I WANT one. Seriously, always fun and interesting to learn about these things, thanks.
Hi Alistair,
I hate to say it but I don’t think that a tensioner makes sense in this application. First there is cost and availability, the units I have used are hydraulic and not cheap, maybe there is a rental option? More importantly, I don’t think you will get the desired result. These work quite well with long bolts and machined surfaces. The sad fact is that the flatness and parallelism tolerances on most bilges is quite poor and the perpendicularity of the stud is not that great in the casting either. My fear is that you might get the bolt to tension, wind the nut on and not fully seat the backing plate and find that everything settles when you release the tensioner.
In general, longer bolt length to stretch is better. Unfortunately, keel bolts are just not that way. What this means is that tension is highly sensitive to displacement so any settling of anything will have big effects. At least on the boats that I have seen, a backing plate would tend to sit on top of high points in the layup/gelcoat and when tension is applied, it will crush those down until it is bearing on a bigger surface and I don’t think that it is practical to perfectly match the older position. Maybe you could do it multiple times being very careful not to disturb anything each time.
Another thing to keep in mind is that not all boats have sufficient extra thread to use one of these. On our boat, you could probably get 3 threads engaged.
Personally, I would be tempted to stick to a torque wrench with some form of lubrication on the nut and understand the limitations of the torque to tension relationship.
To your fun story about bolted derricks, we had a turbine (designed to API standards of course) in a very remote place that needed the case split and when putting back together, our service guy sent around pictures of them weighing factory workers and having them hang onto the end of a piece of pipe on the ratchet. I guess that either the huge torque wrench or the torque multiplier was broken.
Eric
All fair points Eric.
If starting from scratch with a new design, I would probably allow sufficient bolt length, and appropriate geometry around the bolt, for a hydraulic tensioner, should the builder have access to one. They are, indeed, far superior to a torque wrench or torque angle gauge.
I agree that this are probably not practical for the majority of already-built applications, for the reasons Eric described. One that’d work for my boat’s keel bolts would be worth more than I paid for the entire boat.
A torque wrench will only give a useful result on clean threads. If the nut has galled or corrode onto the shaft, it has to be removed & cleaned before it can be re-torqued. Applying torque to a seized nut doesn’t tension the bolt, it just twists it.
I think that either torque, or torque plus torque angle, is likely the right answer for installing these nuts….. but on an existing boat, I’m not sure if there’s much point in doing either without first removing the nut and cleaning the threads, at which point you should at the very least vacuum out any water/crud below the washer and have a good look at what’s going on down there.
I love your line “if the bolts need replacing?- hold on to your hats and wallets”. This post is very important and very critical, but loosing the keel offshore is bad. The other post “Refits-The radical Option” I also find very important and I thank you a lot for being so open and honest. This is something unusual to read in standard boat magazines. Europe is now filled up with former cheap light weight charter boats fore sale. They can be transformed to off shore cruising yachts or should they be destroyed. They are classed in the CE-system as class A-Ocean or class B-offshore, but that classification is often old and never up dated. A CE class A-Ocean should not last for ever. A commercial ship must be reclassified every year. So should we refit or destroy or maybe develop a better yacht? You have been writing on developing a good off shore yacht before, and that option can become the solution.
Interesting. I am left wondering what we are trying to achieve. If I was seriously concerned I suspect stud removal is the only sensible option. I had assumed you were torquing for a much simpler reason: as a safety check that no single bolt was already in a poor state that had been missed. A light torquing should show up any severely damaged bolt without risk of further damage to good bolts. Any wasted bolt will have relaxed below original torque. In other words, if it moves under light torque, be very suspicious. It should not move.
Hi Richard,
I think that’s kind of what I wrote, but longer. Also, a very light torque would be a bad idea after removing the nuts since if preload is a lot lower than applied load there will be movement in the joint, which will result in fatigue failure in the bolts and water ingress into the joint. And if we don’t remove the nuts we can’t know that we are not just torquing against a corroded thread.
Point being, I know that the above sounds more complicated than it needs to be, but it’s not. In fact, if anything I have probably oversimplified.
As to removing the studs, that may be an option with iron keels, but it won’t work with lead, in most cases, because the studs are cast in.
Three comments:
1) for many production boats, the keel bolts are quite large so would require a 3/4″ or 1″ drive torque wrench to properly torque. My concern would not be about avoiding using the bottom 20% of the torque wrench range but rather avoiding top 20% of the range. In my case, finding a large enough (55 mm) deep socket or crow foot is also a challenge.
2) thread pitch is very important in determining torque. If someone just measures bolt diameter and judges torque from that, they could easy over torque the bolts.
3) a portable hardness tester (although it could be hard to find or borrow) could be used on the end of the stud to get a reasonable idea of the grade of the bolt (e.g. grade 2 vs 5 vs 8)
Hi Mark,
1). Good point, although my understanding is that most torque wrenches are pretty accurate at the top end of their range. That’s certainly what the calibration certificate indicates on both of mine.
2). True, that’s one of the reasons I like the torque calculator I linked to, it has about every thread and diameter combination we have ever dreamed of built right in.
3). That’s a good idea, I will add it to the article.
A 4:1 torque multiplier (1/2″ in, 3/4″ out) is about $150 CAD, and a decent 50-250 ft.lb torque wrench in 1/2″ drive is also about $150 CAD. Both are sometimes available for half that. A thousand foot-pounds should cover just about any bolt you’ll ever encounter up to 1-1/2″ plain or 2″ lubed. Multipliers are a lot cheaper and less awkward than five-foot-long monster wrenches. Step up to a 9:1 torque multiplier and you’re at 2250 ft.lb, which translates to about 30 tons on a 2″ 4.5tpi bolt, so I think we can cover most common keel bolts with tools we’ll find at any truck mechanics’ supply shop.
Knowing exactly what to do is, of course, the hard part. There’s no simple shortcut to figuring out how hard to torque a bolt, or how many degrees to turn it after reaching some specified torque value.
Hi John,
I think that the process you laid out is reasonable. Probably the most important point you make is to not just look up a general torque table which is only based on the shank and head strength of the bolt. Those tables miss the compressive strength of what is being clamped, the thread strength of the bolt and the thread strength of the nut. When you are clamping something that is steel and using a normal nut, they are fine but even aluminum can be problematic with certain types of bolts. It would be very easy to crush the laminate or even damage the lead, after all a torque table would have the tension on a 3/4″ stainless keel bolt in the realm of 16000 lbs. While that may sound like a ton, it is less than you might think when you look at a thin keel root and the bending stress. In our case, I calculated the max joint separation force and then figured out a preload from there taking into account the geometry of the joint and bolt pattern. The answer that I got seems roughly in line with your calculation method. On the other hand, I have heard of owners of our model boat applying torques of up to 500 ft lbs on our boats (1″ keel bolts) with likely resultant tensions over 30,000 lbs assuming that the bolts were lubricated and not galling, that sounds like potential for damage to me.
To your note about potentially breaking a good bolt at the 70% torque number, I would not be that worried about it. That 70% is to yield so most bolts can actually take a lot more before breaking and one thing that tends to happen when they start to yield is that the threads lock up (you yield the first thread typically) so the tension does not keep rising linearly with torque. Over the years, I have spec’ed tons of bolts at between 70 and 80% of yield depending on the company and never had one break due to this (assemblers not bothering with a torque wrench or a wildly non-parallel joint have caused issues but those are separate). Still, the way keel joints are designed, I would use a lower number as you suggest as the bolts are oversize for the loads to allow for deterioration.
FYI, most people are using loctite 243 instead of 242 these days, it is supposed to do better with oil and not need a primer for some materials. I am a big fan of 243 and often use it, at work most of our fasteners receive it. As you mentioned, I use a K factor of 0.2 with it and the other nice thing is that it makes it a bit more consistent than dry. The real annoyance with Loctite for personal use is that once the bottle is opened, its shelf life is measured in weeks so I buy the little single use packs as much as I hate that type of packaging. I still use a lot of never-seize as well, it is great stuff but with the industry I have been working in for a while, the mess associated with it is not tolerated like when I did industrial machinery where it was on everything.
Eric
Hi Eric,
Thanks very much for going through the article for reasonableness. I always feel a lot better about these things when you and Matt have been through them and not found any truly horrible blunders.
Thanks for catching my mistake on breaking a bolt. I went back to the calculator and found that actually the results were exactly as you say: if all the inaccuracies went against you the bolt would start to yield, not break. I will fix it.
Interesting on Loctite 243 against 242. I did not even know there were two that close together in specification.
Hi John
The technical discussions surrounding keels are all way above my head, but it does seem to me that a yacht with a keel as part of the hull, for example the Rustler 36, is the way to go. This type of hull may not be as fast, but it provides a comfortable motion in a seaway, there is no way the keel us going to drop off, and hitting a rock is a minor inconvenience which can be repaired later. Just a thought. ?
Yours aye
Bill
Bill, while there are plenty of points in favour of an integral long-keel design like the Rustler 36, they’ve been a shrinking minority of the cruiser and cruiser/racer markets since at least the early ’70s. They also aren’t without their own flaws; encapsulated cast-iron ballast inside the hull can be a real pain too. Most ballasted monohull sailing yachts of the last few decades have keel bolts, and a significant fraction of them seem to have metallurgical or structural issues of some sort in that region.
Personally, I’m glad to see AAC’s million-candlepower spotlight pointed at this. We may not be able to do much to fix the boats that already have problems, but think what we can achieve if we scare a few hundred buyers into asking boat salemen “So, those keel bolts…. they’re bronze, right? Oh, they’re SS? How does your factory verify bolt pre-tensioning? Are they prone to fatigue cracking? Crevice corrosion? You aren’t sure? OK, go call Engineering and then call me back, I’m going to go ask your competitor the same things.”
Buyers saying that to salespeople means that salespeople will ask that of engineers, which means engineers now have ammunition to lay in front of management and say “This lady got reluctant about spending $500,000 with us, because you insisted we cut $250 from the materials budget and woudn’t let us disclose our QA records.”
Hi Matt,
I think that’s a very good way to look at it. If we don’t insist on good boats, or any other product, we only have ourselves to blame.
Hi Bill,
Sure, that’s true, but:
https://www.morganscloud.com/2019/10/20/buying-a-boat-never-say-never/
https://www.morganscloud.com/2020/05/16/refits-keels/
A few years ago a yacht called Hooligan V sank off our homeport of Salcombe with the loss of 1 life. Sailing along in moderate weather the keel fell off, but it was night and in winter. The MAIB report (https://assets.publishing.service.gov.uk/media/547c7036ed915d4c0d000085/HooliganVReport.pdf) is a gripping read- I truly couldn’t put it down, and I urge people to look at it.
it’s a horror story played out over 65 pages, but in summary
– Yacht building standards do not take account of dynamic loads or fatigue
– Designers are not obilged to follow the standards anyway, and in this case did not
– The fabricator who made the keel changed the construction in a way that reduce the strength further
But wait…it gets worse
– The owner wanted to win races, so added more weight to the keel
– It actually wasn’t the bolts that failed, it was the welding; but there were muliple failings in the bolts as well
Holy f***. That’s horrifying. Jaw-dropping levels of negligence by multiple people at multiple points in the design & build process, with some of the defects being of a type that no normal surveyor would find once the boat was complete, and others being obvious with the boat out of the water – but ignored anyway. It’s a pretty damning condemnation of the regulatory regime, too, that despite European law requiring a veritable boat-sized mountain of RCD paperwork, no proof of compliance for these boats could be found.
Hi Matt,
There was a similar case in Australia, involving a Sydney 38, with two fatalities. The sub-contractor who changed the keel fin design went to prison for manslaughter- eventually. It was a very protracted legal case.
Hi John,
Keels have come up on the Valiant web site and information from the factory has it that the 17 keel bolts on my 40-foot boat have a torquing sequence: not only incremental increases in the torque settings but also a sequential pattern on the bolts. The pattern is essentially from the center bolts moving out towards the stern first, then to the bow, and back and forth till the ends are reached: much like bouncing around when tightening the lug nuts on a car’s wheel.
This advice may be more important when the keel has been removed and the bedding is being squeezed in place, but may have some importance when just re-torquing the bolts on a keel in place.
Have you encountered similar advice?
My best, Dick Stevenson, s/v Alchemy
Hi Dick,
Great that you have such detailed information for your boats. As to the pattern, no I have not seen that specifically for keels but doing something like is is pretty standard for torquing and sort of bolt pattern. Definitely something I should have mentioned. I will add it to the next chapter on removing and reinstalling keels.
This series on keels has been both horrifying and wonderfully helpful. Horrifying as to the potential of an aneurysm-level disaster, and helpful as there’s plenty of practical detail.
I’m left holding a dilemma, however, and would welcome some practical advice.
Hunter 42 Passage CC 1993
Owned since January, 2023.
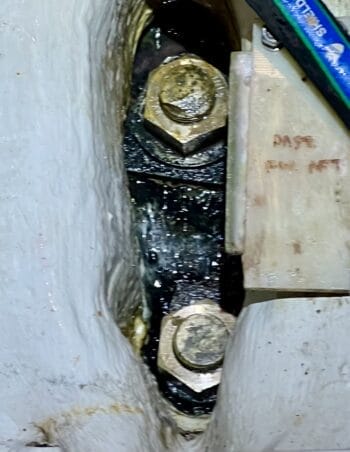
First attempt to clean out the main bilge revealed small semi-circular cracking outboard of the keel bolt diameter (3 bolts so effected). WATER very slowly seeps through these cracks (like the speed of blood from a paper cut).
Advice from others has ranged from “don’t worry about it” to “haul her out NOW”.
I’m taking a middle ground approach and taking her to a yard for the following:
A reasonable plan?
Hi Mark,
You really need an engineer who understands keels to answer this properly, but if it were me, I would be taking the keel off.
Clearly the laminate is damaged and water soaked so while distributing the load better in certanly a good idea I think the laminate itself in the way of the bolts needs to be ground out and reinforced and then that reinforcing carefully tapered to distribute the load.
Then when you put the keel back you can also true up the joint as described in the next chapter and really properly seal it since from what I see trying to the seal the joint without removing the keel, in the way you propose, is futile.
Wow, this is an enlightening and also worrisome thread. Thanks, John, for diving into the subject. Here’s what may be a stupid question: Is it feasible/recommended to check bolt torque, one bolt at a time, while in the water? What would be the expected difference in the fixation force between in water and when the boat is on the hard, with a total compressive force on the order of 15,000 lbs due to the weight of the hull for a 40 +/- foot cruising vessel? Sorry if my stone age level of engineering knowledge is on display.
On land, the keel bolt tension is just the preload created by torquing the nuts.
Afloat and stationary, the keel bolt tension is the preload plus the submerged weight of the ballast keel.
Afloat and moving, the keel bolt tension is the preload plus the submerged weight of the keel plus the reaction forces due to dynamic motion. Those reaction forces can add up to three or more times the weight of the keel, and they’re what we’ve specified the preload to accommodate.
There may be a slight risk of under-tightening the nuts if you do it while the boat is afloat, although the difference is small relative to the dynamic loads experienced in an ocean storm. But I’d say the main risk is this: if you do find an issue, what are you going to do about it while in the water, other than make a mad dash for the travelift? No, this is fall haul-out work, leaving time while the boat is on the hard over winter to make any necessary repairs.
Hi Roger,
For a well designed bolted connection, the loading condition does not matter when torquing the bolt. The key here is the well designed part and there are a few things to watch there.
The goal of torquing the bolt is to get it to a tension, torque is the easiest proxy so that is why we use it. For someone re-torquing keel bolts, the goals are to make sure that the tension is within a range and also to proof check the bolts to help make sure they are not badly compromised.
In a well designed joint, the bolt is less stiff than the things it is clamping so you can think of it as a spring clamping 2 rigid things together. Because the things being clamped are rigid, the distance between the 2 ends of the bolt is just a function of the clamped geometry. If you apply another force pushing those 2 things apart, the bolt won’t even know that force is there until the force is greater than the preload in the bolt and the rigid parts actually move. At that point, the bolt will begin to stretch more until the force in it is equal to the force pushing the 2 rigid parts apart.
With a well designed keel connection, the preload (spring) force on the keel bolts is much greater than the weight of the keel. So the bolts don’t even know whether the keel is hanging from them or pushing up on the hull on the hard if the keel casting and hull layup are stiff enough. The only time you might ever overcome this preload is in something like an extreme grounding but in normal use including when heeled a lot, you will not overcome it. We do have the problem of the preload diminishing over time and re-torquing is important to dealing with this.
So what does change then? The answer is that the force between the 2 rigid parts is less if there is a force trying to separate them. But as long as this force is above 0, that is the only difference. The distance doesn’t change so the preload in the bolt remains exactly the same.
The caveat to all of this is a well designed joint. The most obvious area where many sailboats fail this is that the bolt should be less stiff than what it is clamping. The solution to this is a solid layup in the bilge and large backing plates to put the load over a large area (there are other tricks like nut spacers but I have never seen those in a bilge). This relationship is more forgiving than one might think but if you are clamping something that is not very rigid, you do have to watch it.
If you have a reasonably well designed joint, there should not be a significant difference in bolt tension whether you do it in the water or not. By the way, things like rig tension and how it reshapes the boat are similar to whether the boat is floating or on the hard. To me, the question would more be what could go wrong that you don’t want to have go wrong in the water. Most cruising boats have quite a few bolts but even so, I would not want to have to travel far to haulout with a broken one. There is always the possibilty of a leak too, probably not catastrophic but a consideration.
Eric
Thanks to Eric and Matt for fielding that. The cool thing is I could have answered it correctly too…now…thanks to Eric and Matt.
Thanks for the quick replies to this thread – I should probably have posted to the newer version of the discussion. The explanations of in water versus on hard make sense now.
Roger